How To Publish Your Adobe InDesign Publish Online Documents
Questions


Student Gallery
Be the first to share something.
Course info
Overview
- You will need a copy of Adobe InDesign 2018 or above. But you find that 95% of all the features in this course will work with earlier version of InDesign (e.g. CS6). A free trial can be downloaded from Adobe.
What am I going to get from this course?
- 70 lectures 5+ hours of well structured content.
- Create PDF Forms
- Master Long Documents.
- Advanced Fonts
- Master Styles
- Shortcut Sheet
- Create Charts & Infographics
- Create Interactive Documents
- Workflow Tactics
- Shortcuts & Speed Tips
- Advanced Creative Cloud Features
- Tips for working with Photoshop & Illustrator
- Using Scripts
- Exporting, Prepress & Printing tricks
- You will get the finished files so you never fall behind.
- Downloadable exercise files & cheat sheet.
- Forum support from me and the rest of the BYOL crew.
- Techniques used by professional graphic designers.
- Professional workflows and shortcuts.
- A wealth of other resources and websites to help your accelerate your career.
What is the target audience?
- This course is for people who already know InDesign and want to take their skills and speed to the maximum level.
- This is an advanced InDesign course, so you’ll need basic InDesign skills to find this course useful.
- This course is perfect for anyone that already knows how to insert images & add text.
- If you a completely new to InDesign try my InDesign Essentials course before starting this one.
- This course is perfect for anyone that has completed my InDesign Essentials course.
Course duration 7 hours 45 mins + your study.

Daniel Walter Scott
Founder of Bring Your Own Laptop & Chief Instructor
I discovered the world of design as an art student when I stumbled upon a lab full of green & blue iMac G3’s. My initial curiosity around using the computer to create ‘art’ developed into a full-blown passion, eventually leading me to become a digital designer and founder of Bring Your Own Laptop.
Sharing and teaching are a huge part of who I am. As a certified Adobe instructor, I've had the honor of winning multiple Adobe teaching awards at their annual MAX conference. I see Bring Your Own Laptop as the supportive community I wished for when I was first starting out and intimidated by design. Through teaching, I hope to bring others along for the ride and empower my students to bring their stories, labors of love, and art into the world.
True to my Kiwi roots, I've lived in many places, and currently, I reside in Ireland with my wife and kids.
Downloads & Exercise files
How do I update an InDesign Publish Online document without changing its link?
You can use Update Existing Document in InDesign’s Publish Online window. This replaces the live document with your latest changes while keeping the same shared link, which is ideal for fixing typos, swapping images, or refreshing a catalogue after it has already been sent out.
How to Publish Online in Adobe InDesign and Track Your Document Analytics
Publishing online is not just about getting an InDesign document onto the web. It is also about making sensible decisions around sharing, download options, image quality, and tracking whether people are actually using the thing you made.
That last part is especially useful. With a printed catalogue or newsletter, you send it out and then it is pretty hard to know whether it worked. With Publish Online, you have proper metrics to help answer that question.
Update an existing online document instead of publishing another copy
Open Publish Online and, if you have already published the document once, choose Update Existing Document rather than creating a new document.
This is a really handy option for anything that may need changes after publication, such as a catalogue. Maybe someone spots a typo, an image needs replacing, or some information has changed. Update the InDesign file, publish over the existing document, and the link you have already shared stays exactly the same.
That means no awkward follow-up email saying, “Actually, use this new link instead.” The original link remains the one people use.
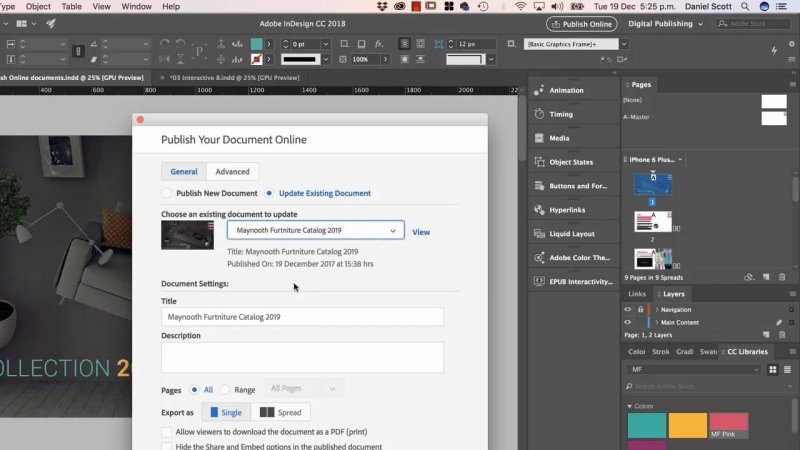
Updating an existing document keeps the original shared link intact while replacing the content.
Choose whether people can download or share the document
The Publish Online window includes a few options worth thinking about before hitting Publish.
Allow PDF downloads when a static copy is useful
You can allow people to download a PDF version of the publication. The PDF will not retain the online interactivity, but it can still be useful for someone who wants a copy to keep, reference, or print.
It is a trade-off. The online version may be the richer experience, but a downloadable PDF can be convenient.
Turn off sharing when you need more control
You can also stop people from sharing the document or taking their own copy. This does not make the document completely impossible to capture, but it does make it harder for people to grab and redistribute it.
If the publication is intended to be a bit more private or controlled, this is an option worth using.
Use the advanced Publish Online settings
The advanced area gives you more control over how the document appears and how much data it needs to load.
Pages: Decide which pages are included in the online publication.
Thumbnail: Choose the image used as the document preview.
Image quality: Set the quality used when the document exports.
Create a thumbnail that works properly
By default, InDesign can use the cover as the thumbnail. That might be perfect, but it does not have to be the final choice. You can select a different image instead, including one designed specifically to work as a thumbnail.
That is useful when the cover does not read clearly at a small size or when you want a more deliberate preview image for the document.
Balance image quality against download speed
You can set the quality to standard, such as 96, or use a higher DPI option, such as 144. Higher quality can look better on high-resolution displays, including Retina screens, but it creates a larger file and a longer download time.
For most publications, standard quality is a sensible choice. It still looks great, and a faster-loading document is generally more useful than chasing the best possible appearance for a relatively limited number of high-resolution laptop displays.
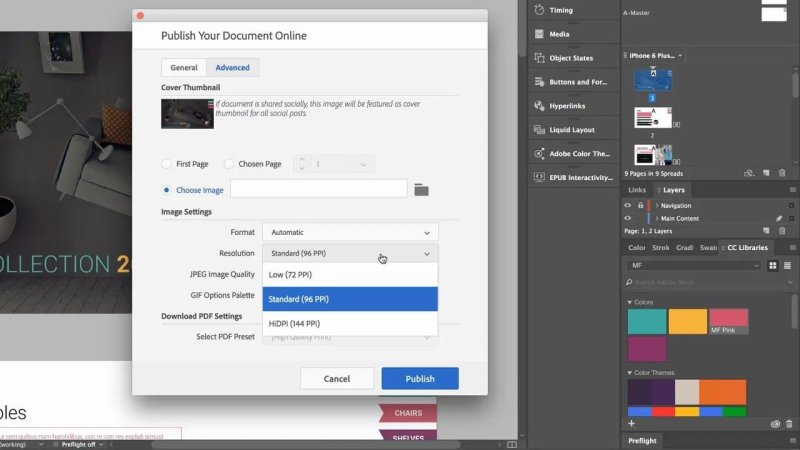
Higher image quality increases file size, so standard quality is often the more practical choice.
Once the settings are right, click Publish. If you selected an existing document, this updates it. Nice and easy.
Open the Publish Online Dashboard
Publishing is only half of it. The useful part comes next, when you can see how the document is performing.
In InDesign, go to File and choose Publish Online Dashboard. This opens the web dashboard containing your published documents. From there, select a publication and open its Analytics tab.
The dashboard gives you a central place to manage your publications, but the analytics are the bit that makes Publish Online much more useful than sending out a traditional printed piece.
Understand the key Publish Online analytics
The Analytics overview provides a straightforward set of numbers to measure engagement:
Views: The number of times the document has been opened.
Readers: The number of individual people who have read it.
Average read time: The typical amount of time a reader spends with the document.
Total read time: The combined time spent reading across all readers.
Views and readers are not the same thing. One person could open the publication 40 times, which pushes up the view count, but that is still only one reader. Looking at both numbers gives a more realistic picture.
Also, pay attention to the units shown for read time. The dashboard can show hours and minutes, and it is easy to misread the figures if you are not looking closely.
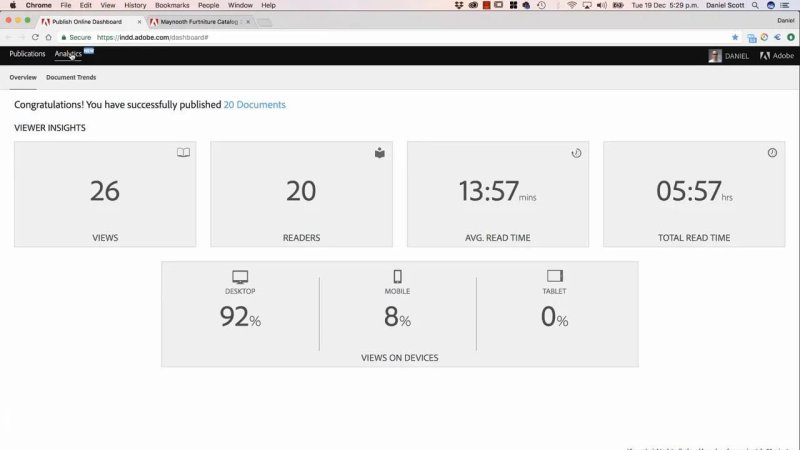
The overview brings views, unique readers, and reading time together in one place.
Use analytics to test whether Publish Online works for your readership
If you are unsure whether Publish Online suits your audience, do a test. Publish a newsletter, catalogue, or other document, share the link, then return to the analytics later.
You will be able to see whether nobody read it at all, whether lots of people opened it, and whether they spent any meaningful time with it. That gives you actual data rather than a vague feeling about whether the publication landed well.
You can also compare documents from month to month. For example, compare a January newsletter with the February edition:
Did one attract more readers?
Did people spend longer reading one than the other?
Did changes in content, design, or promotion appear to improve engagement?
Those comparisons make the numbers useful. They help you assess how your publishing is performing instead of simply sending something out and hoping for the best.
Give the dashboard time to refresh
Do not panic if you send an email containing the link and immediately see no activity in the dashboard. Analytics take a little while to collect and refresh, around 90 minutes.
So if the document has just gone out, give it an hour and a half before drawing conclusions. A zero in the dashboard straight after sending is not necessarily a zero in real life.
Check document trends over time
Beyond the Overview page, open Document Trends to see performance information for your published documents over time.
This is useful for spotting patterns and comparing the results of different publications. Even a document with only a couple of views tells you something. It may be disappointing, sure, but it is still better information than having no idea at all.
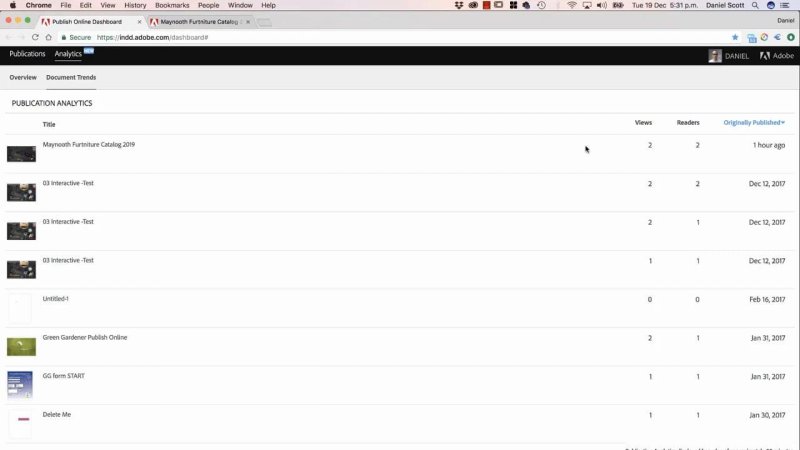
Document trends make it easier to compare the engagement of multiple online publications.
That is the real advantage of publishing an InDesign document online. You can still create the polished design work you would normally make, but now you can update it without changing the link, decide how it is shared, and track whether it is actually being read.
FAQ's
Can I change a published InDesign document after sharing its link?
Yes. Choose Update Existing Document in Publish Online, select the original publication, and publish your changes. The document updates while the existing link remains the same.
Does a downloaded Publish Online PDF keep interactive features?
No. A downloadable PDF can be useful as a static copy, but it does not include all of the interactivity available in the online version.
What does the InDesign Publish Online Dashboard track?
The Analytics tab tracks views, individual readers, average read time, and total read time. Document Trends can then help compare performance across publications.
Why are my Publish Online analytics not updating straight away?
The analytics need time to collect and refresh. Allow roughly 90 minutes after sharing a document before relying on the dashboard figures.
Written by Daniel Walter Scott — Founder of Bring Your Own Laptop & Chief Instructor
