How Text Boxes Can Auto-Expand In Adobe InDesign CC With Auto Size
Questions


Student Gallery
Be the first to share something.
Course info
Overview
- You will need a copy of Adobe InDesign 2018 or above. But you find that 95% of all the features in this course will work with earlier version of InDesign (e.g. CS6). A free trial can be downloaded from Adobe.
What am I going to get from this course?
- 70 lectures 5+ hours of well structured content.
- Create PDF Forms
- Master Long Documents.
- Advanced Fonts
- Master Styles
- Shortcut Sheet
- Create Charts & Infographics
- Create Interactive Documents
- Workflow Tactics
- Shortcuts & Speed Tips
- Advanced Creative Cloud Features
- Tips for working with Photoshop & Illustrator
- Using Scripts
- Exporting, Prepress & Printing tricks
- You will get the finished files so you never fall behind.
- Downloadable exercise files & cheat sheet.
- Forum support from me and the rest of the BYOL crew.
- Techniques used by professional graphic designers.
- Professional workflows and shortcuts.
- A wealth of other resources and websites to help your accelerate your career.
What is the target audience?
- This course is for people who already know InDesign and want to take their skills and speed to the maximum level.
- This is an advanced InDesign course, so you’ll need basic InDesign skills to find this course useful.
- This course is perfect for anyone that already knows how to insert images & add text.
- If you a completely new to InDesign try my InDesign Essentials course before starting this one.
- This course is perfect for anyone that has completed my InDesign Essentials course.
Course duration 7 hours 45 mins + your study.

Daniel Walter Scott
Founder of Bring Your Own Laptop & Chief Instructor
I discovered the world of design as an art student when I stumbled upon a lab full of green & blue iMac G3’s. My initial curiosity around using the computer to create ‘art’ developed into a full-blown passion, eventually leading me to become a digital designer and founder of Bring Your Own Laptop.
Sharing and teaching are a huge part of who I am. As a certified Adobe instructor, I've had the honor of winning multiple Adobe teaching awards at their annual MAX conference. I see Bring Your Own Laptop as the supportive community I wished for when I was first starting out and intimidated by design. Through teaching, I hope to bring others along for the ride and empower my students to bring their stories, labors of love, and art into the world.
True to my Kiwi roots, I've lived in many places, and currently, I reside in Ireland with my wife and kids.
Downloads & Exercise files
How do I make a text box automatically resize in InDesign?
Select the text frame with the Selection tool, then choose Object > Text Frame Options > Auto-Size. Choose Width Only for flexible headings or Height Only for body copy, then set the anchor point to control the direction in which the frame grows.
How to Auto-Expand Text Boxes in Adobe InDesign
Hi, everyone!
Let me know if you've ever found yourself in this one: you duplicate a nicely sized heading, replace “Tables” with “Chairs & Benches”, and suddenly the text does not fit. Then comes the annoying bit: dragging the frame wider, making space for it, or linking it to another text box.
There is a much better way. InDesign can automatically expand or shrink a text frame as its contents change. It is called Auto-Size, and it is especially useful for headings, labels, captions, buttons, and blocks of copy that will vary in length.
Set up a screen-sized interactive document
For an interactive layout, start a new document and switch the document intent from Print to Web. This changes the document measurements to pixels, which makes more sense for screen-based work.
A useful presentation-style canvas size is:
Width: 1920 px
Height: 1080 px
Orientation: Landscape
Pages: 1
Columns: 4
Gutter: 55 px
Margins: 150 px on every side
Bleed and slug: Not required for this layout
This gives you a familiar full HD layout with generous margins and a clear column structure. Save the document before getting underway so the project is ready for the interactive elements, animations, and exports that may come later.
Create a heading text frame
On the first page, draw a text frame across roughly two columns and type a short heading such as “Tables”. Increase the type size until it feels like a proper display heading. In this example, Roboto Light is used, but the Auto-Size behaviour works with any font and style.
At this point, size the text box visually to fit the short heading. That initial box is the perfect test case because it shows exactly what goes wrong when the heading becomes longer.
To create a duplicate page quickly, drag the existing page in the Pages panel onto the Create New Page icon. The duplicate retains the same layout, so it is ideal for testing alternative heading lengths.
The problem with fixed-width title boxes
Change the duplicated heading from “Tables” to “Chairs & Benches”. The longer title either runs beyond the intended area or needs a manual adjustment to the frame.
That manual resizing may not seem like much once, but it becomes tedious when a design includes lots of category titles, multilingual content, changing product names, or editable templates. Auto-Size removes that repetitive frame management.
Use Width Only Auto-Size for titles
For a heading that should stay on one line and extend horizontally as needed, set the text frame to resize by width.
Select the text frame using the Selection tool, the black arrow.
Go to Object > Text Frame Options.
Open the Auto-Size tab.
Change Auto-Sizing from Off to Width Only.
Choose the anchor point on the left-hand side.
Click OK.
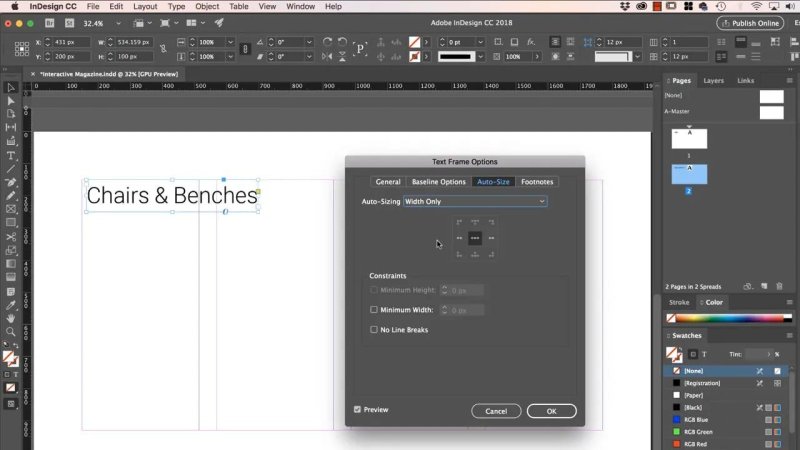
Width Only lets a heading frame respond to changing title lengths instead of needing manual resizing.
The anchor point matters. With the left-side anchor selected, the left edge of the text frame stays put and the frame expands to the right as more characters are added. That is normally what you want for a left-aligned heading.
Once this option is active, type into the frame and it grows with the text. Delete text and it contracts again. A short title such as “Shelves” stays compact, while “Bedside Tables” makes the frame wider without you touching its handles.
Why Width Only is brilliant for headings
Headings are often unpredictable. A neat one-word title can become a three-word label, and a fixed frame can quickly make a clean layout feel messy. Width Only Auto-Size keeps the frame tightly fitted to its content while preserving the heading's placement.
It is a small setting, but it is a seriously handy one for title systems where labels differ in length.
Use Height Only Auto-Size for changing body copy
Auto-Size also works vertically. This is useful when you have a text box containing body copy and you want the box to become taller as content is added, or shorter when copy is removed.
Start with a regular text frame and fill it with placeholder text using Type > Fill with Placeholder Text. Make the frame small enough that the copy becomes overset. This makes the benefit very obvious: the content no longer fits inside the box.
Now apply Auto-Size again:
Select the text frame with the black arrow.
Choose Object > Text Frame Options.
Select the Auto-Size tab.
Set Auto-Sizing to Height Only.
Choose a top anchor point.
Click OK.
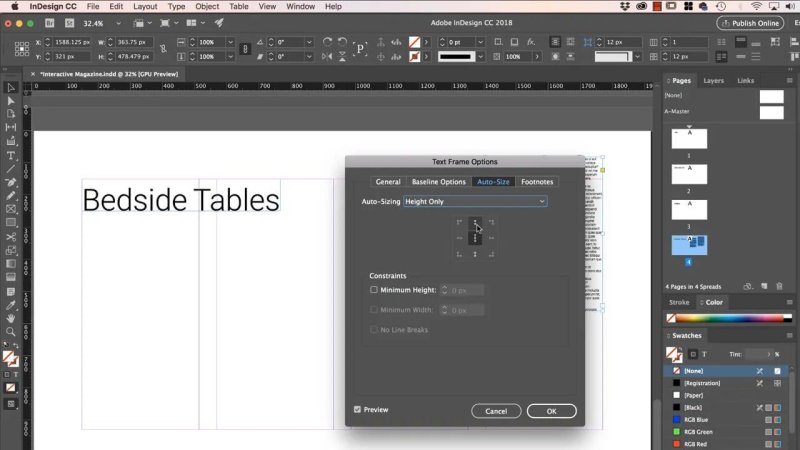
For body copy, anchor the frame at the top so additional text pushes the lower edge down.
With a top anchor, the top of the text frame remains fixed while the lower edge moves down as text is added. Paste in more copy and the frame increases in height. Remove text and it shrinks back up.
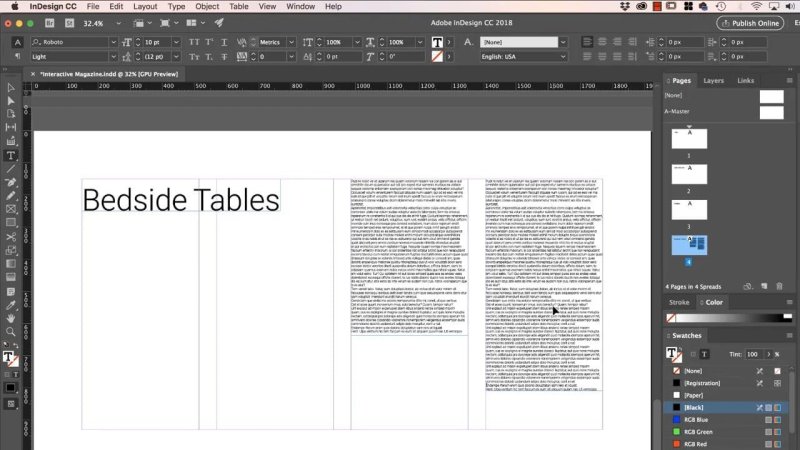
Height Only Auto-Size keeps variable amounts of copy contained without overset text.
Choose the right Auto-Size setting
The Auto-Size menu gives you several directions, but the practical choices here are straightforward:
Width Only: Best for single-line headings, labels, and short title treatments.
Height Only: Best for paragraphs, descriptions, and variable blocks of copy.
Height and Width: Available, but generally best avoided for these layouts because it can produce unpredictable results.
Keeping the resizing to one dimension gives you much more control. The surrounding layout remains stable while the text frame adapts only in the direction you have planned for.
Make Auto-Size work cleanly in your layouts
Auto-expanding text frames are not just a fix for overset text. They are a way to make flexible layouts that can handle real content without falling apart.
Use a left anchor for left-aligned titles that need to grow to the right.
Use a top anchor for copy blocks that should grow downward.
Leave enough space in the growth direction so expanding frames do not collide with other elements.
Test with both short and long content before building the rest of the page around the frame.
Use Width Only or Height Only rather than allowing both dimensions to change at once.
Once Auto-Size becomes part of your InDesign workflow, there is far less dragging, resizing, and repairing when content changes. Set the frame behaviour once, then let the text box do the boring work for you.
FAQ's
Where is Auto-Size in Adobe InDesign?
Select a text frame, then go to Object > Text Frame Options and choose the Auto-Size tab.
Which Auto-Size option should I use for headings?
Use Width Only for headings that should stay on one line and expand horizontally as the title gets longer.
How can I stop overset text in an InDesign text frame?
Set the frame to Height Only Auto-Size and anchor it at the top. The frame will grow downward as more text is added.
Should I use Height and Width Auto-Size in InDesign?
It is available, but Width Only for headings and Height Only for body copy usually give cleaner, more predictable layout results.
Written by Daniel Walter Scott — Founder of Bring Your Own Laptop & Chief Instructor
