How To Make Arrows In Adobe InDesign CC
Questions


Student Gallery
Be the first to share something.
Course info
Overview
- You will need a copy of Adobe InDesign 2018 or above. But you find that 95% of all the features in this course will work with earlier version of InDesign (e.g. CS6). A free trial can be downloaded from Adobe.
What am I going to get from this course?
- 70 lectures 5+ hours of well structured content.
- Create PDF Forms
- Master Long Documents.
- Advanced Fonts
- Master Styles
- Shortcut Sheet
- Create Charts & Infographics
- Create Interactive Documents
- Workflow Tactics
- Shortcuts & Speed Tips
- Advanced Creative Cloud Features
- Tips for working with Photoshop & Illustrator
- Using Scripts
- Exporting, Prepress & Printing tricks
- You will get the finished files so you never fall behind.
- Downloadable exercise files & cheat sheet.
- Forum support from me and the rest of the BYOL crew.
- Techniques used by professional graphic designers.
- Professional workflows and shortcuts.
- A wealth of other resources and websites to help your accelerate your career.
What is the target audience?
- This course is for people who already know InDesign and want to take their skills and speed to the maximum level.
- This is an advanced InDesign course, so you’ll need basic InDesign skills to find this course useful.
- This course is perfect for anyone that already knows how to insert images & add text.
- If you a completely new to InDesign try my InDesign Essentials course before starting this one.
- This course is perfect for anyone that has completed my InDesign Essentials course.
Course duration 7 hours 45 mins + your study.

Daniel Walter Scott
Founder of Bring Your Own Laptop & Chief Instructor
I discovered the world of design as an art student when I stumbled upon a lab full of green & blue iMac G3’s. My initial curiosity around using the computer to create ‘art’ developed into a full-blown passion, eventually leading me to become a digital designer and founder of Bring Your Own Laptop.
Sharing and teaching are a huge part of who I am. As a certified Adobe instructor, I've had the honor of winning multiple Adobe teaching awards at their annual MAX conference. I see Bring Your Own Laptop as the supportive community I wished for when I was first starting out and intimidated by design. Through teaching, I hope to bring others along for the ride and empower my students to bring their stories, labors of love, and art into the world.
True to my Kiwi roots, I've lived in many places, and currently, I reside in Ireland with my wife and kids.
Downloads & Exercise files
How do you add arrowheads to a line in Adobe InDesign?
Draw and select a line, then open the expanded Stroke panel. Use the Start and End arrowhead menus to choose your arrow styles, then adjust their scale so the heads suit the weight of the line. You can also control stroke alignment and line caps for a much cleaner result.
How to Make Arrows in Adobe InDesign
Arrows are not the most glamorous part of InDesign, but they are one of those things everyone needs eventually. They show direction, connect ideas, annotate diagrams, and make layouts easier to understand.
Start with the Line tool, draw a line, and give it a useful stroke colour and weight. A black stroke at around 5 pt makes the following controls easy to see, though the right weight will always depend on the scale and style of the document.
The important bit is to select the line before making changes. Once it is selected, open the Stroke panel.
Expand the Stroke panel to reveal arrowhead controls
The compact Stroke panel can be a little misleading because it only shows the stroke weight. Double-click the panel tab to expand it and reveal the useful stuff, including arrowheads, caps, joins, stroke alignment, and scaling controls.
This expanded panel is where the arrowhead options live. There are two dropdown menus:
Start: Applies an arrowhead to the point where the line was first drawn.
End: Applies an arrowhead to the point where the line was released.
That start-and-end distinction matters. If an arrowhead appears to face the wrong direction, it is usually not broken. It is simply attached to the opposite end of the line from the one you intended.
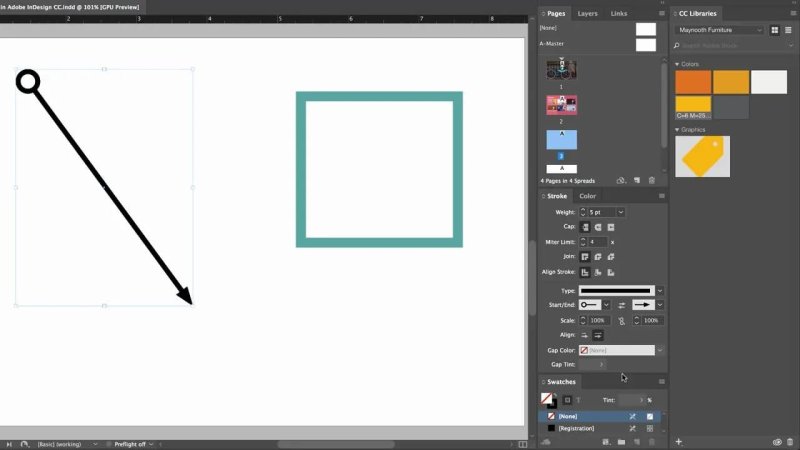
The Start and End controls let you build an arrow from any simple line.
Choose arrowheads for both ends of the line
InDesign includes a range of arrowhead styles, from straightforward filled triangles to bars, circles, and more decorative options. For most diagrams and directional graphics, a standard triangle is the sensible choice. But putting a different shape at the start can be useful when you need a line to feel more like a connector or an annotation.
For example, you might use a circular start and a triangular end. It creates a line with a clear sense of direction, though at large sizes it can get a little Austin Powers love-mail-symbol-ish. That may be exactly what you want, or not. Design is full of important decisions like that.
Scale arrowheads independently from the stroke
One of the most useful advanced stroke controls is Scale. Without it, increasing a line’s stroke weight can make its arrowheads look wildly out of proportion. A thick line can end up with a small, underwhelming arrowhead, or an oversized end that overwhelms everything around it.
Use the scale percentage beside the Start and End arrowhead settings to adjust each end independently. This lets you make the arrowhead large enough to read clearly while keeping the shaft of the line at the right weight.
The goal is visual balance. The arrowhead should feel connected to the line, not bolted on afterwards.
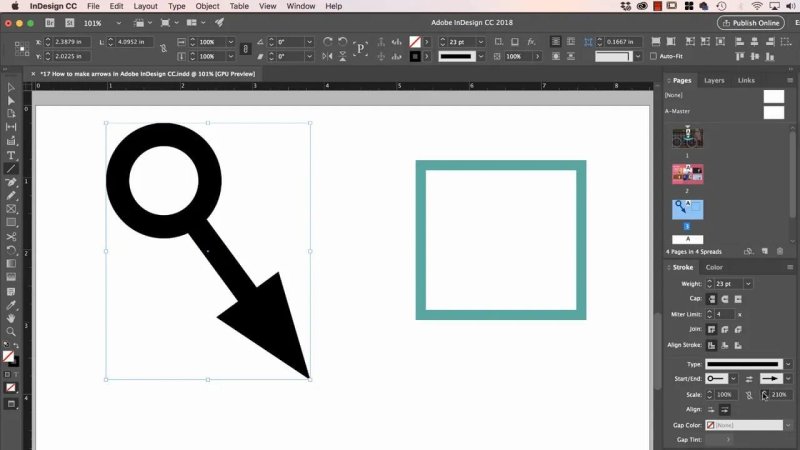
Scaling the arrowhead separately helps a heavy line retain a balanced, intentional look.
Use Shift for faster numerical adjustments
There is a small workflow trick here that saves a surprising amount of time. Clicking a numeric control normally changes it in small increments, such as 1 percent at a time.
Hold Shift while clicking the same control and InDesign changes the value in much larger jumps, typically multiples of 10. This works particularly well when adjusting arrowhead scale or stroke weight and you need to move quickly before fine-tuning.
Click normally for small, precise changes.
Hold Shift and click for larger changes.
It is a tiny shortcut, but those are often the ones that make working in InDesign feel much less fiddly.
Understand where a stroke actually sits
Here is a classic alignment issue: when you draw a rectangle with a stroke, the path itself runs through the centre of that stroke. Half the stroke extends inward and half extends outward.
This can be annoying when you are trying to align borders accurately. You may think you have positioned the edge correctly, but InDesign is aligning the centre of the stroke, not its outer visible edge.
With an object selected, use the Align Stroke controls in the Stroke panel to choose where the stroke sits:
Align Stroke to Centre: The default. The stroke straddles the path.
Align Stroke to Inside: Keeps the entire stroke inside the object boundary.
Align Stroke to Outside: Places the entire stroke outside the object boundary.
For shapes such as rectangles, inside or outside alignment can make layout work far more predictable. You can preserve the exact outer dimensions of a box, or keep the stroke from eating into the available space inside it.
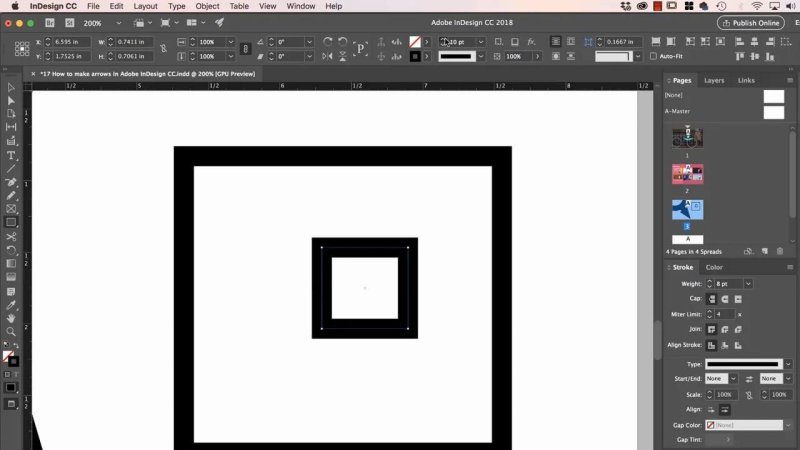
A stroke sits around its path by default, which is why alignment settings matter when borders need to line up precisely.
Use line caps to change the character of a line
Line caps control the appearance of an open line’s endpoints. They seem minor, but they noticeably change the style and apparent length of a thick line.
Butt cap
The slightly unfortunate name aside, the butt cap is the default option. The stroke ends exactly at the endpoint of the line. It is square, direct, and practical.
Round cap
The round cap adds a rounded end to the line. This gives the stroke a softer, friendlier look and is especially useful for simple icons, informal graphics, and designs using rounded type or shapes.
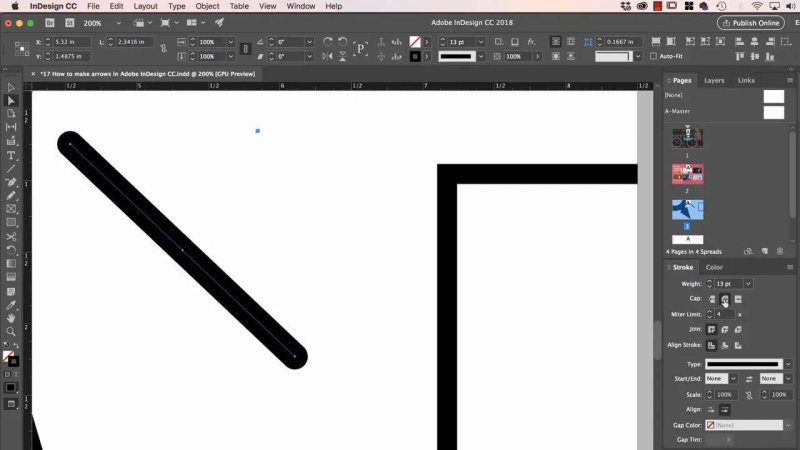
Round caps soften a thick line and give it a distinctly different visual style.
Projecting cap
The projecting cap has a square end too, but it extends beyond the actual endpoint of the line. It can make a line appear slightly longer and gives it a more substantial, block-like finish.
You probably will not use every cap style every day, but knowing they are there means you can make deliberate choices rather than accepting the default every time.
Know how arrowheads relate to the end of a line
Arrowheads attach to the endpoint of the line. In practice, this means the line ends where the arrowhead begins, and the arrowhead uses that endpoint as its tip or attachment point depending on the chosen style.
This matters when an arrow needs to touch, point at, or overlap another object. If the arrow looks as if it stops too early, extends too far, or does not land exactly where expected, inspect how the selected arrowhead is using the line endpoint.
There is no single universal setting here because it depends on the graphic you are making. The useful thing is simply knowing that the apparent tip and the actual line endpoint are not always visually identical.
A practical checklist for better InDesign arrows
Draw the line first and set an appropriate stroke weight.
Expand the Stroke panel to access the full set of controls.
Use the Start and End menus based on the direction in which the line was drawn.
Scale each arrowhead so it feels proportional to the stroke.
Hold Shift when you need to change a numeric setting in larger increments.
Use stroke alignment to control whether borders sit inside, outside, or across a shape’s path.
Choose butt, round, or projecting caps to suit the style of the artwork.
Check how the arrowhead meets the endpoint before positioning it against another object.
These are slightly nerdy stroke details, sure. But once you start using them deliberately, arrows, borders, and diagram lines stop looking like default InDesign objects and start looking properly designed.
FAQ's
Why is my InDesign arrowhead on the wrong end of the line?
InDesign defines Start as the point where you began drawing the line and End as the point where you released it. Switch the arrowhead from Start to End, or vice versa, to put it at the intended end.
Can I make an arrowhead larger without making the line thicker in InDesign?
Yes. Use the Scale control beside the Start or End arrowhead setting in the expanded Stroke panel. This changes the arrowhead size independently of the stroke weight.
What is the difference between butt cap and round cap in InDesign?
A butt cap ends exactly at the line endpoint with a square edge. A round cap adds a rounded end that extends beyond the endpoint, creating a softer appearance.
Why does my rectangle stroke not align with other objects?
By default, a stroke is centred on the object path, so half sits inside the shape and half sits outside it. Use Align Stroke to place the stroke entirely inside or outside when accurate visible-edge alignment matters.
Written by Daniel Walter Scott — Founder of Bring Your Own Laptop & Chief Instructor
