How To Automatically Place Lots Of Text Onto Multiple Pages In InDesign CC
Questions


Student Gallery
Be the first to share something.
Course info
Overview
- You will need a copy of Adobe InDesign 2018 or above. But you find that 95% of all the features in this course will work with earlier version of InDesign (e.g. CS6). A free trial can be downloaded from Adobe.
What am I going to get from this course?
- 70 lectures 5+ hours of well structured content.
- Create PDF Forms
- Master Long Documents.
- Advanced Fonts
- Master Styles
- Shortcut Sheet
- Create Charts & Infographics
- Create Interactive Documents
- Workflow Tactics
- Shortcuts & Speed Tips
- Advanced Creative Cloud Features
- Tips for working with Photoshop & Illustrator
- Using Scripts
- Exporting, Prepress & Printing tricks
- You will get the finished files so you never fall behind.
- Downloadable exercise files & cheat sheet.
- Forum support from me and the rest of the BYOL crew.
- Techniques used by professional graphic designers.
- Professional workflows and shortcuts.
- A wealth of other resources and websites to help your accelerate your career.
What is the target audience?
- This course is for people who already know InDesign and want to take their skills and speed to the maximum level.
- This is an advanced InDesign course, so you’ll need basic InDesign skills to find this course useful.
- This course is perfect for anyone that already knows how to insert images & add text.
- If you a completely new to InDesign try my InDesign Essentials course before starting this one.
- This course is perfect for anyone that has completed my InDesign Essentials course.
Course duration 7 hours 45 mins + your study.

Daniel Walter Scott
Founder of Bring Your Own Laptop & Chief Instructor
I discovered the world of design as an art student when I stumbled upon a lab full of green & blue iMac G3’s. My initial curiosity around using the computer to create ‘art’ developed into a full-blown passion, eventually leading me to become a digital designer and founder of Bring Your Own Laptop.
Sharing and teaching are a huge part of who I am. As a certified Adobe instructor, I've had the honor of winning multiple Adobe teaching awards at their annual MAX conference. I see Bring Your Own Laptop as the supportive community I wished for when I was first starting out and intimidated by design. Through teaching, I hope to bring others along for the ride and empower my students to bring their stories, labors of love, and art into the world.
True to my Kiwi roots, I've lived in many places, and currently, I reside in Ireland with my wife and kids.
Downloads & Exercise files
Transcript
Hi there, in this video we're going to do some cool stuff where we take a lot on bit of text, and you see, my pages over here, there's nothing. I import it, and voilà, it creates lots of pages for me. Auto flows them without you having to go and do the fun game of linking text boxes. All right, let's go and do that now in this video.
So we're going to flow some really long text into an InDesign document without having to do the painful, linking every text box. So we're going to start with a new document, 'Print', 'Letter'. And we're going to have '2' columns. And that's going to be it, we're going to click 'Create'. So let's bring in our document. Let's go to 'File', 'Place'. And in your '05 Long Documents' grab a long text, either one of those two. Let’s click 'Open'. Now the trick here is that I need to hold down the 'Shift' key because without it I just drag and drag boxes, but then I'm going to click this box and link it to this box, and life is tough.
So all I need to do is, when I'm placing, undo, till it's placed again. Let's hold down the 'Shift' key, and what you'll notice is, can you see the icon changes to the little wiggly line? And what that means is, if I click in the top corner here it's going to go through, match the columns that I have, and see, magically over here I've got a bunch of different pages with all the text flow through it. So that might work for you perfectly. What you might find though is, I can-- I don't want it to flow in through all the text, because if you do this I don't have columns, if I delete this guy, 'New document', 'Print', 'Letter'. Only one column could create. Bring in the text. I'm not sure why I'm going this long way to show you, but I am.
We're here now, hold down 'Shift'. Watch this. Just going to flow like big chunks of text across the page, and that's probably not what you want. So what you can do is, before I place it I'm going to hit 'Esc'. On your Master page, I'm going to double click the 'A-Master'. I'm going to put a couple of boxes on here. I'm going to say, maybe I just want one that is, that size, on this page. And over here, I'm going to copy and paste it. So I've got another version that sits inside here. I'm not sure why I have text boxes sitting down here. Let's just say that I've got some boxes here. It's going to have some Factoids in it. Duplicate it. Now I'm getting off track, but now I've got these guys on the Home page. And what I want to do is link them together.
So with my Black Arrow I'm going to click on this box here. And what you can do is, go to 'View', 'Extras', 'Show Text Threads'. And as long as you're not in that preview mode, with 'W', you can kind of see where they're linked. So once you've done that, go back to 'Page 1'. Now bring in your long text, 'File', 'Place', 'Long Text'. Now hold 'Shift', now click inside this box anywhere. And because you've got them on the Master page you'll notice that all my pages there kind of match what I did on the Master pages and flows through nicely.
One other option you can do with this, this is called Flowable Text. Hold the 'Shift' key down, there's something next we're going to look at, it's called the Primary Text Frame. I'm going to close this down without saving, even though-- it's been ages designing those, the Master pages. Let's go to 'Create new'. This one's going to be specific because we're going to use it later on when we're dealing with something called Books. So we're going to go to 'Print', let's go into the 'US Letter'. We're going to have Columns of '2'. Go to that Gutter at 1/2", it's '0.5'. And we're going to have really big Margins, we're going to have inch all around. And let's click 'Create'.
The first thing I want to do is I'm going to go to my Master page like I did earlier. And I'm going to grab a Text box, and it's going to be-- we're going to have a text box that goes all the way across these two columns. And I'm going to get the columns to match. Remember our shortcuts now, 'Command-Option-7' to change paragraph. We're going to go '2' Columns, with a Gutter of '0.5 inches'. So it should match what I had before. I'm going to grab another copy of it, move it across. Make sure they're linked. Grabbing the Black Arrow, clicking in this box, making those two. And the big difference is going to be something called a Primary Text Frame. So I'm going to click on this first one, and there's this option here that says I want to make you a Primary Text Frame. Nothing really changes, the icon changes. Both of them change because they're connected. And why are they different? Let's have a little look.
Let's go to page 1 and import my text. So, 'File', 'Place', let's bring in my 'Long Text' document. Let's just click on the page here. It gets the Primary Text Frame, you don't have to hit the Shift key. It's not a big advantage, I guess, but it's going to do the same thing. It's going to rechart and grab all the pages I need. And what makes the Primary Text Frame better than maybe just doing the Autoflow Text? It's got something called Smart Text Reflow. Now why that's useful is, let's say some of our Chapter Headings-- I'm going to find a Chapter Heading here, there's one, 'Oak'. It's on-- let's see if it's on page 3. I want any of these Chapter Headings, they need to start on their own page, and have a slightly different layout. So what I'm going to do is create another Master page.
To do it, at the top here, I'm going to say, I would like a 'New Master'. I'm going to call it 'B-Master'. You might have to kind of move this down a little bit, so you can see them all. And on my B-Master, what I'd like to do is I'm going to-- from A-Master, I'm going to copy-- Double click 'A-Master', I'm going to copy the text box that I made. Paste that on B-Master. And what I'd like to do is-- they're going to start on their own page. And they're going to be about half the size. So I want two of them. I want to do two things, I want to link them. I can do it on the A-Master, and I also want to make them a Primary Text Frame. This is where the magic happens. You might just use Autoflow. Often that's what I'm doing, but if you're doing a book you'll see the benefits of this now.
So let's go to 'Page 3', find 'Oak'. So in front of Oak here I'm going to say, you my friend, start on its own page because you are Chapter Header. Where are you? 'Insert Break Character'. You see, it starts on a new page. There he is there. So he's on his own page. But I want it to match the B-Master, I can drag it down but I want it to match exactly what I'm doing with my B-Master. It's easy to do. On page 4, I've got it selected, right click it and say 'Apply Master to Page'. And it's still at 'A', not 'B'. And this is where the magic happens. You can see, it's pulled the text box styling from B-Master and applied it to this. Technically it's called Smart Text Reflow, but really we don't call it that, we just call it the Primary Text Frame, and it means you can create as many Masters as you need. And you can just apply them to different pages and it will try and reflow the text for you.
If you don't use the Primary Text Frame and just use your standard frame, like we did in the first part, it will not reflow it for you. You'll have to kind of cut and paste it and try and get it to link back up, which can be a real hassle. You can see again, say this page, moves on. I can say, you my friend I can apply Master again, and go back to being A-Master, and it reflows the text. One thing you might do whether you're doing Primary Text Frame or just the Autoflow is that it generates pages for you, but it doesn't delete them for you, like Word does. Word has that kind of, like it gets bigger when it needs to, and gets smaller when it needs to.
Let's say that we've kind of got rid of lots of text. I'm going to delete all this. I'm just deleting text. You can see, it just leaves-- that's kind of all pages all by itself. You can make that an option where it deletes empty pages. So you can go to 'InDesign', 'Preferences', go to 'Type'. It's 'Edit', 'Preferences', 'Type' on a PC. And in here there is 'Delete Empty Pages'. It just means that when they start deleting stuff, watch this, it should start deleting pages. There it goes. Deleting all the ones that were empty. Kind of need it together till I get it to check by deleting or adding something. But yes, that is an option that I don't like on by default. So I'm going to go and turn that back off.
Let's go and jump to the next video while I'm doing that. All right, see you then.
How do I place a long text document into InDesign without linking text boxes manually?
You can use Auto Flow by holding Shift while placing text, then clicking into your first text frame. InDesign will create as many pages as necessary and flow the copy through your columns automatically. For flexible book layouts, use Primary Text Frames instead.
How to Flow Lots of Text into Adobe InDesign Automatically
If you are importing a large Word document or a long text file, set up the document structure first. For a straightforward layout, create a new Print document using Letter size and set it to two columns.
Those document columns matter. When InDesign flows the text, it uses that structure to move copy from the first column to the second, then onwards to the next page. It is a lot nicer than playing the tedious game of drawing, selecting, and manually linking text box after text box.
Once the document is ready, choose File > Place, select the long text file, and click Open. Your loaded-text cursor is now ready to place the content.
Use Shift to Auto Flow text across new pages
Here is the trick: hold down Shift before clicking into the first text area. The loaded-text cursor changes to show a little wiggly line, which tells you Auto Flow is active.
Click in the top-left corner of the first column. InDesign will then:
Place the text into the first column.
Continue it through the remaining columns.
Create additional pages as the text requires.
Keep the story threaded throughout the document.
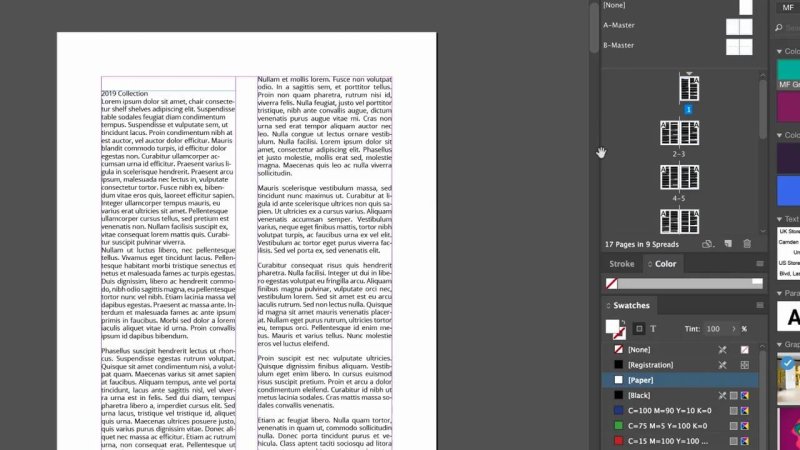
Auto Flow fills the two-column layout and generates the extra pages needed for the complete story.
For a standard document with the same layout on every page, that may be all you need. Place the file with Shift held down, click once, and get on with the more interesting parts of the design.
Why a one-column document can produce an awkward result
Auto Flow follows the frames and columns that exist. If the document only has one column and you Auto Flow a long story into it, InDesign will create pages of one large vertical block of text. Technically, it has done exactly what it was asked to do, but that is probably not the layout you had in mind.
This is where master pages become useful. Rather than relying only on document columns, create the text frames you need on a master page. You can include a main text area, smaller text boxes for factoids, or any repeating structure that belongs throughout the publication.
Create linked text frames on a master page
Open the Pages panel and double-click A-Master. Draw the text frames that should repeat across the document. For example, you might have one main frame on the left-hand page and another on the right-hand page.
These frames need to be linked in the order the story should flow. With the Selection tool, select the first frame and use its out port to link it to the next frame.
If you want to see the connections clearly, choose View > Extras > Show Text Threads. Make sure you are not in Preview mode, because text threads will be hidden there.
Once the master-page frames are linked, return to page 1. Choose File > Place, load the text, hold Shift, and click inside the first master text frame. InDesign creates pages based on the master and flows the content through your intended layout.
This approach is handy when every spread needs a consistent arrangement but the page layout includes more than a simple column grid.
Use Primary Text Frames for flexible book layouts
Auto Flow is great, and honestly it is what I use a lot of the time. But for a book or a long publication with different page designs, Primary Text Frames are where things get properly useful.
Set up a new document with a more deliberate book-style structure:
US Letter page size
Two columns
0.5-inch gutter
1-inch margins on all sides
On A-Master, draw a text frame that spans the text area. Set the frame itself to two columns with a 0.5-inch gutter, so it matches the document setup. Copy that frame to the facing master page and link the frames together.
Then select the first frame and turn on the Primary Text Frame option. Its icon changes, and the connected frame changes too. The primary text frame is not just another text box. It tells InDesign that this is the main continuing story frame for the page template.
Now when you use File > Place and click into the page, InDesign flows the text and creates the required pages without needing to hold Shift. That is a small convenience, but it is not the big win.
Smart Text Reflow is the actual magic
The real benefit of a Primary Text Frame is what happens when different master pages use different text-frame layouts. InDesign can reflow the continuing story to match the master you apply.
Imagine the beginning of each chapter needs to sit on its own page with a different layout. Create a new master page, perhaps B-Master. Copy the existing primary text frame from A-Master onto B-Master, resize or reposition it for the chapter-opening design, link the frames, and make them primary text frames too.
For example, the chapter opener might have smaller text frames that leave more room for a title, an image, or other editorial design elements.
Next, put the chapter heading on a new page:
Place the text cursor before the chapter heading.
Choose Type > Insert Break Character > Page Break.
Select the new chapter-opening page.
Right-click and choose Apply Master to Pages.
Apply B-Master instead of A-Master.
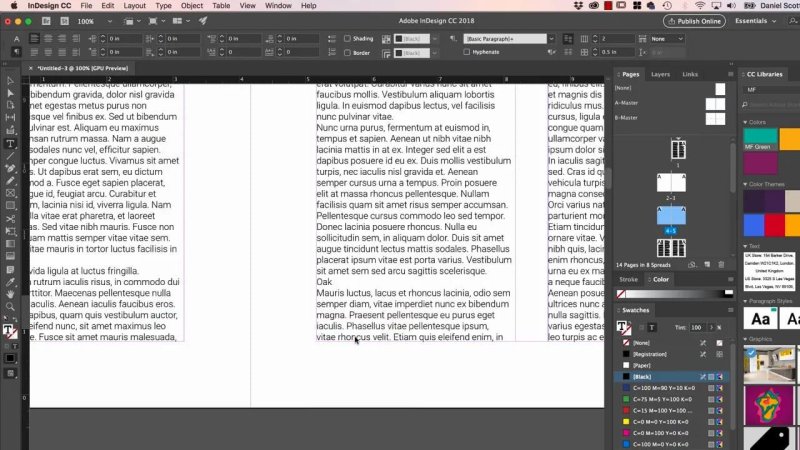
Primary Text Frames allow the same story to continue cleanly even when a new master uses a different frame layout.
InDesign pulls the text into the B-Master frame arrangement and continues the story. That is the bit that makes book production much less painful.
Apply A-Master to that page again and the text reflows back into the original layout. You can create as many master-page variations as the publication needs, then apply them where they belong without breaking the main story thread.
Why ordinary master-page text frames do not behave the same way
Regular linked frames on a master page can Auto Flow text perfectly well when the layout stays consistent. But if you switch a page to a master with differently shaped or positioned frames, the story will not automatically reflow in the helpful way it does with Primary Text Frames.
You can end up cutting, pasting, reconnecting threads, and generally doing the sort of work InDesign ought to be doing for you. For a long document with chapter openers and varying layouts, Primary Text Frames are absolutely worth setting up.
Manage empty pages with Smart Text Reflow settings
There is one thing to remember whether you use Auto Flow or Primary Text Frames: InDesign happily creates pages when more text is needed, but it does not necessarily remove pages when content is deleted.
Say you delete a large section from the document. The remaining text can reflow, but the now-empty pages may remain behind. If you want InDesign to remove them automatically, turn on Delete Empty Pages.
On a Mac, go to InDesign > Preferences > Type. On a PC, go to Edit > Preferences > Type. Find and enable Delete Empty Pages.
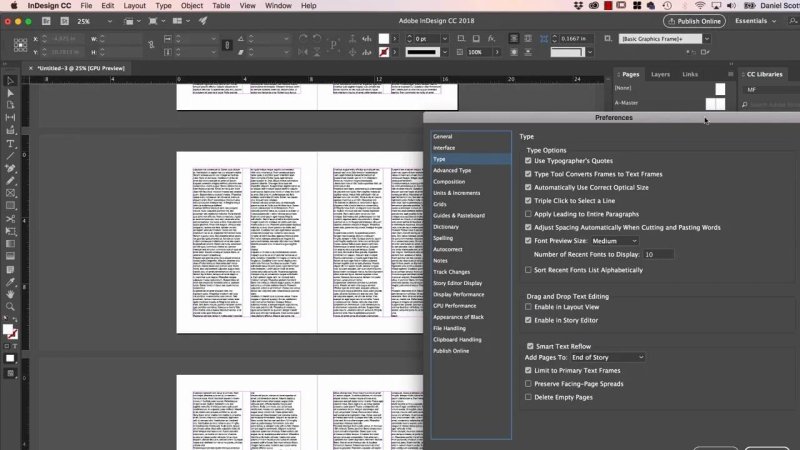
The Type preferences contain the option to remove empty pages created after a long story is shortened.
After enabling it, you may need to make a small edit, such as adding or deleting a character, to give InDesign a nudge and make it reassess the document. It will then remove pages that no longer contain content.
I do not tend to leave this switched on by default. Automatic page deletion can be useful, but it is also something you want to control carefully when working on a designed publication with deliberate blank pages or special layouts.
Choose the right method for the job
Use Shift Auto Flow when the document has a consistent grid and you need to place lots of text quickly.
Use linked frames on a master page when every page follows a repeating but more customised layout.
Use Primary Text Frames when the same story must flow through multiple master-page designs, especially in books and chapter-based documents.
Enable Delete Empty Pages only when appropriate if you want pages to disappear as text is removed.
The main goal is simple: build the text structure first, then let InDesign do the repetitive flowing and page-making work. Save the manual text-box linking for the rare moments when it is genuinely needed.
FAQ's
What is Auto Flow in InDesign?
Auto Flow places a loaded text story into linked frames and automatically creates extra pages until all the text has been placed. Hold Shift while clicking into the first text frame to use it.
What is a Primary Text Frame in InDesign?
A Primary Text Frame is a master-page text frame designated to carry the main story. It lets text reflow more intelligently when you apply different masters with different text-frame layouts.
Why does InDesign leave blank pages after I delete text?
InDesign can add pages automatically as text grows, but it does not always remove pages as the story becomes shorter. Enable Delete Empty Pages in Preferences under Type if you want empty pages removed automatically.
Written by Daniel Walter Scott — Founder of Bring Your Own Laptop & Chief Instructor
