How To Make Paragraphs Span 2 Columns In Adobe InDesign CC
Questions



Student Gallery
Be the first to share something.
Course info
Overview
- You will need a copy of Adobe InDesign 2018 or above. But you find that 95% of all the features in this course will work with earlier version of InDesign (e.g. CS6). A free trial can be downloaded from Adobe.
What am I going to get from this course?
- 70 lectures 5+ hours of well structured content.
- Create PDF Forms
- Master Long Documents.
- Advanced Fonts
- Master Styles
- Shortcut Sheet
- Create Charts & Infographics
- Create Interactive Documents
- Workflow Tactics
- Shortcuts & Speed Tips
- Advanced Creative Cloud Features
- Tips for working with Photoshop & Illustrator
- Using Scripts
- Exporting, Prepress & Printing tricks
- You will get the finished files so you never fall behind.
- Downloadable exercise files & cheat sheet.
- Forum support from me and the rest of the BYOL crew.
- Techniques used by professional graphic designers.
- Professional workflows and shortcuts.
- A wealth of other resources and websites to help your accelerate your career.
What is the target audience?
- This course is for people who already know InDesign and want to take their skills and speed to the maximum level.
- This is an advanced InDesign course, so you’ll need basic InDesign skills to find this course useful.
- This course is perfect for anyone that already knows how to insert images & add text.
- If you a completely new to InDesign try my InDesign Essentials course before starting this one.
- This course is perfect for anyone that has completed my InDesign Essentials course.
Course duration 7 hours 45 mins + your study.

Daniel Walter Scott
Founder of Bring Your Own Laptop & Chief Instructor
I discovered the world of design as an art student when I stumbled upon a lab full of green & blue iMac G3’s. My initial curiosity around using the computer to create ‘art’ developed into a full-blown passion, eventually leading me to become a digital designer and founder of Bring Your Own Laptop.
Sharing and teaching are a huge part of who I am. As a certified Adobe instructor, I've had the honor of winning multiple Adobe teaching awards at their annual MAX conference. I see Bring Your Own Laptop as the supportive community I wished for when I was first starting out and intimidated by design. Through teaching, I hope to bring others along for the ride and empower my students to bring their stories, labors of love, and art into the world.
True to my Kiwi roots, I've lived in many places, and currently, I reside in Ireland with my wife and kids.
Downloads & Exercise files
Transcript
Hi there, in this video we're going to look at the secrets of splitting and spanning columns, where we take this first paragraph that I really want to cross over both columns, and these guys down the bottom here, I want them to be in separate little columns, within a column. We can do that simply and easily within InDesign like this. So this one spans, this one splits, it's all just one text box, not lots of text boxes all hacked together. Let's go and learn how to do that now in InDesign.
First thing we need to do is, we've got a single text box here, I'm on page 4. Our text box spans both these two columns. I want to split it to match our column guides down the back there. To do it with the Black Arrow, have it selected, and along here you should be able to see the number of columns. I'm going to have two. We're going to match the gutter which is the space between the columns that we did earlier on, and it was 54 pixels. I said I'll match up. This kind of shows you-- I'm going to hit 'W' to show the preview. I want my first paragraph actually to span both of these columns, and the text to suck underneath. You can do it easily, grab the Type tool, click anywhere in this first paragraph. And along the top here, we need to go from 'Character' to 'Paragraph'. Then along on the right, quite far along, you need to find this little guy, looks like a, I don't know, bridge or the outer trail on for something. And we're going to go from 'None' and we're going to 'Span All'. And, it goes and spans that whole column.
That's really handy especially if you're being in the past just putting him in his own text box. Now you don't have to, you can flow along with the rest of the text. That can also be kept in a Paragraph style, make it super easy to use. So that is how to span columns. Let's look at how to split columns. I'm going to go to our 'Exercise Files'. I want you to go into '03 Magazine', and double click 'Magazine Text'. What we'll do is we'll copy this out. This little chunk here, 'Wood Types', I'm going to copy it. I'm going to jump back into InDesign. And I'm going to make a space for it, about there. I'm going to paste it in. Now, what I'd like to is, this 'Wood Types' I'm actually just going to make it bold, because it's going to be my heading. There's these six options down the bottom here. I would like them to be kind of side by side, in a nice set of columns.
Now I could copy and paste these out into another separate text box, split that into three columns, then try and paste it back in as an in line graphic, and it will work but it's not as easy as this option. So with all three of them selected with the Type tool, switch to 'Paragraph'. And the same place we were a second ago, instead of spanning, we're going to split too. So it's going to split these column into two parts. So we've got kind of too many columns within another column. Super useful, super quick.
I'm going to add bullet points while I'm here. You can see, it's just a really nice quick easy way to add those columns rather than jumping out to another text box or trying to play around with tabs.
All right, that's going to be it for splitting and spanning columns. Let's get on to the next video.
How do you make a paragraph span across columns or split text into smaller columns in InDesign?
Use InDesign’s Span Columns paragraph feature. First set the number of columns in a single text frame, then apply Span All to a paragraph that should run across them, or choose Split to divide selected paragraphs into narrower columns inside that same frame.
How to Split and Span Columns in Adobe InDesign
Column layouts can get messy quickly if every heading, intro, list and body section lives in a separate text box. It works, but it is a bit of a hack. Text becomes harder to edit, reflow and keep aligned.
InDesign has a much nicer solution: create columns inside one text frame, then tell individual paragraphs whether they should follow those columns, span across all of them, or split into even smaller columns.
This gives you a flexible magazine-style layout without breaking the flow of your text. A wide introductory paragraph can sit above two narrow body columns, while a compact list lower down can become its own neat multi-column section.
Set Up Columns Inside the Text Frame
Start with a single text frame that spans the full width you need. Select the frame using the Selection tool, which is the black arrow.
In the control options, set the number of columns for that text frame. For example, set it to two columns if you want the body copy to align with a two-column page design.
Also set the gutter, which is the gap between the columns. Matching this value to the gutter used by your document’s column guides keeps the layout looking intentional and properly aligned.
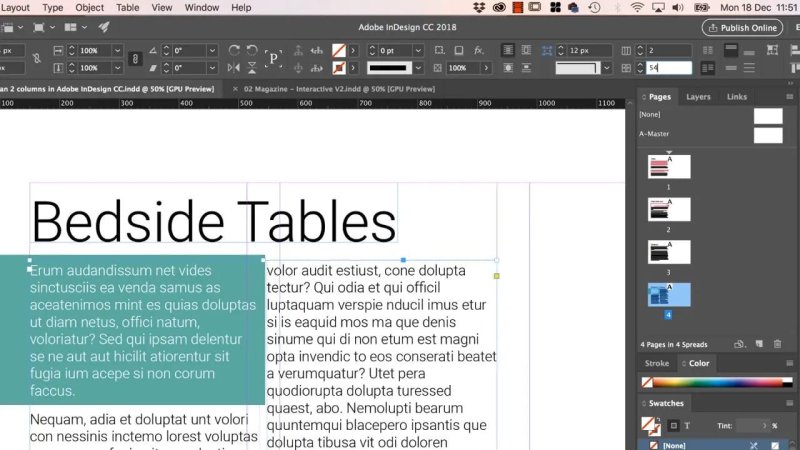
A single text frame can follow the page grid with two internal text columns.
At this stage, all the text flows from the first column into the second. That is the foundation. Now you can control individual paragraphs within it.
Make a Paragraph Span Both Columns
A paragraph that needs more visual impact, such as an introduction, pull quote or section heading, does not have to be placed in a separate frame. Make it span the columns instead.
Select the Type tool.
Click anywhere inside the paragraph that should stretch across the full width.
Switch the control panel from Character to Paragraph.
Find the Span Columns control, represented by an icon that looks a little like a bridge.
Change the setting from None to Span All.
That paragraph will immediately extend across both columns, while the text after it starts beneath and returns to the normal two-column flow.
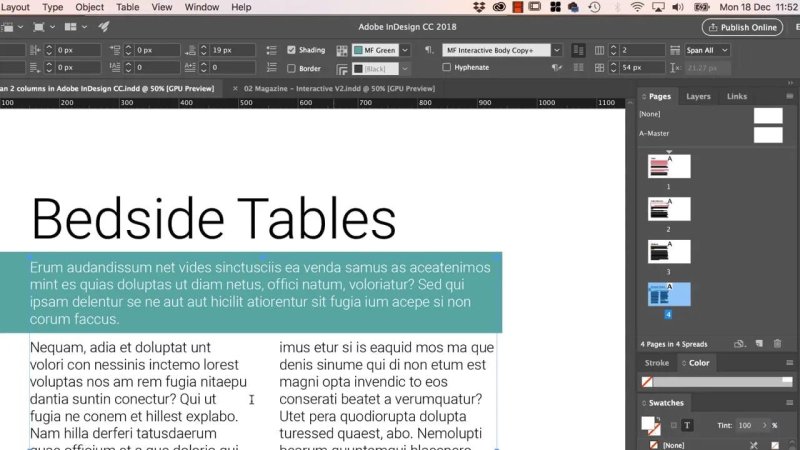
Span All turns a single paragraph into a full-width introduction while the body text remains in columns.
This is especially useful when you have previously made a separate text box just for an introductory paragraph. There is no need for that extra object now. The paragraph remains part of the same flowing story, so edits and copy changes are much easier to manage.
Use Paragraph Styles for Repeating Spans
If this is a recurring magazine treatment, save the formatting in a paragraph style. A style can include the span setting, so every time you apply that style to an intro or heading, it automatically spans the columns.
That is much faster than manually formatting every occurrence, and it helps keep a long document consistent.
Split Paragraphs into Smaller Columns
Spanning makes a paragraph wider. Splitting does the opposite: it divides selected text into smaller columns within the existing text frame.
This is perfect for a short list of options, names, features or bullet points. Rather than creating another text box, splitting it into columns, then trying to force it back into the layout as an inline object, you can do the whole thing directly in the main text frame.
For example, add a heading such as “Wood Types”, then place a group of short list items beneath it. The goal is to show those items side by side in a compact, tidy arrangement rather than as one long vertical list.
With the Type tool, select the paragraphs you want to arrange into smaller columns.
Switch to the Paragraph controls.
Go to the same Span Columns control used for spanning.
Choose Split.
Set the number of split columns you need, such as two.
The selected paragraphs are now split into two narrow columns inside the original layout. You effectively get columns within a column, while everything is still part of one connected text frame.
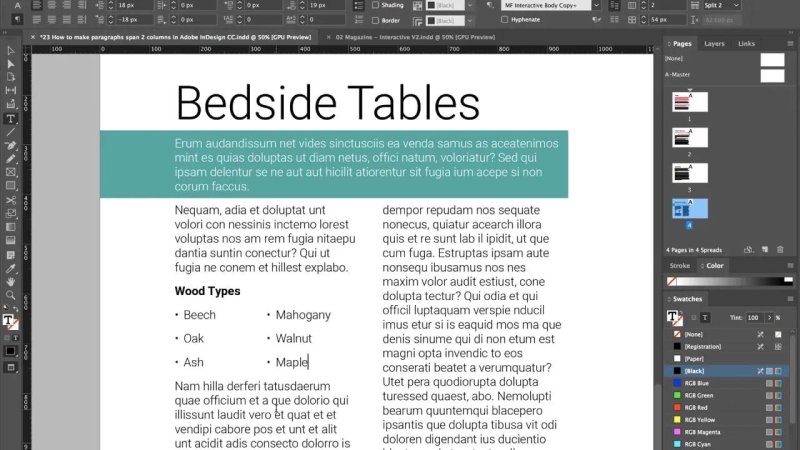
Split columns make a short list more compact without adding another text frame or relying on tabs.
Why Split Columns Instead of Using Tabs or Extra Text Boxes?
You could build this layout with tabs, multiple frames or an inline object. But the split columns feature is quicker and much more robust for text that may change later.
Text stays connected: content continues to reflow naturally within the same story.
Editing is simpler: there are fewer separate frames to select, move and maintain.
Lists look cleaner: short entries can sit side by side without fiddly tab stops.
Layouts are more consistent: paragraph styles can preserve the same treatment throughout a publication.
It is fast: span and split controls are available directly from paragraph formatting.
Use Span and Split Together for Magazine Layouts
The real power comes from combining both options in a single story. A broad intro paragraph can span the width of two columns. Regular body copy can continue below in two columns. Then a small group of items can split into narrower columns further down the page.
All of that can happen in one text frame, with no awkward collection of independent boxes. It is a small InDesign feature, but it is incredibly useful for building flexible editorial layouts that stay easy to edit.
FAQ's
Can a heading span columns in InDesign?
Yes. Click in the heading with the Type tool, open the Paragraph controls, then choose Span All from the Span Columns setting. The heading will extend across every column in that text frame.
Can I split only part of a text frame into columns?
Yes. Select only the paragraphs you want to affect, then choose Split in the Span Columns controls. The rest of the text frame can keep its normal column structure.
Do split columns require separate text boxes?
No. Split columns work inside the existing text frame. This keeps the content flowing as one story and avoids the hassle of aligning and maintaining extra text boxes.
Written by Daniel Walter Scott — Founder of Bring Your Own Laptop & Chief Instructor
