How To Create Interactive Button Triggered Animations In InDesign CC
Questions


Student Gallery
Course info
Overview
- You will need a copy of Adobe InDesign 2018 or above. But you find that 95% of all the features in this course will work with earlier version of InDesign (e.g. CS6). A free trial can be downloaded from Adobe.
What am I going to get from this course?
- 70 lectures 5+ hours of well structured content.
- Create PDF Forms
- Master Long Documents.
- Advanced Fonts
- Master Styles
- Shortcut Sheet
- Create Charts & Infographics
- Create Interactive Documents
- Workflow Tactics
- Shortcuts & Speed Tips
- Advanced Creative Cloud Features
- Tips for working with Photoshop & Illustrator
- Using Scripts
- Exporting, Prepress & Printing tricks
- You will get the finished files so you never fall behind.
- Downloadable exercise files & cheat sheet.
- Forum support from me and the rest of the BYOL crew.
- Techniques used by professional graphic designers.
- Professional workflows and shortcuts.
- A wealth of other resources and websites to help your accelerate your career.
What is the target audience?
- This course is for people who already know InDesign and want to take their skills and speed to the maximum level.
- This is an advanced InDesign course, so you’ll need basic InDesign skills to find this course useful.
- This course is perfect for anyone that already knows how to insert images & add text.
- If you a completely new to InDesign try my InDesign Essentials course before starting this one.
- This course is perfect for anyone that has completed my InDesign Essentials course.
Course duration 7 hours 45 mins + your study.

Daniel Walter Scott
Founder of Bring Your Own Laptop & Chief Instructor
I discovered the world of design as an art student when I stumbled upon a lab full of green & blue iMac G3’s. My initial curiosity around using the computer to create ‘art’ developed into a full-blown passion, eventually leading me to become a digital designer and founder of Bring Your Own Laptop.
Sharing and teaching are a huge part of who I am. As a certified Adobe instructor, I've had the honor of winning multiple Adobe teaching awards at their annual MAX conference. I see Bring Your Own Laptop as the supportive community I wished for when I was first starting out and intimidated by design. Through teaching, I hope to bring others along for the ride and empower my students to bring their stories, labors of love, and art into the world.
True to my Kiwi roots, I've lived in many places, and currently, I reside in Ireland with my wife and kids.
Downloads & Exercise files
How do you make a button trigger an animation in InDesign?
Create and name the object you want to animate, assign it an animation preset, then turn the clickable graphic into a button and set its action to play that animation. Finally, remove the default On Page Load event so the animation appears only when the button is activated.
How to Create Button Triggered Animations in Adobe InDesign
Interactive buttons are one of the really nice features in Adobe InDesign Publish Online. They also work for EPUB, and they give you a much better way to communicate information without stuffing everything onto the page at once.
A simple example is an interactive location map. Click a country button or map pin, and the relevant store address slides down into view. The same technique works for product details, image galleries, secondary navigation, pop-up labels, and all sorts of content that needs to stay neatly tucked away until someone asks for it.
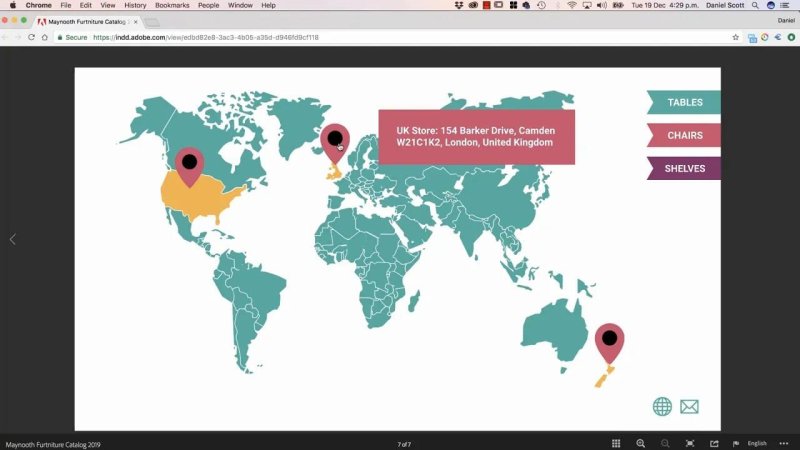
A button-triggered address panel keeps the map clean until location details are needed.
Build the content you want to reveal
Start on a new blank page in your InDesign document. Page transitions can safely be ignored here, particularly if they were added for interactive PDF, because those transitions are a separate feature and only work in full-screen interactive PDFs.
For the map example, place the main map graphic first, then add the icons that will act as the location controls. In this case, there are map pins for the United States, the United Kingdom, and New Zealand.
Next, create the content that should appear when one of those controls is activated. For the UK location:
Draw a rectangle for the address background.
Apply a fill colour that stands out from the map.
Create a text frame and paste in the UK store address.
Set the text colour and size so it is readable against the background.
Position the address panel where it should finish after animating onto the page.
The address panel is made of two objects, the coloured rectangle and the text frame. They need to move as one unit, so select both and group them with Command + G on Mac or Control + G on Windows.
Name animated objects properly
Before applying an animation, give the grouped object a useful name in the Animation panel. This matters more than it might seem. If every object is left with a name like “Group,” choosing the right animation later becomes a guessing game.
For this example, name the group UK Address. Clear names make interactive documents much easier to build, test, and fix, especially once you have several buttons and animations on one page.
Apply an animation preset
With the address group selected, open the Animation panel and choose an appropriate preset. A Fly In From Top animation works nicely for an address panel because it feels like the information is dropping into place.
At this point, test the animation in the EPUB Interactivity Preview panel. The address should slide down, but there is a problem: it will probably play as soon as the page opens. That is the default behaviour, and it is not what we want for a button-controlled animation.
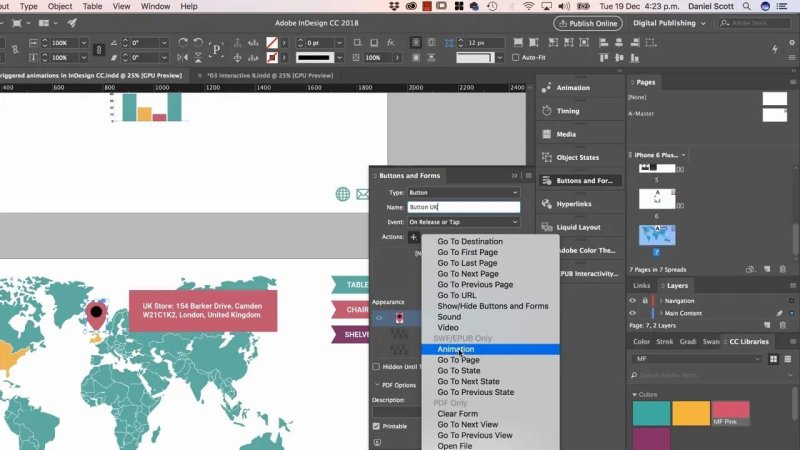
Choose a simple entrance preset first, then hand control of that animation to a button.
Turn the map icon into an interactive button
Select the map pin or other graphic that should trigger the address. Open the Buttons and Forms panel and change its type to Button.
Give the button a meaningful name too, such as Button UK. Again, this keeps things sensible when your page grows beyond a single interaction.
Under Actions, choose Animation. InDesign may label this option as being for SWF and EPUB, but it also works properly in Publish Online.
Then choose the animation you want the button to play. In this case, select UK Address. The button is now connected to the grouped address panel.
By default, the button uses the On Release event. That means the action runs when the mouse button is released after clicking, or when a tap is completed on a touch screen. For most buttons, this is exactly what you want.
Stop the animation from playing on page load
This is the important bit. The button can now play the UK Address animation, but the animation may still run when the page loads. To fix that, select the animated address group again and return to the Animation panel.
Look in the Events area. You will see two events attached to the animation:
On Page Load, which was assigned by default when the animation was created.
On Release, which was added when the button was connected to the animation.
Remove On Page Load and leave On Release active. Now the address remains hidden until the UK button is clicked or tapped.
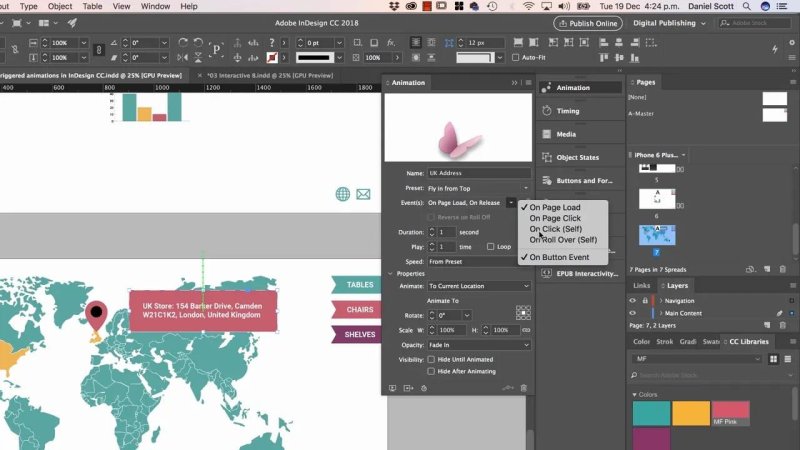
Removing the page-load event is what turns a normal animation into an intentional button interaction.
Preview button controlled animations
Use the EPUB Interactivity Preview panel to check that the address stays hidden initially and appears when the map icon is activated. This is a quick way to catch the most common issue, which is forgetting to remove the page-load event.
There is one small preview quirk worth knowing about. On Roll Over interactions may not work correctly in the small EPUB Interactivity Preview window, even though they work when published through Publish Online or exported for EPUB.
Use hover interactions when they make sense
On Release is the standard click or tap behaviour, but it is not your only choice. You can set a button to On Roll Over, which triggers an animation when the pointer moves over the button.
Hover-based interactions can be useful for desktop-focused experiences where a reader needs quick supporting information without clicking. They are less suitable as the only way to reveal essential information, since touch devices do not use a traditional mouse hover.
Repeat the process for other locations
Once the UK interaction is working, repeat the same process for the US and New Zealand map pins. Each one needs its own panel, group name, animation, and button connection.
Create a background rectangle and add the address text.
Group the elements together.
Name the group clearly, such as US Address.
Apply an animation of your choice.
Turn the corresponding map pin into a button.
Set the button action to play that specific animation.
Remove On Page Load from the animated group.
Try different animation styles rather than making every panel fly in the same way. The important thing is that the motion supports the content and does not become a distraction.
Think beyond map addresses
This technique is not really about maps. It is about giving one page more depth without making it feel cluttered. You can use a row of buttons to reveal different product images, show extra descriptions, switch between navigation options, or surface supporting content only when it is relevant.
The workflow stays the same:
Create the content that will appear.
Group it if it contains multiple elements.
Name it clearly.
Apply an animation.
Create a button from the trigger object.
Assign the animation action.
Remove the page-load event.
Once that pattern clicks, Publish Online and EPUB layouts become much more flexible. Instead of trying to communicate everything at once, you can build interactions that invite people to explore information on a single page.
FAQ's
Do button-triggered animations work in InDesign Publish Online?
Yes. Set a button action to Animation and select the named animation you want it to play. Although InDesign may refer to SWF and EPUB in the panel, the interaction also works in Publish Online.
Why does my InDesign animation play before I click the button?
The animation still has the default On Page Load event enabled. Select the animated object, open the Animation panel, and remove On Page Load while keeping the button-triggered event active.
What does On Release mean for an InDesign button?
On Release means the button action occurs when a mouse click is released or a touch-screen tap is completed. It is the usual event for buttons that reveal content or play an animation.
Why should I group an address panel before animating it?
Grouping lets the background shape and text move together as one animated object. Without grouping, each element would need separate animation settings and could easily become misaligned.
Written by Daniel Walter Scott — Founder of Bring Your Own Laptop & Chief Instructor
