Mastering Hyphenation Options Using Adobe InDesign CC
Questions


Student Gallery
Be the first to share something.
Course info
Overview
- You will need a copy of Adobe InDesign 2018 or above. But you find that 95% of all the features in this course will work with earlier version of InDesign (e.g. CS6). A free trial can be downloaded from Adobe.
What am I going to get from this course?
- 70 lectures 5+ hours of well structured content.
- Create PDF Forms
- Master Long Documents.
- Advanced Fonts
- Master Styles
- Shortcut Sheet
- Create Charts & Infographics
- Create Interactive Documents
- Workflow Tactics
- Shortcuts & Speed Tips
- Advanced Creative Cloud Features
- Tips for working with Photoshop & Illustrator
- Using Scripts
- Exporting, Prepress & Printing tricks
- You will get the finished files so you never fall behind.
- Downloadable exercise files & cheat sheet.
- Forum support from me and the rest of the BYOL crew.
- Techniques used by professional graphic designers.
- Professional workflows and shortcuts.
- A wealth of other resources and websites to help your accelerate your career.
What is the target audience?
- This course is for people who already know InDesign and want to take their skills and speed to the maximum level.
- This is an advanced InDesign course, so you’ll need basic InDesign skills to find this course useful.
- This course is perfect for anyone that already knows how to insert images & add text.
- If you a completely new to InDesign try my InDesign Essentials course before starting this one.
- This course is perfect for anyone that has completed my InDesign Essentials course.
Course duration 7 hours 45 mins + your study.

Daniel Walter Scott
Founder of Bring Your Own Laptop & Chief Instructor
I discovered the world of design as an art student when I stumbled upon a lab full of green & blue iMac G3’s. My initial curiosity around using the computer to create ‘art’ developed into a full-blown passion, eventually leading me to become a digital designer and founder of Bring Your Own Laptop.
Sharing and teaching are a huge part of who I am. As a certified Adobe instructor, I've had the honor of winning multiple Adobe teaching awards at their annual MAX conference. I see Bring Your Own Laptop as the supportive community I wished for when I was first starting out and intimidated by design. Through teaching, I hope to bring others along for the ride and empower my students to bring their stories, labors of love, and art into the world.
True to my Kiwi roots, I've lived in many places, and currently, I reside in Ireland with my wife and kids.
Downloads & Exercise files
How do I control hyphenation in Adobe InDesign?
Use InDesign’s Paragraph Hyphenation settings to stop awkward breaks, then use the User Dictionary for words that need special treatment. For individual phrases that must stay together, apply No Break instead of inserting manual line breaks. It is a small bit of setup that makes text look much more considered.
Mastering Hyphenation in Adobe InDesign
Hyphenation can be useful. It helps text sit more evenly in narrow columns and can reduce huge gaps caused by justified copy. But InDesign’s defaults can make some pretty questionable decisions.
It may hyphenate a person’s name, split the final word of a paragraph, or continue a broken word into the next column or page. None of those are particularly nice reading experiences. So, if hyphenation is on, take control of it rather than letting it do whatever it feels like.
To turn hyphenation on or off for selected text, click in the text frame with the Type tool and use the Hyphenate option in the Paragraph panel. The more useful controls are found in the Paragraph panel menu.
Fix the three hyphenation settings that cause the most trouble
Open the Paragraph panel menu, choose Hyphenation, and check the options near the bottom of the dialogue box. These three options are worth turning off in most layouts:
Hyphenate Capitalized Words: Turn this off. Capitalised words are often names, countries, brands, and business names. Splitting “Alexandria” across two lines is not a great result.
Hyphenate Last Word: Turn this off. A hyphenated final word at the end of a paragraph generally looks clumsy.
Hyphenate Across Columns: Turn this off. A word ending in one column and continuing at the top of the next column, or even the next page, is just not a nice way to treat a word.
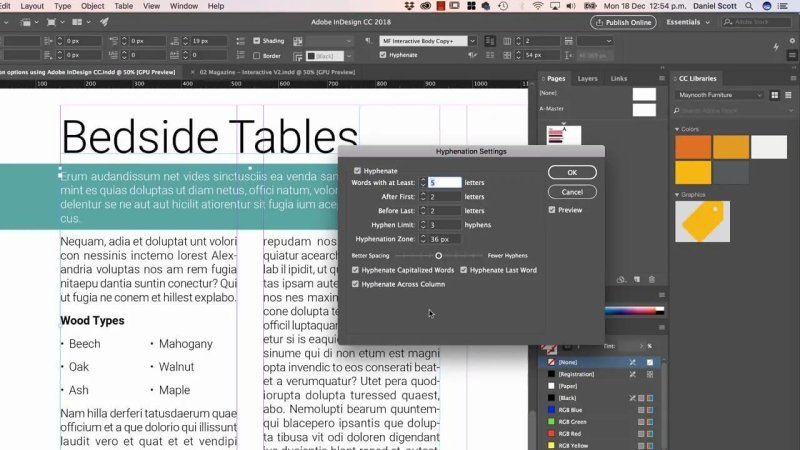
The Hyphenation dialogue is where the default behaviour becomes much more sensible.
With those three settings disabled, hyphenation is immediately more readable. You still get the benefits where they matter, without casually breaking names, paragraph endings, or column transitions.
Make those InDesign hyphenation settings the default
Changing the settings in an open document affects the relevant selected text or paragraph settings in that document. If you want this behaviour to be the default for new documents, close all open documents first.
With no documents open, switch to the Essentials workspace if needed.
Select the Type tool.
Open either the Paragraph or Character panel.
Open the panel menu and choose Hyphenation.
Enable hyphenation if that is how you want to work, then disable the three problematic options.
Click OK.
Those choices will now be used as your default going forward. It is a worthwhile setup step if you regularly create text-heavy documents.
Control exactly where a specific word can hyphenate
Sometimes a word is perfectly fine in general, but InDesign keeps splitting it in a weird spot. This is where the User Dictionary is very handy.
Say a commonly used word such as “furniture” keeps landing near the end of a line and breaking in a way you do not like. Select the word, then go to Edit > Spelling > User Dictionary. Because the word was selected first, InDesign places it into the Word field for you.
Choose Hyphenate to see the word’s existing hyphenation options. InDesign uses a priority system here. Tildes indicate possible breaking points, with the earlier option being the preferred place to break and later options acting as fallbacks if the preferred break will not work.
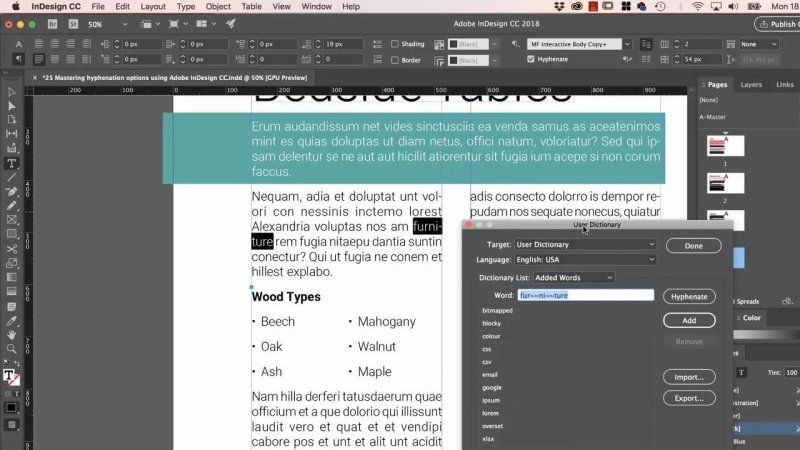
The User Dictionary lets you decide how a frequently used word may break rather than leaving it to chance.
To force one specific break, remove the other tildes and leave only the break you want, then click Add. InDesign will immediately use that chosen break when the word needs to hyphenate.
Do be thoughtful about the result. A technically valid break can create an unfortunate-looking fragment. For example, splitting “furniture” after “fur” may be a terrible choice in context, even if it makes the line fit.
Prevent one lowercase word from ever hyphenating
If a lowercase word should never break at all, add it to the User Dictionary with a tilde at the very beginning of the word, then click Add. That leading tilde tells InDesign: never hyphenate this word.
This is particularly useful for specialised terms that occur repeatedly in your work. It solves the problem globally, rather than requiring you to repair the same word again and again in individual text frames.
Your User Dictionary works across documents
The User Dictionary is not a document-by-document setting. Once you add entries, they apply to your future InDesign work as well. It can hold custom spelling and hyphenation decisions for terms such as product names, technical language, abbreviations, and regional spellings.
Even better, the dictionary can be shared. Export it and send it to a colleague, or import it onto another computer. That means a team can work from the same set of approved words and hyphenation behaviour instead of rebuilding the same dictionary repeatedly.
Keep two or more words together with No Break
Hyphenation is related to another common text problem: phrases you never want separated across two lines. Maybe “oak tables” is a product description that needs to stay together. Instead of forcing the line with manual returns, select both words and apply No Break.
The longer route is:
Go to Window > Type & Tables > Character.
Open the Character panel menu.
Choose No Break.
InDesign will either pull the selected words back onto the current line or move the whole phrase down to the next one. It affects only that selected instance, which is exactly what makes it useful for tidying a layout as you work.
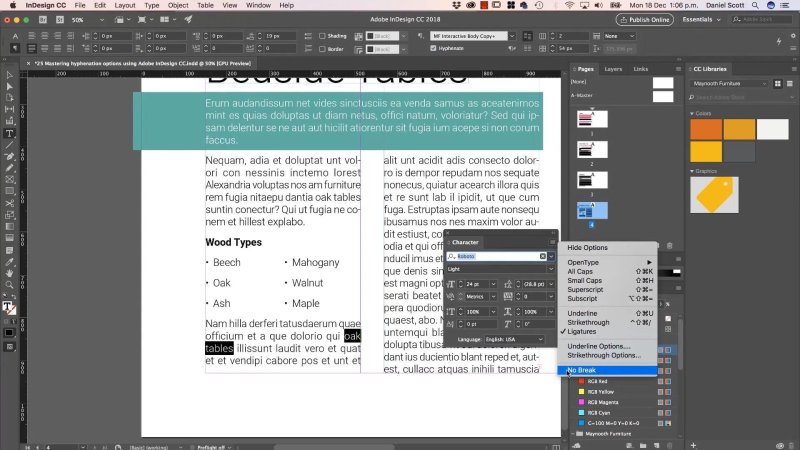
Use No Break for an individual phrase that must remain on one line.
The faster way to apply No Break
The quick way is much better once you know it. Select the words, then open Quick Apply with Command + Return on a Mac or Control + Return on a PC. Type “No B”, choose No Break, and press Return.
That is a fast, clean fix for pairs of words and short phrases that belong together.
Do not fix line breaks with Shift + Return
A soft return, created with Shift + Return, may appear to solve a line-break problem, but it is not the right tool here. It hardcodes a layout decision that can become a mess as text edits, column widths, type size, or page flow change.
No Break expresses the actual intent: these words should stay together. InDesign can then reflow the copy intelligently instead of being trapped by a manual line ending.
A practical hyphenation workflow
For tidy, professional text, keep the approach simple:
Turn hyphenation on only when it benefits the layout.
Disable hyphenation for capitalised words, final paragraph words, and across-column breaks.
Add frequently troublesome words to the User Dictionary.
Specify a preferred break for words that need one.
Use a leading tilde in the dictionary for a word that must never hyphenate.
Apply No Break to specific multi-word phrases that should stay together.
Avoid soft returns as a way to manipulate copy.
Hyphenation might not be the most exciting part of InDesign, but it has a big effect on whether a page feels polished or slightly off. A few deliberate settings put you in charge of the details.
FAQ's
Where are the hyphenation settings in InDesign?
Click in your text with the Type tool, open the Paragraph panel menu, and choose Hyphenation. This dialogue contains the main controls for how InDesign breaks words.
How do I stop InDesign from hyphenating names?
In the Hyphenation dialogue, turn off Hyphenate Capitalized Words. This prevents InDesign from breaking capitalised names, countries, brands, and similar words.
How do I stop a word from hyphenating in InDesign?
Select the word, go to Edit > Spelling > User Dictionary, place a tilde at the beginning of the word, and click Add. InDesign will then avoid hyphenating that word in future documents.
How do I keep two words on the same line in InDesign?
Select the words and apply No Break from the Character panel menu, or use Quick Apply with Command + Return on Mac or Control + Return on PC and search for No Break.
Written by Daniel Walter Scott — Founder of Bring Your Own Laptop & Chief Instructor
