Keyboard Shortcuts In Adobe InDesign CC That Will Change Your Life
Questions




Student Gallery
Be the first to share something.
Course info
Overview
- You will need a copy of Adobe InDesign 2018 or above. But you find that 95% of all the features in this course will work with earlier version of InDesign (e.g. CS6). A free trial can be downloaded from Adobe.
What am I going to get from this course?
- 70 lectures 5+ hours of well structured content.
- Create PDF Forms
- Master Long Documents.
- Advanced Fonts
- Master Styles
- Shortcut Sheet
- Create Charts & Infographics
- Create Interactive Documents
- Workflow Tactics
- Shortcuts & Speed Tips
- Advanced Creative Cloud Features
- Tips for working with Photoshop & Illustrator
- Using Scripts
- Exporting, Prepress & Printing tricks
- You will get the finished files so you never fall behind.
- Downloadable exercise files & cheat sheet.
- Forum support from me and the rest of the BYOL crew.
- Techniques used by professional graphic designers.
- Professional workflows and shortcuts.
- A wealth of other resources and websites to help your accelerate your career.
What is the target audience?
- This course is for people who already know InDesign and want to take their skills and speed to the maximum level.
- This is an advanced InDesign course, so you’ll need basic InDesign skills to find this course useful.
- This course is perfect for anyone that already knows how to insert images & add text.
- If you a completely new to InDesign try my InDesign Essentials course before starting this one.
- This course is perfect for anyone that has completed my InDesign Essentials course.
Course duration 7 hours 45 mins + your study.

Daniel Walter Scott
Founder of Bring Your Own Laptop & Chief Instructor
I discovered the world of design as an art student when I stumbled upon a lab full of green & blue iMac G3’s. My initial curiosity around using the computer to create ‘art’ developed into a full-blown passion, eventually leading me to become a digital designer and founder of Bring Your Own Laptop.
Sharing and teaching are a huge part of who I am. As a certified Adobe instructor, I've had the honor of winning multiple Adobe teaching awards at their annual MAX conference. I see Bring Your Own Laptop as the supportive community I wished for when I was first starting out and intimidated by design. Through teaching, I hope to bring others along for the ride and empower my students to bring their stories, labors of love, and art into the world.
True to my Kiwi roots, I've lived in many places, and currently, I reside in Ireland with my wife and kids.
Downloads & Exercise files
What are the most useful InDesign keyboard shortcuts?
The best InDesign shortcuts are the ones that remove annoying little clicks you repeat all day: switching fill and stroke, adjusting type, moving through spreads, selecting buried objects, and opening menus alphabetically. Learn a handful properly, practise them for a week, and they will make layout work feel a whole lot smoother.
Advanced Adobe InDesign Keyboard Shortcuts That Actually Save Time
These are my favourite super-duper useful InDesign keyboard shortcuts. They are not necessarily the shortcuts everyone needs, but they are the ones that save me from constantly hunting through panels, tiny controls, and menus.
Do not try to memorise every shortcut here in one go. Pick a few that match the work you do most often, write them down, and give them a proper chance to stick. If they still do not stick after a little while, they were probably never meant to be part of your workflow.
Quick fill and stroke shortcuts
When an object is selected, there are a few simple keyboard shortcuts for controlling its fill and stroke without having to click those tiny controls in the Tools panel.
Toggle between fill and stroke with X
Press X to switch the active target between the fill and the stroke. It is very handy when you need to set both quickly, such as applying a red fill and then changing the stroke to yellow.
This one also works in Illustrator and Photoshop, so it is worth getting into the habit.
Remove or add a fill
Press /, the forward slash key, to apply no fill to the active fill or stroke target.
Press ,, the comma key, to apply a fill.
Press ., the full stop key, to apply a gradient.
The forward slash is the real winner here. It is a wonderfully quick way to clear a fill from an object without opening a swatch panel. Gradients are available too, obviously, but that is not always the first thing anyone wants to add.
Move through long InDesign documents faster
Jump directly to a page
For a long document, use Command + J on a Mac or Control + J on a PC. Enter the page number you need and press Return or Enter.
It is technically more of a quick command than a single-key shortcut, but it becomes very fast. Rather than scrolling endlessly through a document, use the shortcut, type the page number, and you are there.
Centre a page or an entire spread
Command + 0 on Mac, or Control + 0 on PC, centres the current page in the document window.
Command + Option + 0 on Mac, or Control + Alt + 0 on PC, centres the full spread.
That second shortcut is particularly useful for magazine layouts, books, brochures, and anything with facing pages. It gives you the proper spread view rather than treating each page separately.
Move cleanly from spread to spread
Regular Page Down can leave the document window in a slightly odd position. To jump neatly to the next spread, use Option + Page Down on Mac or Alt + Page Down on PC. Use the matching Page Up shortcut to move backwards.
On a MacBook without dedicated Page Down keys, use Fn + Option + Down Arrow. It is a few keys, sure, but it is surprisingly useful when you spend a lot of time working through a multipage publication.
Speed up typography adjustments
Type is where shortcuts can really start to pay off. Rather than repeatedly opening Character and Paragraph controls, you can make quick adjustments directly from the keyboard.
Increase or decrease font size
Select text, then use the following shortcuts:
Command + Shift + . on Mac, or Control + Shift + . on PC, to increase type size.
Command + Shift + , on Mac, or Control + Shift + , on PC, to decrease type size.
These are the greater-than and less-than keys, but calling them full stop and comma makes them much easier to find.
Adjust tracking and kerning with the arrow keys
To tighten or loosen selected text, hold Option on Mac or Alt on PC, then use the left and right arrow keys.
Option or Alt + Left Arrow tightens spacing.
Option or Alt + Right Arrow opens spacing.
With the text cursor sitting between two characters, the same shortcuts let you kern individual letter pairs. It is perfect for those moments when a headline looks nearly right but one pair of letters is bothering you.
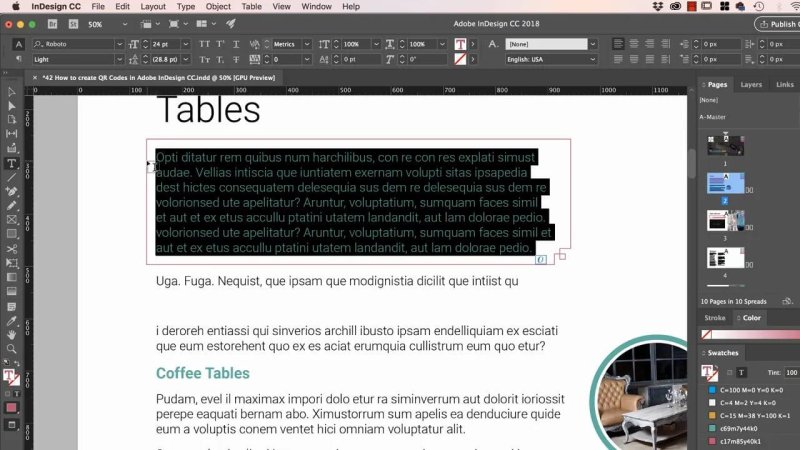
Keyboard type controls are much quicker than repeatedly digging through character settings.
Adjust leading without opening the panel
With text selected, hold Option on Mac or Alt on PC and use the up and down arrow keys to alter the leading.
Option or Alt + Up Arrow reduces leading.
Option or Alt + Down Arrow increases leading.
So the simple rule is: left and right for tracking, up and down for leading. If you are a bit of a tracking and kerning fiend, this is a lovely one to have in your hands.
Toggle between Character and Paragraph controls
One of those shortcuts that is a pain to remember but brilliant once it is in your fingers is Command + Option + 7 on Mac or Control + Alt + 7 on PC.
It toggles the Control panel between Character and Paragraph formatting controls. This is great when you need to move quickly between things such as tracking and font settings on one side, then space after or paragraph controls on the other.
I am forever on Character when I want Paragraph, and on Paragraph when I want Character. This stops that little bit of pointless clicking.
Get import options only when you need them
When placing Word documents or other files, the Import Options checkbox is brilliant until you leave it switched on. Then every time you place an image afterward, InDesign asks for options you do not need. Annoying.
The solution is simple: select the file in the Place dialog, then hold Shift while clicking Open. InDesign will show the import options for that one file only, without permanently enabling the checkbox.
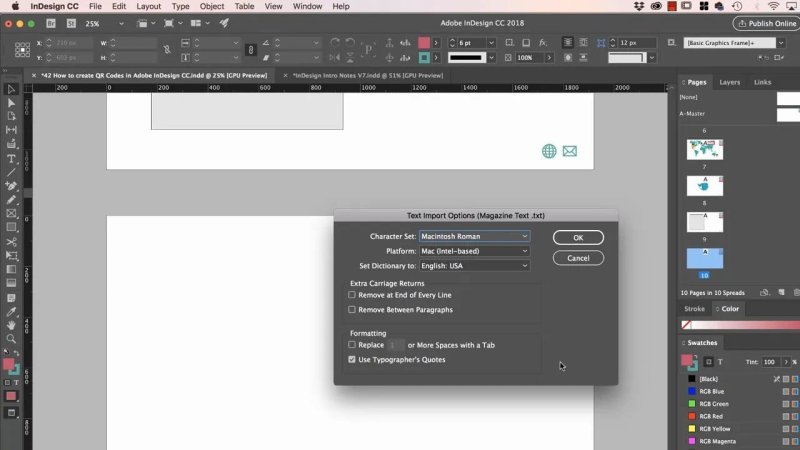
Holding Shift while opening a placed file gives you one-time import options without leaving the setting switched on.
It is a tiny trick, but it saves the classic cycle of turning Import Options on, forgetting about it, getting irritated later, then finally going back to turn it off.
Select objects hidden underneath other objects
Complex layouts often have objects stacked on top of each other. Maybe there is a QR code on top of a coloured box, and that box sits on top of an image. Clicking the image normally means dragging other stuff out of the way first. No thanks.
With the Selection tool, hold Command on Mac or Control on PC while clicking. Each click cycles through the objects underneath the cursor.
Keep the modifier key held down and click repeatedly until the object you want is selected. You can then delete it, move it, or edit it without dismantling the rest of the layout.
This shortcut is also really handy in Photoshop when there are loads of layers piled up in one place.
Override master page items on one page
Master page items are fantastic for repeated elements such as page numbers, logos, headers, footers, and other document furniture. But sometimes a particular page needs to be different.
To access an item that came from a master page, hold Command + Shift on Mac or Control + Shift on PC and click the object.
This overrides that one instance, pulling it out of the master page relationship so you can edit, move, recolour, reorder, or delete it on the current page.
For example, you may have page numbers on every page but want to remove one on a full-page advertisement. Override the page number on that page and get rid of it, while keeping every other page number connected to the master.
Use Power Zoom to move around a detailed layout
When you are zoomed right into a page, the normal approach is to zoom out, pan across, and zoom back in. Power Zoom makes that whole process much less clunky.
Hold the Spacebar, then click and hold the mouse button. InDesign zooms out while you hold it. Move the cursor to the area you want to inspect and release to return to the previous zoom level in that new location.
The Spacebar is normally your tool for panning around, but this click-and-hold behaviour turns it into a fast way to jump between detailed areas. It is especially useful when working close up on image-heavy layouts.
Temporarily use a tool without changing tools
Most of the time, the Selection tool is where we live. But every now and then you need to quickly draw a frame, create a text box, or zoom into something. Rather than switch tools, use the shortcut key temporarily.
Hold M to temporarily use the Rectangle Frame tool.
Hold T to temporarily use the Type tool.
Hold Z to temporarily use the Zoom tool.
Keep the key held down while you use the tool. When you release it, InDesign returns to the tool you were using before. Draw a quick type box with T, let go, and you are straight back to the Selection tool. Super handy.
The best odd little shortcut: alphabetise InDesign menus
This is the weird little shortcut that is ridiculously useful when you know the name of a command but cannot remember where Adobe has tucked it away.
Hold Command + Option + Shift on Mac, or Control + Alt + Shift on PC, then click a menu such as Object. The menu items appear in alphabetical order.
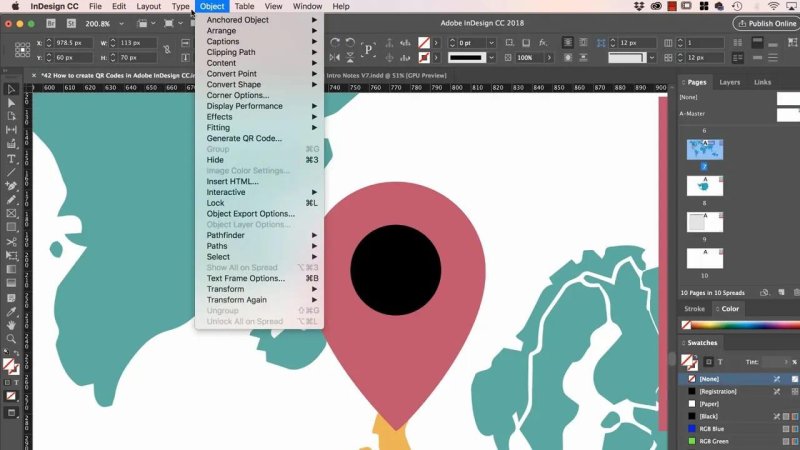
Alphabetising a long menu makes it much easier to find a command when you know its name but not its usual menu location.
Normally, menus are grouped in an order that makes sense eventually, but searching them can feel a bit random when you are in a hurry. Alphabetical order means you can go straight to the first letter of the command you need.
It is one of those shortcuts that makes you wonder why it is not available across every Adobe app. But in InDesign, it is there, and it is excellent.
Build shortcuts into your actual workflow
The goal is not to become a walking shortcut sheet. The goal is to stop wasting energy on repetitive little actions.
Start with the shortcuts that solve your current frustrations:
If you work with lots of shapes, learn X and /.
If you work on books or magazines, learn page jumping and spread navigation.
If you spend ages formatting text, focus on type size, tracking, and leading.
If you work with master pages, learn the override shortcut immediately.
If you are always hunting through menus, give alphabetised menus a go.
Print a shortcut sheet if that helps, keep a short list beside you, and practise a few for a week. The good ones will become automatic. The ones that do not fit your work can quietly disappear from your brain, and that is completely fine.
FAQ's
How do I switch between fill and stroke in InDesign?
Select an object and press X. This toggles the active target between the object's fill and stroke, making it much easier to change each one without clicking tiny panel controls.
What is the shortcut to override a master page item in InDesign?
Hold Command + Shift on Mac or Control + Shift on PC, then click the master page item. You can then edit, move, recolour, reorder, or remove that item only on the selected page.
How can I show import options for only one placed file in InDesign?
In the Place dialog, select the file, hold Shift, and click Open. This displays Import Options for that file only and does not leave the Import Options setting enabled for future placed files.
How do I alphabetise menus in Adobe InDesign?
Hold Command + Option + Shift on Mac or Control + Alt + Shift on PC while clicking a menu. InDesign displays the commands in alphabetical order, which makes a long menu much easier to search.
Written by Daniel Walter Scott — Founder of Bring Your Own Laptop & Chief Instructor
