How To Use Adobe Stock With Adobe InDesign CC
Questions


Student Gallery
Be the first to share something.
Course info
Overview
- You will need a copy of Adobe InDesign 2018 or above. But you find that 95% of all the features in this course will work with earlier version of InDesign (e.g. CS6). A free trial can be downloaded from Adobe.
What am I going to get from this course?
- 70 lectures 5+ hours of well structured content.
- Create PDF Forms
- Master Long Documents.
- Advanced Fonts
- Master Styles
- Shortcut Sheet
- Create Charts & Infographics
- Create Interactive Documents
- Workflow Tactics
- Shortcuts & Speed Tips
- Advanced Creative Cloud Features
- Tips for working with Photoshop & Illustrator
- Using Scripts
- Exporting, Prepress & Printing tricks
- You will get the finished files so you never fall behind.
- Downloadable exercise files & cheat sheet.
- Forum support from me and the rest of the BYOL crew.
- Techniques used by professional graphic designers.
- Professional workflows and shortcuts.
- A wealth of other resources and websites to help your accelerate your career.
What is the target audience?
- This course is for people who already know InDesign and want to take their skills and speed to the maximum level.
- This is an advanced InDesign course, so you’ll need basic InDesign skills to find this course useful.
- This course is perfect for anyone that already knows how to insert images & add text.
- If you a completely new to InDesign try my InDesign Essentials course before starting this one.
- This course is perfect for anyone that has completed my InDesign Essentials course.
Course duration 7 hours 45 mins + your study.

Daniel Walter Scott
Founder of Bring Your Own Laptop & Chief Instructor
I discovered the world of design as an art student when I stumbled upon a lab full of green & blue iMac G3’s. My initial curiosity around using the computer to create ‘art’ developed into a full-blown passion, eventually leading me to become a digital designer and founder of Bring Your Own Laptop.
Sharing and teaching are a huge part of who I am. As a certified Adobe instructor, I've had the honor of winning multiple Adobe teaching awards at their annual MAX conference. I see Bring Your Own Laptop as the supportive community I wished for when I was first starting out and intimidated by design. Through teaching, I hope to bring others along for the ride and empower my students to bring their stories, labors of love, and art into the world.
True to my Kiwi roots, I've lived in many places, and currently, I reside in Ireland with my wife and kids.
Downloads & Exercise files
What is Adobe Stock, and how does it work with InDesign?
Adobe Stock is a subscription library of professional stock imagery that can be used in commercial design projects. Its best feature is the connection to Creative Cloud Libraries: you can design with a watermarked preview first, then license the chosen image and have the high-resolution version update automatically in InDesign.
What Is Adobe Stock? Using Stock Images with InDesign and CC Libraries
Adobe Stock is simply a place to get stock images for your projects. Think professional photography and other visual assets that you can use commercially once they have been licensed.
It works as a subscription service, with plans that include a set number of image licences each month. Adobe Stock is not the only option, of course. iStock and Shutterstock are the other big names, and there is often plenty of overlap between their collections. Some assets are exclusive, but generally you can find similar imagery across the major stock libraries.
The real advantage of Adobe Stock is not necessarily that it has completely different images. It is how nicely it plugs into Adobe Creative Cloud applications, especially InDesign and Photoshop.
The Useful Bit: Add Images to a Creative Cloud Library
Rather than downloading every possible image to your computer, add promising options directly to a Creative Cloud Library. This gives you a tidy holding area for the assets you are considering for a particular job.
For example, if you are designing for a furniture brand, search Adobe Stock for furniture. Once you find an image you like, use the cloud or library option and add it to the relevant library, such as a dedicated furniture project library.

Adding a possible image to a project library keeps it ready for use without committing to a licence yet.
Then switch back to InDesign and open the CC Libraries panel. Select the same library and the image will be there, ready to drag straight onto the page.
This is a much smoother workflow than downloading files, locating them again, placing them manually, and hoping everyone is using the right version.
Design First with the Watermarked Preview
When you initially place an Adobe Stock asset from a library, it comes in as a reasonably high-resolution preview, but it has a large watermark across it. That is exactly what you want at this stage.
You do not need to spend a licence on every image that might work. Use the watermarked version to test whether the crop, composition, colour, and general feel suit the layout. It is there for making design decisions, not for final output.
In a furniture collection layout, for instance, you can drag the room image into an image frame, resize it, adjust the composition, and build the rest of the page around it. You might add a black rectangle over the image, reduce its opacity, and send it behind the key design elements to create a darker background treatment.
The important thing is that you can get the layout looking right before you pay for the final image.
License the Image When the Design Is Approved
Once you or the client has signed off the image, licensing is simple. Select the Adobe Stock image in the CC Libraries panel, then use the small licence icon or right-click and choose License Image.
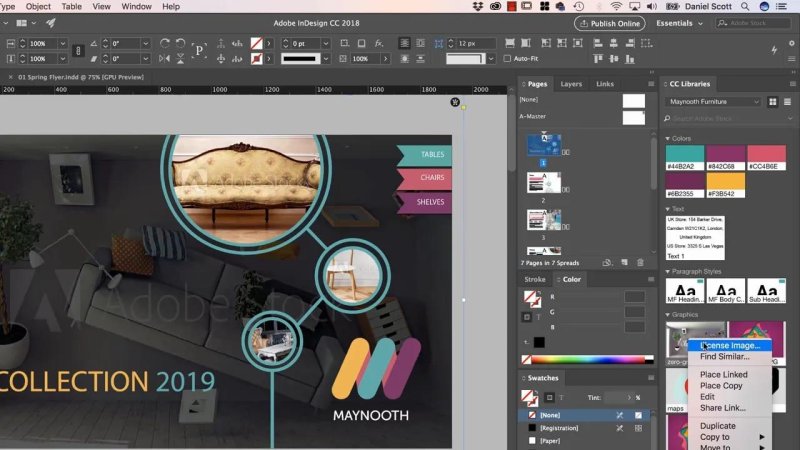
The licence command is available directly inside InDesign, right where the placed asset lives.
Your subscription uses one of its available licences. Adobe Stock shows the number remaining for the month, and larger plans are available if you need more images.
After confirming the licence, Creative Cloud syncs the asset. The watermark disappears and the placed preview is replaced with the licensed, high-resolution version. Crucially, the image updates in the existing layout. You do not need to place it again, rebuild the crop, or recreate the work you have already done.
Why This Workflow Is So Good
The time-saving part is not just that the image becomes licensed. It is that your design work stays intact.
Try before committing: Place watermarked previews while exploring ideas.
Keep project assets organised: Store likely images in a dedicated CC Library.
License only the approved option: Use your image allowance on assets you will actually use.
Preserve the layout: The licensed high-resolution asset replaces the preview automatically.
Use the image commercially: Once licensed, it is available for your commercial projects.
It Is Even Better in Photoshop
This workflow is especially handy in Photoshop. You can use an Adobe Stock preview while doing all the fun stuff: manipulating it, adjusting it, bending it, compositing it, and generally pushing it around until it works.
Only when the image is definitely the right one do you license it. The final asset updates without forcing you to repeat the editing work with a freshly downloaded file.
A Simple Adobe Stock and InDesign Workflow
Search Adobe Stock for imagery that suits the project.
Add your strongest options to a project-specific Creative Cloud Library.
Open that library in InDesign.
Drag the watermarked preview into the layout and design with it.
Get approval on the selected image and final composition.
Choose License Image from the CC Libraries panel.
Allow Creative Cloud to sync the licensed high-resolution image into the document.
That is Adobe Stock tied into CC Libraries. It lets you work quickly, avoid premature licensing decisions, and keep your final commercial imagery connected to the design from the beginning.
FAQs
Can I use an Adobe Stock preview in an InDesign layout before licensing it?
Yes. You can place the watermarked preview from a Creative Cloud Library and use it to build and test the layout before licensing the final image.
What happens when I license an Adobe Stock image in InDesign?
Creative Cloud syncs the licensed high-resolution version into the document, replacing the watermarked preview while retaining the work already done in the layout.
Why use Adobe Stock instead of downloading images manually?
Using Adobe Stock through CC Libraries keeps assets organised by project and means the final licensed image can update in place without needing to be re-imported or reworked.
Written by Daniel Walter Scott — Founder of Bring Your Own Laptop & Chief Instructor
