How To Create QR Codes In Adobe InDesign CC
Questions


Student Gallery
Be the first to share something.
Course info
Overview
- You will need a copy of Adobe InDesign 2018 or above. But you find that 95% of all the features in this course will work with earlier version of InDesign (e.g. CS6). A free trial can be downloaded from Adobe.
What am I going to get from this course?
- 70 lectures 5+ hours of well structured content.
- Create PDF Forms
- Master Long Documents.
- Advanced Fonts
- Master Styles
- Shortcut Sheet
- Create Charts & Infographics
- Create Interactive Documents
- Workflow Tactics
- Shortcuts & Speed Tips
- Advanced Creative Cloud Features
- Tips for working with Photoshop & Illustrator
- Using Scripts
- Exporting, Prepress & Printing tricks
- You will get the finished files so you never fall behind.
- Downloadable exercise files & cheat sheet.
- Forum support from me and the rest of the BYOL crew.
- Techniques used by professional graphic designers.
- Professional workflows and shortcuts.
- A wealth of other resources and websites to help your accelerate your career.
What is the target audience?
- This course is for people who already know InDesign and want to take their skills and speed to the maximum level.
- This is an advanced InDesign course, so you’ll need basic InDesign skills to find this course useful.
- This course is perfect for anyone that already knows how to insert images & add text.
- If you a completely new to InDesign try my InDesign Essentials course before starting this one.
- This course is perfect for anyone that has completed my InDesign Essentials course.
Course duration 7 hours 45 mins + your study.

Daniel Walter Scott
Founder of Bring Your Own Laptop & Chief Instructor
I discovered the world of design as an art student when I stumbled upon a lab full of green & blue iMac G3’s. My initial curiosity around using the computer to create ‘art’ developed into a full-blown passion, eventually leading me to become a digital designer and founder of Bring Your Own Laptop.
Sharing and teaching are a huge part of who I am. As a certified Adobe instructor, I've had the honor of winning multiple Adobe teaching awards at their annual MAX conference. I see Bring Your Own Laptop as the supportive community I wished for when I was first starting out and intimidated by design. Through teaching, I hope to bring others along for the ride and empower my students to bring their stories, labors of love, and art into the world.
True to my Kiwi roots, I've lived in many places, and currently, I reside in Ireland with my wife and kids.
Downloads & Exercise files
Transcript
Hi there, in this video we're going to look at how to make this QR code, here in the top left. When it gets used, it's going to open up a website. Awesome! Let's go and learn how to make that now.
So to create a QR code, I'm on my page 1, I'm going to go up to 'Object', 'Generate QR Code'. Now, by default it's going to be a web hyperlink, and that's the one that people use the most. You can have it to be an email address. These other ones are a bit weird, if you use a QR code, and it will give you some text. You could use it like, I don't know, a treasure hunt map thing. It could give you text clues, not sure why you would. Hyperlink is probably the most important one.
Type in the URL, that it wants to go to. Then pick a color, I'm picking 'Paper' for mine because I want it to go on this dark background here, but you could pick any color, it works for most colors. When I say most colors, I mean, if I put black on this it's probably not going to get read by the camera of the cell phone. So black's going to be a nice good contrast. Then you can just drag it out the size you need it to be. Now, give it some test before you go out to print. Just to make sure that it can be read by a QR Code Reader. That's how to do a QR Code, really.
You can select on him, and go to 'Object', 'Edit QR Code' to adjust it if you need to, or change the color. The awkward bit, the QR Code Reader thing that nobody uses. It's up to you, you might find a really good use for this but the problem with QR Code Readers or QR Codes in general is that nobody has a QR Code Reader on their cell phone by default. So people have to download it, and use it that way. Now the trouble is, it's like, I've done it but I'm a super nerd when it comes to this sort of stuff. I need a QR Code Reader but it's just not something on by default so it's not a really good mass use.
Now sometimes I put it on things, just for like, it's kind of like, cool person, social proof, like look how cool we are with QR Codes, that nobody's going to use. A Twitter, and Facebook, and YouTube, and a QR Code, I don't know, I find it's kind of part of that proving how cool you are, and how techy you are, but you've got to, I guess, not rely on it, because I find-- it could be just me, you could be in a different situation, you might love QR Codes and have a good use for using them, but just make sure you're not 100% relying on it. I'll probably have a web address on there as well.
That's going to be the end of interact-- I've kind of shot you down in the last video. I felt like, let's do all this cool Publish Online, and then I kind of shot you down with the QR Code. You might love it, do QR codes. That's going to be it for interactive stuff for the moment. We're going to get into some shortcuts next. Let's go and do that now in Adobe InDesign. Sorry QRs.
How do I make a QR code in Adobe InDesign?
Create one by choosing Object > Generate QR Code, selecting Web Hyperlink, entering the destination URL, and choosing a high-contrast colour. Once it is generated, place and size it in the layout, then test it with a QR code reader before sending the document to print.
How to Create and Edit QR Codes in Adobe InDesign
How do I make a QR code in Adobe InDesign?
QR codes are a handy way to connect a printed piece to something online. In this example, the code sits in the top-left corner of a page and opens a website when scanned.
To make one in InDesign, start on the page where you want the code to live, then go to:
Object > Generate QR Code
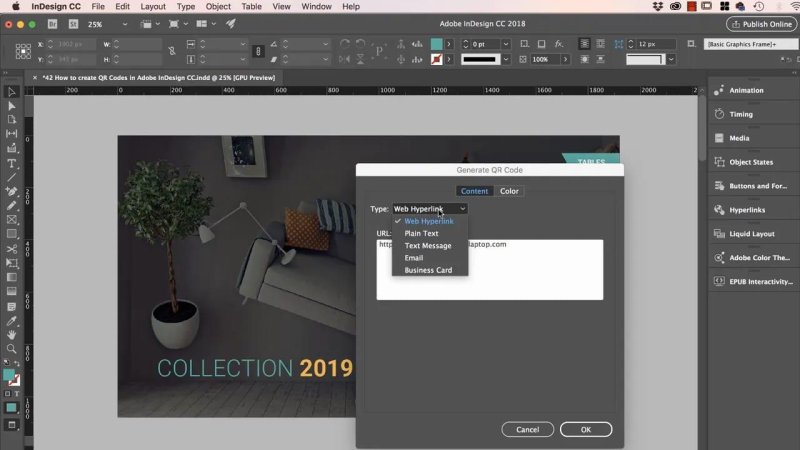
The Generate QR Code command opens a simple dialog for choosing what the code contains.
InDesign opens the Generate QR Code dialog, where you choose the kind of information the code should hold.
Choose What the QR Code Will Do
By default, InDesign sets the QR code type to Web Hyperlink. That is the important one, and probably the option you will use most often. Enter the full URL for the page you want people to reach.
There are other content types available as well. You can create a QR code for an email address, or even make one that displays plain text. Text QR codes could potentially work for something like a treasure hunt, where a scan reveals a clue. It is a slightly odd use case, but it is there if you need it.
For the vast majority of brochures, posters, flyers, and print layouts, stick with a web hyperlink. It gives the code a clear job: scan it, open the page.
Pick a Colour That Can Actually Be Scanned
After entering the URL, choose the QR code colour. You are not limited to black, but contrast matters a lot.
For a code sitting on a dark background, a light swatch such as Paper makes sense. It gives the camera a clear pattern to read. A dark code on a dark image, though, is asking for trouble. It might look tidy in the layout but be almost impossible for a phone to recognise.
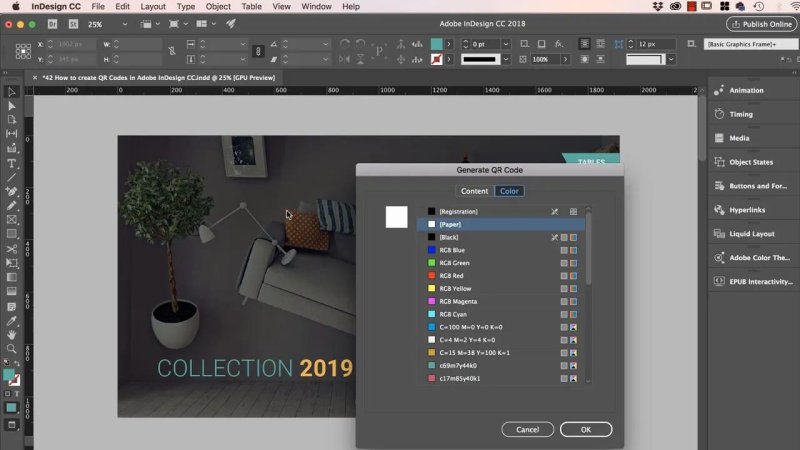
Choose a QR code colour with enough contrast against the artwork behind it.
Use this simple rule:
Choose a light QR code on a dark background.
Choose a dark QR code on a light background.
Avoid colours that blend into photographs, textures, or nearby type.
Do not assume a code works just because it looks good on screen.
White on a dark background is generally a nice, safe option. The QR pattern needs to be obvious to the camera, not merely fashionable.
Place and Size the Code in Your Layout
Once you confirm the dialog, InDesign generates the code. From there, drag it out to the size you need and position it in the design.
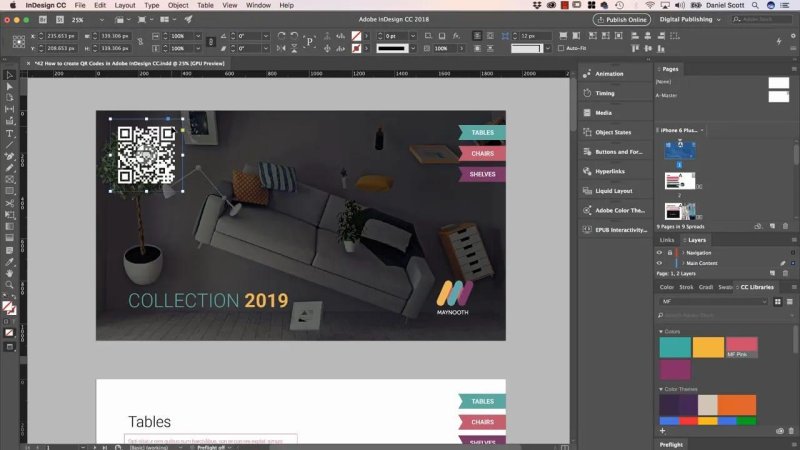
A light QR code is clearly visible against this dark page artwork.
Give the code enough room to breathe. Do not tuck it into a busy, low-contrast corner and hope for the best. The design still needs to look good, obviously, but the code also needs to do its job.
Test Before You Print
This is the bit that matters: test the QR code before it goes to print.
Scan it with a QR code reader and make sure it can be read easily and that it opens the correct destination. A wrong URL, poor contrast, or overly small code can turn a useful feature into a tiny square of disappointment.
Testing is especially important when the code is printed over an image or colour background. What looks perfectly fine at 100 percent on your monitor may not work as well once it is physically printed.
Edit an Existing QR Code
Need to change the link later, or decide the colour was a bit ambitious? Select the QR code, then choose:
Object > Edit QR Code
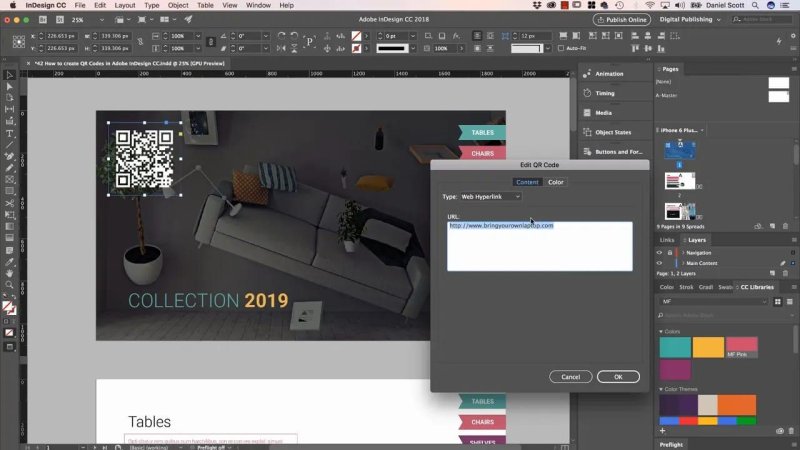
Select the placed code and use Edit QR Code to change its contents or appearance.
From there, you can adjust the information stored in the code or choose a different colour. This is much nicer than deleting the original and building a new one every time the destination changes.
Should You Rely on a QR Code?
Here is the slightly awkward bit. QR codes can be useful, but do not make them the only way someone can reach your content.
Not everyone has or uses a QR code reader. Some people will scan it immediately, some will ignore it, and some may not have the right tool set up on their phone. You might have an audience that loves QR codes and has a perfect reason to use them. Great. Use them.
Just do not rely on them one hundred percent.
If the QR code points to something important, include the web address as well. That gives people another route to the same destination and means the print piece still works even when the code is not scanned.
Use QR Codes as a Helpful Extra
A QR code can sometimes be part of the visual language of a modern, connected brand. You see the familiar mix of social icons, web addresses, and a QR code, and it can add a little “look how techy we are” energy to a design.
That is fine. Just make sure it is not there purely as a decorative little pixel square. Give it a useful destination, make it readable, test it, and provide a typed URL as backup.
That is the sensible way to use QR codes in Adobe InDesign: easy to generate, easy to edit, and much more effective when they are designed for the real world rather than just looking cool on the page.
FAQ's
Where is Generate QR Code in Adobe InDesign?
Choose Object > Generate QR Code. In the dialog, select the content type, enter the relevant information, choose a colour, and confirm.
Can an InDesign QR code link to a website?
Yes. Select Web Hyperlink in the Generate QR Code dialog and enter the URL you want the code to open.
Can I change a QR code after creating it in InDesign?
Yes. Select the code and choose Object > Edit QR Code to change its content or colour.
What colour should a QR code be?
Use a colour that strongly contrasts with its background. A light code on a dark background or a dark code on a light background is the safest approach.
Should a QR code be the only link in a printed design?
No. Include a readable web address too, particularly when the destination is important. A QR code is a helpful shortcut, not a reason to remove every other way of reaching the page.
Written by Daniel Walter Scott — Founder of Bring Your Own Laptop & Chief Instructor
