How To Add Video To Adobe InDesign CC Documents
Questions


Student Gallery
Be the first to share something.
Course info
Overview
- You will need a copy of Adobe InDesign 2018 or above. But you find that 95% of all the features in this course will work with earlier version of InDesign (e.g. CS6). A free trial can be downloaded from Adobe.
What am I going to get from this course?
- 70 lectures 5+ hours of well structured content.
- Create PDF Forms
- Master Long Documents.
- Advanced Fonts
- Master Styles
- Shortcut Sheet
- Create Charts & Infographics
- Create Interactive Documents
- Workflow Tactics
- Shortcuts & Speed Tips
- Advanced Creative Cloud Features
- Tips for working with Photoshop & Illustrator
- Using Scripts
- Exporting, Prepress & Printing tricks
- You will get the finished files so you never fall behind.
- Downloadable exercise files & cheat sheet.
- Forum support from me and the rest of the BYOL crew.
- Techniques used by professional graphic designers.
- Professional workflows and shortcuts.
- A wealth of other resources and websites to help your accelerate your career.
What is the target audience?
- This course is for people who already know InDesign and want to take their skills and speed to the maximum level.
- This is an advanced InDesign course, so you’ll need basic InDesign skills to find this course useful.
- This course is perfect for anyone that already knows how to insert images & add text.
- If you a completely new to InDesign try my InDesign Essentials course before starting this one.
- This course is perfect for anyone that has completed my InDesign Essentials course.
Course duration 7 hours 45 mins + your study.

Daniel Walter Scott
Founder of Bring Your Own Laptop & Chief Instructor
I discovered the world of design as an art student when I stumbled upon a lab full of green & blue iMac G3’s. My initial curiosity around using the computer to create ‘art’ developed into a full-blown passion, eventually leading me to become a digital designer and founder of Bring Your Own Laptop.
Sharing and teaching are a huge part of who I am. As a certified Adobe instructor, I've had the honor of winning multiple Adobe teaching awards at their annual MAX conference. I see Bring Your Own Laptop as the supportive community I wished for when I was first starting out and intimidated by design. Through teaching, I hope to bring others along for the ride and empower my students to bring their stories, labors of love, and art into the world.
True to my Kiwi roots, I've lived in many places, and currently, I reside in Ireland with my wife and kids.
Downloads & Exercise files
Transcript
Hi there, in this tutorial we're going to look at how to add video like this stuff in the background, that you put in yourself. And we'll look at those guys here where we're doing YouTube video. Hey, it's me, I'm saying "Hi" there. So we're going to add a video from myself and video from YouTube, and Vimeo. All sorts of video. And we're going to publish it online in our Interactive Catalog.
To add those two videos, we'll do our own video first. We're going to go down to our 'Chairs & Benches' page, so page 3. We need to find this Media Tab, if you can't find it over here go to 'Window', 'Interactive', and go to 'Media'. So in here, I'm going to, this little button down the bottom right here, and we're going to do video but you can totally do an mp3 file if you just want audio. We're going to go to 'Exercise Files', go to '04 Interactive'. There's only one mp4 in there. I got this from this website here, shared up to PexelsVideo. So videos.pexels.com, I'm probably not saying that right but there are free commercial use stuff, library stuff in here. Oh, awesome!
So I've used some stuff, let's jump back into InDesign. So, 'Video.mp4', let's click 'Open', and your cursor becomes loaded, what I'm going to do is drag it out to any odd size because I want to resize it afterwards. So it's too-- it's not quite how I want it. So I'm going to right click it and use our 'Fitting' and this, 'Fit Frame to Content'. So the box is the same size. What I want to do, I want to use it like a bit of a graphic in the background, I'll make it nice and big. And I'm going to kind of crop it in, and then maybe double click the center and move it across a bit. So we're doing some kind of cropping. Because it's kind of an abstract style video, it's kind of blurred out, I'm okay that it's just kind of cropped in a bit. You might not have the luxury to do that.
The other thing to do is, this is on a wrong layer now. It's because, over here, my Layers panel, we were working on that navigation earlier. So it's ended up in the wrong page. What I can do is, with it selected I can grab this dot, and just drag it down to this layer here and say, you're now in the main content, because I want the navigation to be above it. Now what I'm going to do, I'm going to clear off and lock that Navigation layer, so I don't wreck it. So I've got a video here. You've got some basic options. You can go over here and say-- there's a 'Play on Page Load' that's what I want, because I don't want to control this. If you do want to control this 'Skin Overall, we'll leave them on just so you can see them. I don't want them, so I'm going to get it to play by itself otherwise if you don't have controls, it's not going to play.
Next thing to do is preview it. There's EPUB Interactivity you can try, click on the first page, hit 'Play' and because we're on page 3, it should play page 3. There's my little navigation, slightly appearing over it, and there's my video playing. This will work when I hit 'Publish Online'. Takes a little time to publish online, so I'm going to leave that but you can see in here. I put the controllers in, watch this, if I roll up over there's a little Playhead that appears. So you can go and turn those on and off by closing that down, click on this guy, and go to 'Media' and with it selected, you can decide, actually I don't want any kind of play control, just want it to play by itself.
The one thing to know about using videos in your page is that the document can become quite big, and take a long time to load. What you might find easier is to use, say Vimeo or YouTube videos rather than your own videos that you floated into here. Both YouTube and Vimeo have great servers all over the place and they do that lovely buffering thing. You can adjust the quality of them depending on how fast your internet connection is. So there's some perks for using YouTube, especially if you've got lots of video, you don't want lots of videos bloating out your Page Load and it taking a very long time.
So first of all we need to jump out to YouTube or Vimeo. So in YouTube, find a video, any video, as long as it's got a picture of me in it. Once you've found it what you're looking for is the 'Share' option down here. And in the Share option, there's one called 'Embed' and that's the trick that we need. So there's a couple of things we can do in here before we get into InDesign. We came down here to say wherever we want to have those suggestive videos at the end I don't want those to appear at the end of my video. Do I want the video title? Can you see along the top there? I'm going to turn that off, I don't like that there. So I'm going to have the player controls to play or pause, that's totally going to be there and that's the main perks of it.
In terms of the height and width it's harder to change it in InDesign later on. So if you know the height and width you want it to be you can type it in here. There is a way of adjusting it, and then design afterwards, I'll show you how. Let's click 'Copy', jump back into InDesign, and all you do is go 'Edit', 'Paste', I'm going to use the shortcut. And that little kind of cube appears for a little while and eventually it turns it into a YouTube video, there it is, cool. So I don't have a space for it here, I should. I was just going to make this text up here, and you're going to be coming down there. You can preview it in your EPUB Interactivity. Go to, on the right page, we're going to hit 'Play'. Give it a second, that's going to play, there's my YouTube clip and it plays in here. Now it doesn't play properly in this little clip here, it does when you publish online.
One of the things I want to do before you go is, let's say you want to resize it. If I resize it just like I do in image, to fit, unfortunately it will, when I go back to my EPUB Reader - I've made it that big, watch this, if I hit 'Play' - it goes back to its original size. So it's kind of coded to be that size. So what I'd like to do is, I'm going to scale that up to the size I want. Here we go, so I want it to be about that sort of size. I'm going to take these dimensions here. So '782' + '445'. And what you do is, right click it, go to 'Edit HTML' and you need to type these in here, at least be proportionately high. So 782 x 445, click 'OK'. Now, if I go into my EPUB Interactivity preview thing it should be the right size. So you can either do that in YouTube before you bring it in, or you can right click it like I did, and edit the HTML.
If you're using Vimeo, it's the exact same option in Vimeo. So, in Vimeo here, remember you're only allowed to pick videos that have me in them. Then find the video you like, click on 'Share', see this little dart? And in here, you're looking for the same thing, you're looking for Embed. Vimeo has a nice little option, it says 'Show Options', and you can decide on your height and width here before you go into InDesign. The same sort of thing, you can 'Auto play' it. Do you need the text, does the video loop? Select all of this, copy it, and just paste it into InDesign.
All right buddies, that is using video inside Publish Online in Adobe InDesign.
Can you add videos to Adobe InDesign?
Yes. You can place your own MP4 video directly into an InDesign layout, or embed video hosted on YouTube and Vimeo. Both approaches work in Publish Online, but hosted video is often the better choice when you want faster page loading and several videos in the same interactive catalogue.
How to Add Video to Adobe InDesign Publish Online
There are two main ways to add video to an Adobe InDesign document for Publish Online:
Placed video files, such as an MP4 you have created or downloaded.
Embedded YouTube or Vimeo videos, pasted into InDesign using embed code.
Placing your own video gives you complete control over how it sits in the design. It is brilliant for decorative background footage, short product clips, or any video that needs to be carefully cropped into the page.
But there is a trade-off. Every video file you place contributes to the document load. If you pack a catalogue with lots of MP4s, it can become rather chunky and take longer to load online.
YouTube and Vimeo are useful alternatives because the video is hosted on their servers. They handle the buffering and can adapt video quality to the internet connection. For a publication with plenty of video, that can make the whole experience feel much smoother.
Add Your Own MP4 Video in InDesign
Start on the page where the video belongs. To access video controls, open the Media panel. If it is not already visible, go to Window > Interactive > Media.
From the Media panel, use the button at the bottom right to choose a video file. You can also use this area to add an MP3 if you only need audio, but for this example, choose an MP4.
There are plenty of sources for stock footage. Pexels Videos is one example of a library with free commercial-use video assets, which can be handy when you need something atmospheric rather than a very specific piece of footage.
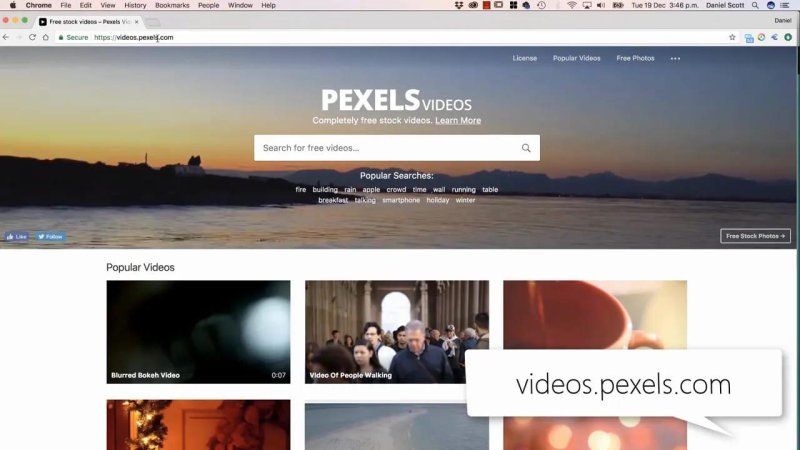
A stock-video library can be useful when you need an abstract or atmospheric clip for a layout.
Draw the Video Frame First
Once you select the MP4 and click Open, the cursor becomes loaded with the video. Drag out a frame on the page at any rough size. Do not worry too much about getting it perfect immediately, because you can resize and crop it afterwards.
For a video that is being used as a large visual background, make the frame big and crop the content within it. Right-click the video, use Fitting, and adjust the frame and content as needed. Double-clicking the content lets you reposition the actual video within its frame.
This works especially nicely with blurred, abstract, or texture-like footage. You can crop quite aggressively without worrying that an important detail has disappeared.
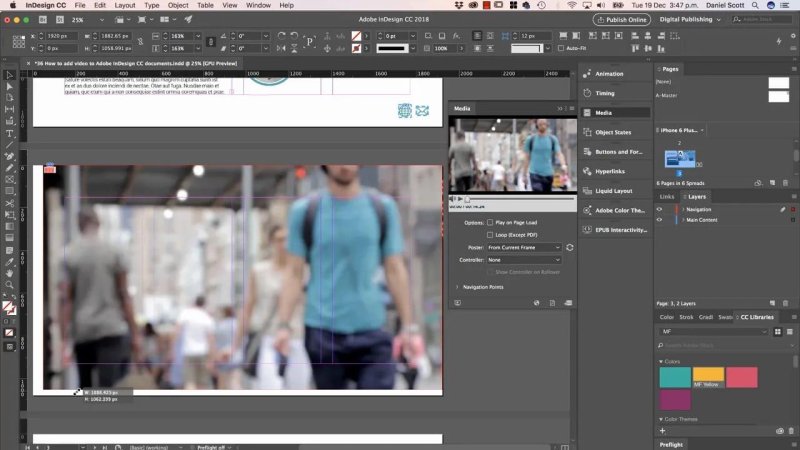
A large cropped video frame can work beautifully as a moving background element in a catalogue layout.
Put the Video on the Correct Layer
Layer order matters. If your navigation needs to remain above the video, make sure the video is on the main content layer and the navigation sits on a layer above it.
With the video selected, drag its coloured selection indicator in the Layers panel to the correct layer. Then lock the navigation layer once it is in place. That little bit of housekeeping stops you accidentally dragging or editing the navigation while working on the video.
Set Video Playback and Controls
Select the placed video and look in the Media panel for its playback options.
Play on Page Load: Use this when the video should start automatically, such as a decorative background clip.
Controller options: Turn these on when people need a visible play, pause, and scrub control.
Skin: Choose an overall controller skin if you want the controls displayed.
If you remove the controls, the video needs another way to start, such as playing on page load. Otherwise, there is nothing to press and the video simply will not play.
For a background video, autoplay with no controller is generally the cleaner choice. For instructional or feature video, controls are often more useful because people can pause, replay, or skip through the clip.
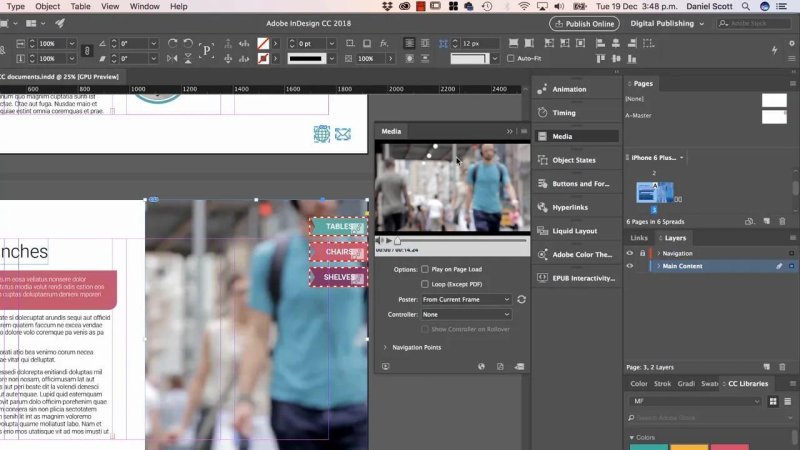
The Media panel is where you decide whether a placed video plays automatically or displays controls.
Preview Before Publishing
Use EPUB Interactivity Preview to check the page before publishing. Select the appropriate page and press play. This is a useful check for layout, layer order, autoplay, and the appearance of video controls.
Embedded online video may not behave perfectly inside the small preview panel, but it works properly once published online. The preview is still useful for checking your placed MP4 video and the rest of the interactive page around it.
Why YouTube and Vimeo Can Be Better for Larger Projects
Embedded video keeps the actual video file off your InDesign document. That matters when you have a lot of clips, longer clips, or content that would otherwise make a Publish Online document slow to load.
YouTube and Vimeo bring a few practical benefits:
Video is streamed from their infrastructure.
Playback can buffer as needed.
Quality can adapt to the available internet connection.
You avoid loading your publication up with multiple large video files.
The compromise is that you need the video hosted online, and you need to use its embed code. The process is simple once you know the trick.
Embed a YouTube Video in InDesign
First, find the video on YouTube. Under the video, choose Share, then select Embed. That Embed option is the bit you need.
Before copying the code, take a moment to adjust the available settings. You can decide whether suggested videos appear when the video ends, whether the title shows at the top of the player, and whether playback controls remain available.
For a cleaner catalogue design, it can be a good idea to turn off suggested videos and the title. Keeping player controls on is often sensible for an embedded YouTube clip, since it gives people a straightforward way to play and pause it.
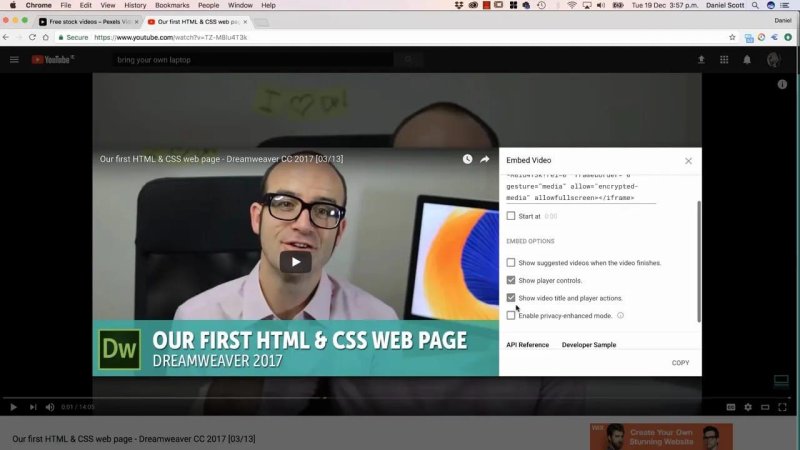
YouTube embed settings let you reduce clutter by controlling suggested videos, titles, and player controls before copying the code.
Set the Size Before You Paste
In the YouTube embed settings, you can enter the width and height before copying the code. This is worth doing because embedded video does not resize quite like a normal InDesign image.
Once the settings look right, click Copy. Back in InDesign, choose Edit > Paste, or use the normal paste shortcut. A small placeholder cube appears briefly, then resolves into the embedded YouTube video.
You can place it into the layout like any other page element, moving surrounding content to make room where needed.
Do Not Rely on Dragging to Resize an Embedded Video
Here is the slightly annoying bit. If you resize a YouTube embed visually in InDesign, it may still revert to the dimensions set in its underlying embed code during preview or publishing. In other words, it is effectively coded to its original size.
To change it properly, scale the video frame to the size you want and note its width and height. Then right-click the embedded video and choose Edit HTML. Replace the width and height values in the code with your desired dimensions, keeping the video proportional.
You can set those dimensions before importing from YouTube, or edit the HTML after pasting it into InDesign. Both routes work.
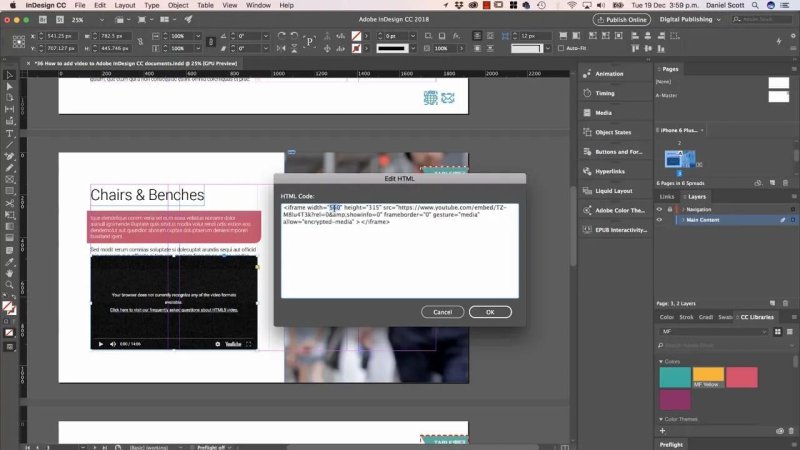
For an embedded video to keep its new size, update the width and height directly in the HTML embed code.
Embed a Vimeo Video in InDesign
Vimeo follows the same basic workflow. Open the Vimeo video, click Share, and find the Embed option.
Vimeo gives you a useful Show Options section before you copy the code. From there, you can choose the width and height as well as options such as autoplay, text display, and looping.
When the options are set, select and copy the complete embed code. Paste it directly into InDesign. Just as with YouTube, you can later edit the HTML if you need to correct the embedded player dimensions.
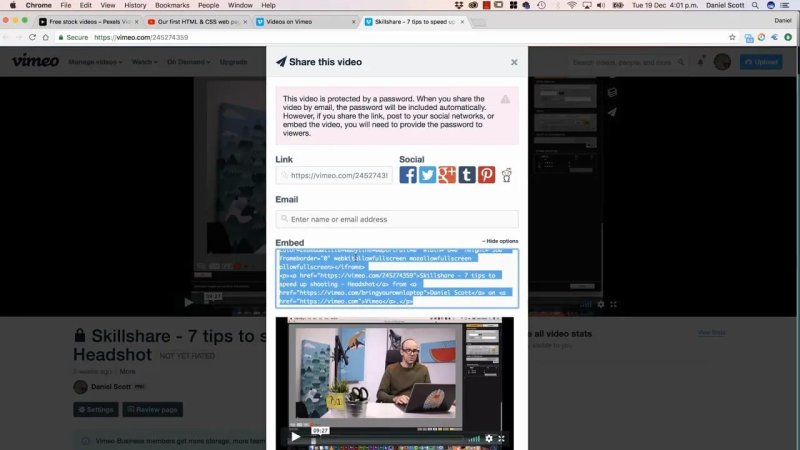
Vimeo provides the same essential embed workflow, with options for dimensions, autoplay, text, and looping.
A Practical Workflow for Video in Publish Online
For a tidy, responsive interactive catalogue, use each video type where it makes the most sense:
Use a placed MP4 when the video is part of the visual design, especially as a cropped background or a short decorative sequence.
Use YouTube or Vimeo embeds for longer content, multiple videos, or anything that would make the Publish Online document too heavy.
Keep navigation on a higher layer so it remains usable above any moving content.
Choose autoplay deliberately. It suits background footage, but a feature video usually benefits from visible controls.
Preview the page before publishing, then check the finished Publish Online version for final playback behaviour.
Set embedded dimensions in the code rather than expecting visual resizing alone to stick.
With those choices made upfront, video can turn a static InDesign layout into something much more alive, without making the online publication unnecessarily slow or difficult to use.
FAQ's
Can I add an MP4 directly to Adobe InDesign?
Yes. Open the Media panel, choose the video option, select your MP4, and draw a frame on the page. You can then crop, reposition, layer, and configure its playback settings.
Why is my InDesign Publish Online document loading slowly?
Placed video files can make a document much larger, particularly when there are several of them. Hosting videos on YouTube or Vimeo and embedding them can help reduce the amount of video content loaded directly into the publication.
Why does my embedded YouTube video return to its original size?
The embedded player dimensions are defined in its HTML code. Resize the item visually to find the dimensions you want, then use Edit HTML to update the width and height values in the embed code.
Can Vimeo videos autoplay in InDesign Publish Online?
Yes. Vimeo's Embed options include autoplay, alongside settings for width, height, text display, and looping. Set these before copying the embed code into InDesign.
Written by Daniel Walter Scott — Founder of Bring Your Own Laptop & Chief Instructor
