How To Create A Grep Style In Adobe InDesign CC
Questions





Student Gallery
Be the first to share something.
Course info
Overview
- You will need a copy of Adobe InDesign 2018 or above. But you find that 95% of all the features in this course will work with earlier version of InDesign (e.g. CS6). A free trial can be downloaded from Adobe.
What am I going to get from this course?
- 70 lectures 5+ hours of well structured content.
- Create PDF Forms
- Master Long Documents.
- Advanced Fonts
- Master Styles
- Shortcut Sheet
- Create Charts & Infographics
- Create Interactive Documents
- Workflow Tactics
- Shortcuts & Speed Tips
- Advanced Creative Cloud Features
- Tips for working with Photoshop & Illustrator
- Using Scripts
- Exporting, Prepress & Printing tricks
- You will get the finished files so you never fall behind.
- Downloadable exercise files & cheat sheet.
- Forum support from me and the rest of the BYOL crew.
- Techniques used by professional graphic designers.
- Professional workflows and shortcuts.
- A wealth of other resources and websites to help your accelerate your career.
What is the target audience?
- This course is for people who already know InDesign and want to take their skills and speed to the maximum level.
- This is an advanced InDesign course, so you’ll need basic InDesign skills to find this course useful.
- This course is perfect for anyone that already knows how to insert images & add text.
- If you a completely new to InDesign try my InDesign Essentials course before starting this one.
- This course is perfect for anyone that has completed my InDesign Essentials course.
Course duration 7 hours 45 mins + your study.

Daniel Walter Scott
Founder of Bring Your Own Laptop & Chief Instructor
I discovered the world of design as an art student when I stumbled upon a lab full of green & blue iMac G3’s. My initial curiosity around using the computer to create ‘art’ developed into a full-blown passion, eventually leading me to become a digital designer and founder of Bring Your Own Laptop.
Sharing and teaching are a huge part of who I am. As a certified Adobe instructor, I've had the honor of winning multiple Adobe teaching awards at their annual MAX conference. I see Bring Your Own Laptop as the supportive community I wished for when I was first starting out and intimidated by design. Through teaching, I hope to bring others along for the ride and empower my students to bring their stories, labors of love, and art into the world.
True to my Kiwi roots, I've lived in many places, and currently, I reside in Ireland with my wife and kids.
Downloads & Exercise files
How do GREP Styles work in InDesign?
GREP Styles automatically apply a Character Style when InDesign finds matching text inside a paragraph. Set up a Paragraph Style, connect it to a Character Style, then give it text or a GREP pattern to find. It is a little bit of magic, especially for long documents and repeat client work.
How to Use GREP Styles in Adobe InDesign
GREP Styles are one of those InDesign features that can feel properly magical. Type a business name and it becomes bold automatically. Put text inside quotation marks and it becomes italic. No manual highlighting, no hunting through pages, no forgetting a formatting rule halfway through a document.
They work by connecting a Paragraph Style with a Character Style. When text within a paragraph matches the rule you set, InDesign applies the chosen Character Style dynamically.
This makes GREP Styles brilliant for recurring formatting conventions, particularly in longer documents, templates, and client work where the same formatting rules come up again and again.
GREP Styles vs Nested Styles
GREP Styles and Nested Styles are closely related because both automate Character Styles within a Paragraph Style. The important difference is where they look for their trigger.
Nested Styles begin at the start of a paragraph. They are ideal for things such as numbered lists, lead-ins, labels, and consistent text at the beginning of every paragraph.
GREP Styles can search throughout the paragraph for a word, phrase, character, or pattern. They are better when the text you need to format could appear anywhere.
You do not need to choose one forever. Both are useful. Nested Styles are great when the beginning of the paragraph is home base. GREP Styles are for reaching through the text and finding the thing that matters wherever it appears.
Example 1: Automatically Format a Business Name
Say your business name is Maynooth Furniture, and your brand rules say it should always appear in bold. You could format every instance by hand, but that is slow and easy to miss. A GREP Style means every new occurrence is formatted as soon as you type it.
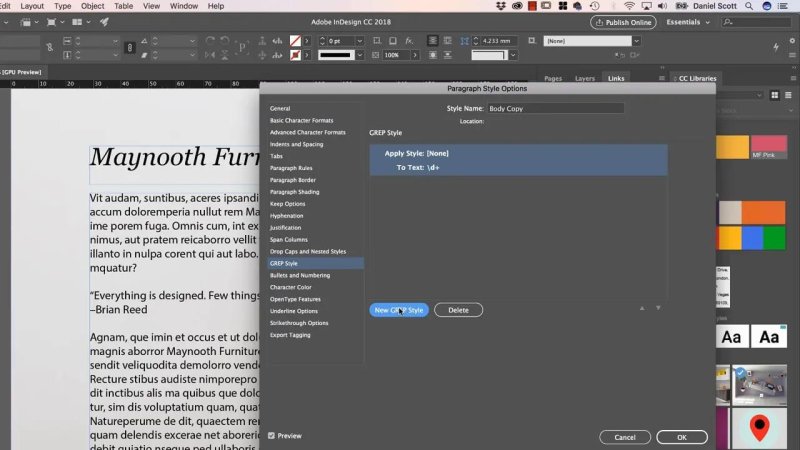
GREP Styles live inside Paragraph Style Options, where a character style can be linked to matching text.
1. Create the Paragraph Style
First, select the body text that should use this automation. Open the Paragraph Styles panel, create a style, and name it something useful, such as Body Copy.
The GREP Style will live inside this Paragraph Style, so only paragraphs using Body Copy will follow the rule.
2. Create a Character Style for the Business Name
Click away so that no text is selected, then open the Character Styles panel and create a new style. Name it Business Name.
Set the formatting you want. In this example, that is:
Bold type
A green character colour, purely to make the automation obvious
In real brand work, this might be bold only, italic, underlined, a particular colour, or a combination that matches the brand guidelines.
3. Connect the Styles with a GREP Rule
With nothing selected, open Body Copy in the Paragraph Styles panel. In Paragraph Style Options, choose GREP Style, then create a new GREP Style.
Choose Business Name as the Character Style to apply. Then replace the default search content with the exact wording you want InDesign to find:
Maynooth Furniture
Click OK. Every matching occurrence inside Body Copy paragraphs will receive the Business Name Character Style.
The handy part is that it remains dynamic. Add another occurrence later and InDesign formats it immediately. That is the whole point. Set the rule once, then let InDesign do its job.
Match Different Capitalisation When Needed
You can add more than one GREP Style to the same Paragraph Style. For example, if a term may appear with different capitalisation, create another rule for its lowercase version and apply the same Character Style.
That is probably not something you would want for a carefully controlled business name, but it is useful for recurring terminology, language conventions, or other text that may legitimately appear in more than one case.
Example 2: Italicise Text Inside Quotation Marks
Another lovely use is formatting a quote automatically. If text placed inside quotation marks should be italic, create a Character Style that does one job only: it makes the text italic.
1. Create a Quote Character Style
With no text selected, create a new Character Style called Quote. Under Basic Character Formats, set the font style to italic.
Do not add a colour unless you actually want one. If InDesign has accidentally picked up a colour setting and you need to clear it, hold Command on Mac or Control on Windows while clicking the setting to deselect it.
Keep this style simple. Its only job in the world is to italicise text.
2. Add Another GREP Style to Body Copy
Return to the Body Copy Paragraph Style and add another GREP Style. Select Quote as the Character Style to apply.
Then build a pattern that uses your opening and closing quotation marks along with the GREP token for any character. The useful token here is:
.+?
This represents a sequence of characters and is useful for finding the content between your quotation marks. Add the exact quotation marks used in the document around that pattern so InDesign can identify the quoted text correctly.
Be careful with the quotation marks. Straight quotes and curly quotes are different characters. If the document uses curly quotation marks, copy and paste those exact marks into the GREP field rather than assuming the straight quote key will match them.
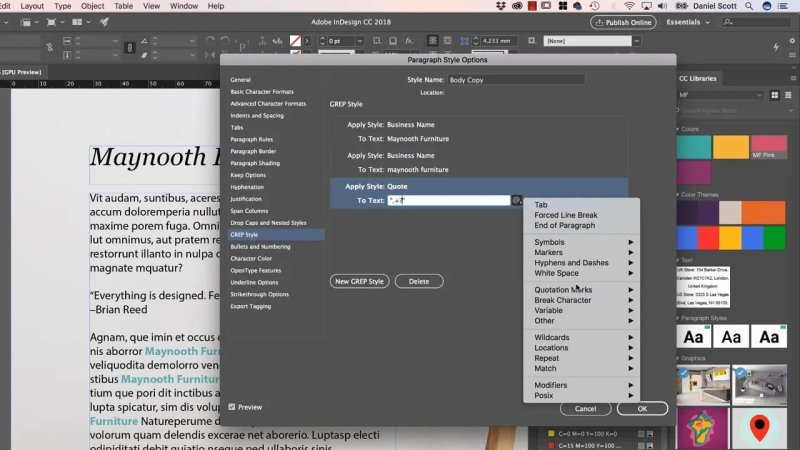
The GREP menu provides wildcards and other pattern-building options when a simple text match is not enough.
Once the rule is in place, text enclosed by a complete pair of quotation marks is italicised automatically. If only the opening quote is present, the style will not apply yet because InDesign has not found a completed match.
Build GREP Rules with Wildcards
You do not have to memorise every GREP expression. InDesign includes options for building patterns, including wildcards and character categories.
That means you can create rules that look for things such as:
Any digit between two specific characters
Any uppercase letter within a pattern
A repeated word or phrase
A particular punctuation pattern
There is a lot available here, and it can get quite technical. Honestly, for unusual GREP patterns, it is completely reasonable to search for an existing expression and adapt it rather than trying to derive every bit of GREP syntax from scratch.
When to Use GREP Styles
GREP Styles take a little time to set up, so they make the most sense when the formatting will be repeated. They are especially helpful when you are working with:
Long documents with recurring terms
Brand names that must always follow a style rule
Editorial templates with quoted passages
Documents containing consistent terminology or notation
Multiple jobs for the same client
For a one-off phrase in a tiny document, manual formatting may be quicker. But once a pattern repeats, GREP Styles start saving time and improving consistency. They make sure your formatting rules keep happening, even when you are busy doing the actual design work.
FAQ's
What is the difference between GREP Styles and Nested Styles in InDesign?
Nested Styles apply formatting from the beginning of a paragraph, while GREP Styles search throughout the paragraph for matching text or patterns. Nested Styles suit structured starts of paragraphs, while GREP Styles suit words, phrases, punctuation, and recurring patterns anywhere in the copy.
Do GREP Styles update automatically when I add text?
Yes. Once a GREP Style is attached to a Paragraph Style, text that matches its rule is formatted dynamically as it is entered or edited.
Why is my quote GREP Style not working?
Check that both opening and closing quotation marks are present, and confirm that the marks in your GREP pattern match the marks used in the document. Straight quotes and curly quotes are different characters, so they do not automatically match each other.
Written by Daniel Walter Scott — Founder of Bring Your Own Laptop & Chief Instructor
