Free Icons Using Adobe Market In InDesign CC
Questions


Student Gallery
Be the first to share something.
Course info
Overview
- You will need a copy of Adobe InDesign 2018 or above. But you find that 95% of all the features in this course will work with earlier version of InDesign (e.g. CS6). A free trial can be downloaded from Adobe.
What am I going to get from this course?
- 70 lectures 5+ hours of well structured content.
- Create PDF Forms
- Master Long Documents.
- Advanced Fonts
- Master Styles
- Shortcut Sheet
- Create Charts & Infographics
- Create Interactive Documents
- Workflow Tactics
- Shortcuts & Speed Tips
- Advanced Creative Cloud Features
- Tips for working with Photoshop & Illustrator
- Using Scripts
- Exporting, Prepress & Printing tricks
- You will get the finished files so you never fall behind.
- Downloadable exercise files & cheat sheet.
- Forum support from me and the rest of the BYOL crew.
- Techniques used by professional graphic designers.
- Professional workflows and shortcuts.
- A wealth of other resources and websites to help your accelerate your career.
What is the target audience?
- This course is for people who already know InDesign and want to take their skills and speed to the maximum level.
- This is an advanced InDesign course, so you’ll need basic InDesign skills to find this course useful.
- This course is perfect for anyone that already knows how to insert images & add text.
- If you a completely new to InDesign try my InDesign Essentials course before starting this one.
- This course is perfect for anyone that has completed my InDesign Essentials course.
Course duration 7 hours 45 mins + your study.

Daniel Walter Scott
Founder of Bring Your Own Laptop & Chief Instructor
I discovered the world of design as an art student when I stumbled upon a lab full of green & blue iMac G3’s. My initial curiosity around using the computer to create ‘art’ developed into a full-blown passion, eventually leading me to become a digital designer and founder of Bring Your Own Laptop.
Sharing and teaching are a huge part of who I am. As a certified Adobe instructor, I've had the honor of winning multiple Adobe teaching awards at their annual MAX conference. I see Bring Your Own Laptop as the supportive community I wished for when I was first starting out and intimidated by design. Through teaching, I hope to bring others along for the ride and empower my students to bring their stories, labors of love, and art into the world.
True to my Kiwi roots, I've lived in many places, and currently, I reside in Ireland with my wife and kids.
Downloads & Exercise files
Can I use free Adobe Market icons in an InDesign design and change their colours?
Yes. Download an editable SVG icon into a Creative Cloud Library, place it into InDesign, then open it in Illustrator to change its colour or shape. Once saved, the linked asset updates back in your InDesign document automatically, which is pretty handy.
How to Find, Edit and Use Free Adobe Market Icons in InDesign
The Creative Cloud app includes an Assets area with a Market section full of free design resources for commercial use. Icons are the main attraction, but there are also graphics, textures and UI design resources worth digging through.
On a Mac, open the Creative Cloud app from the small Creative Cloud icon in the menu bar. On a PC, look in the bottom-right area of the desktop. If it is hiding, open it from the Applications folder instead.
Once the app is open, go to Assets, then Market. There is loads in there, so do not try to scroll through everything. Use the search icon and search for the thing you actually need.
For a sale graphic, for example, search terms such as tag, price tag or swing tag will give you plenty of options.
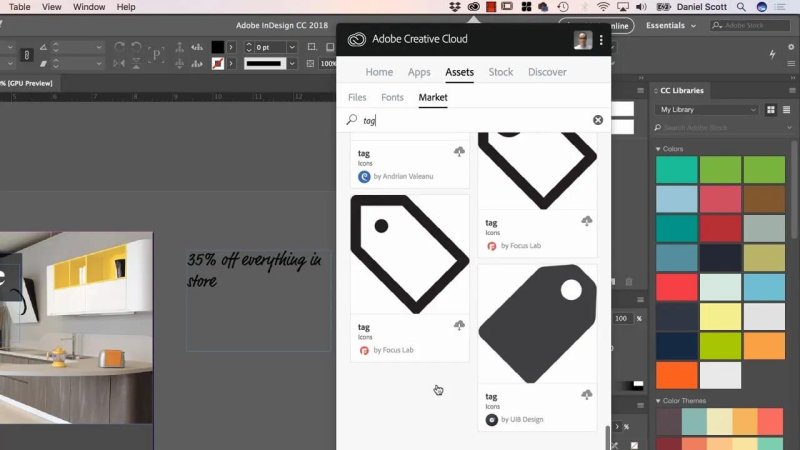
A focused search for tag assets quickly brings up several icon styles to choose from.
Choose SVG icons wherever possible
When choosing an icon, look for an SVG, which means Scalable Vector Graphic. SVG is the good stuff here because it is a vector format.
Vectors are much easier to work with than JPEG or PNG files. You can resize them without worrying about quality, and you can edit their individual shapes and colours in Illustrator. With a JPEG or PNG, you are generally into Photoshop territory, and it becomes a lot more awkward.
Once you have picked an SVG icon, click Download. Creative Cloud will ask where to save it, and this is where Creative Cloud Libraries become useful.
Create a library for the project
You might already have a default library called My Library. That is fine, but creating a dedicated library for each brand or project makes life much tidier. For a furniture company project, for instance, create a library named after that company and keep its colours, icons and graphics together.
After downloading, open the CC Libraries panel in InDesign. If it is not visible, go to Window > CC Libraries. Select the new project library from the dropdown and the downloaded tag should be sitting there ready to use.
Place the icon into InDesign at a sensible size
You can drag an asset directly from the CC Libraries panel onto the page. The only issue is that some Market icons arrive absolutely enormous because of the way the original designer built them.
If the asset comes in at a ridiculous size, right-click it in the CC Libraries panel and choose Place Linked. This gives you a loaded place cursor, or Place Gun, so you can click and drag to create the icon at approximately the size you want.
From there, resize and rotate it into place. For a sale graphic, angle the tag a little and position it over the image so it feels intentional rather than just stuck on top.
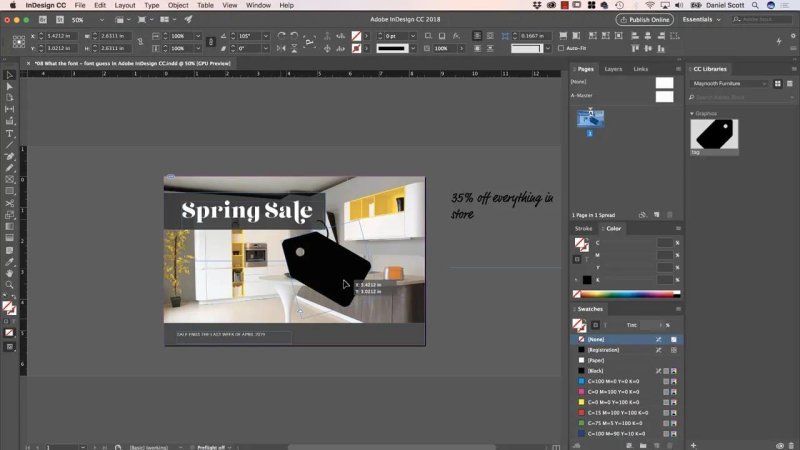
Place Linked gives you much better control when an icon arrives far larger than the layout needs.
Edit the colour in Illustrator, not InDesign
If you want dark text on the tag, the tag itself may need a lighter fill colour. InDesign is not really built for getting inside an SVG and changing its individual paths, colours and shapes. That is an Illustrator job.
The nice bit is that the handoff is straightforward:
In the CC Libraries panel, double-click the SVG asset.
It opens in the Adobe application it was made in, which for an SVG will commonly be Illustrator.
Use the white arrow, the Direct Selection tool, to select the coloured part you want to change.
Open Properties, find Fill, and choose the new colour.
Save the Illustrator file.
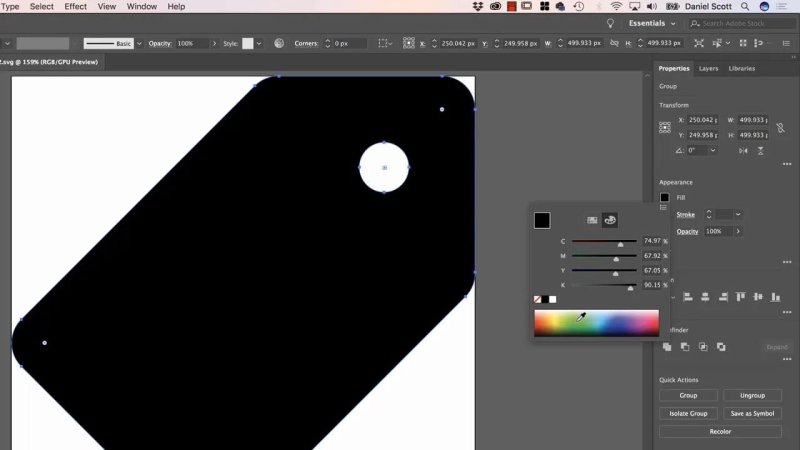
Selecting the vector shape in Illustrator makes changing the tag fill a quick job.
As soon as the Illustrator file is saved, the library asset updates. Back in InDesign, the placed linked graphic updates as well. You do not need to go hunting through the Links panel and force anything to happen. Just save the edit and let the Creative Cloud connection do its thing.
This is why using a linked SVG from a Creative Cloud Library is so useful. You can make a change once and keep the InDesign layout in sync with the editable source asset.
Add the sale text and arrange the tag
With the tag colour changed, add your sale message as text in InDesign. Bring the tag to the front so the text and shape sit properly over the background image.
You can do that with the arrange command:
Right-click the object.
Choose Arrange.
Select Bring to Front.
There is also a keyboard shortcut for moving an object all the way to the front: hold Command + Shift on Mac, or the equivalent modifier shortcut on PC, then use the second square bracket key beside the P key.
Rotate the tag and its text until the two feel like one graphic. A small amount of visual imperfection is fine. The goal is a readable sale tag that sits naturally in the composition.
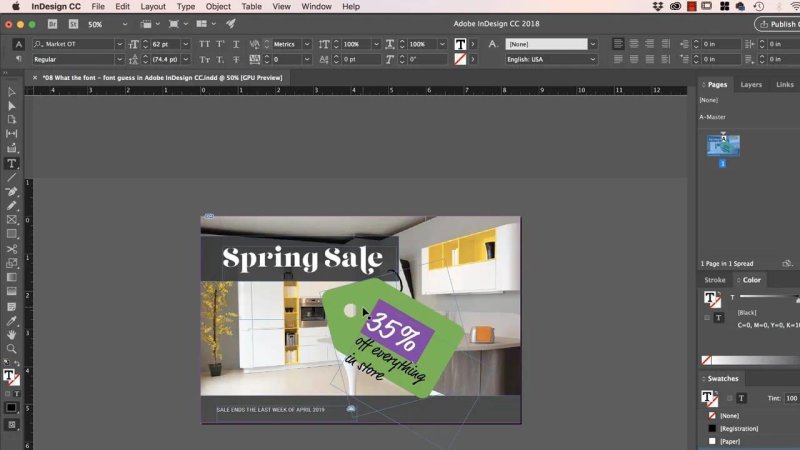
The finished tag becomes a strong focal point once the colour, text, rotation and stacking order are sorted.
Tighten the type with leading
When your tag includes several lines of text, the spacing between those lines can make or break it. This spacing is called leading.
Select the text and use the following shortcut to adjust leading quickly:
Hold Option on Mac or Alt on PC.
Press the down arrow to increase the leading.
Press the up arrow to decrease the leading.
For compact sale copy, decreasing the leading slightly can pull the lines together and make the message feel more like a unified graphic. If shortcuts are not your thing, adjust leading in the Character controls instead.
Use OpenType stylistic sets to refine the lettering
The font used for the tag can make a surprisingly big difference. An OpenType font such as Market OT, available through Typekit, can include stylistic alternates that change the character shapes without changing the font itself.
With the Type tool active, look for the OpenType options and test the available Stylistic Sets. In this case, a stylistic set changes the ends of the letters so they become cleaner and less scribbly. It is a small adjustment, but it can make display text much easier to read.
That is the real value of browsing Adobe Market assets: you get a useful starting point, then make it fit the job. Use an editable SVG, save it to the right Creative Cloud Library, place it as a linked asset, edit it in Illustrator, and finish the design properly in InDesign.
FAQ's
Why should I choose an SVG icon instead of a PNG or JPEG?
SVG icons are vectors, so they can be resized easily and their colours and shapes can be edited in Illustrator. PNG and JPEG files are less flexible and usually require Photoshop for more involved changes.
Where do I find CC Libraries in InDesign?
Go to Window > CC Libraries. Choose the library you created for the project from the panel dropdown to access the downloaded assets.
How do I update an SVG icon placed in InDesign?
Double-click the library asset to open it in Illustrator, edit the vector, then save it. The linked item in the Creative Cloud Library and the placed item in InDesign update automatically.
How can I change line spacing in InDesign quickly?
Select the text, hold Option on Mac or Alt on PC, then press the up arrow to decrease leading or the down arrow to increase it.
Written by Daniel Walter Scott — Founder of Bring Your Own Laptop & Chief Instructor
