How To Add Paragraph Borders & Shading In Adobe InDesign CC
Questions


Student Gallery
Be the first to share something.
Course info
Overview
- You will need a copy of Adobe InDesign 2018 or above. But you find that 95% of all the features in this course will work with earlier version of InDesign (e.g. CS6). A free trial can be downloaded from Adobe.
What am I going to get from this course?
- 70 lectures 5+ hours of well structured content.
- Create PDF Forms
- Master Long Documents.
- Advanced Fonts
- Master Styles
- Shortcut Sheet
- Create Charts & Infographics
- Create Interactive Documents
- Workflow Tactics
- Shortcuts & Speed Tips
- Advanced Creative Cloud Features
- Tips for working with Photoshop & Illustrator
- Using Scripts
- Exporting, Prepress & Printing tricks
- You will get the finished files so you never fall behind.
- Downloadable exercise files & cheat sheet.
- Forum support from me and the rest of the BYOL crew.
- Techniques used by professional graphic designers.
- Professional workflows and shortcuts.
- A wealth of other resources and websites to help your accelerate your career.
What is the target audience?
- This course is for people who already know InDesign and want to take their skills and speed to the maximum level.
- This is an advanced InDesign course, so you’ll need basic InDesign skills to find this course useful.
- This course is perfect for anyone that already knows how to insert images & add text.
- If you a completely new to InDesign try my InDesign Essentials course before starting this one.
- This course is perfect for anyone that has completed my InDesign Essentials course.
Course duration 7 hours 45 mins + your study.

Daniel Walter Scott
Founder of Bring Your Own Laptop & Chief Instructor
I discovered the world of design as an art student when I stumbled upon a lab full of green & blue iMac G3’s. My initial curiosity around using the computer to create ‘art’ developed into a full-blown passion, eventually leading me to become a digital designer and founder of Bring Your Own Laptop.
Sharing and teaching are a huge part of who I am. As a certified Adobe instructor, I've had the honor of winning multiple Adobe teaching awards at their annual MAX conference. I see Bring Your Own Laptop as the supportive community I wished for when I was first starting out and intimidated by design. Through teaching, I hope to bring others along for the ride and empower my students to bring their stories, labors of love, and art into the world.
True to my Kiwi roots, I've lived in many places, and currently, I reside in Ireland with my wife and kids.
Downloads & Exercise files
How do I add borders and shading to a paragraph in InDesign?
Place the text cursor anywhere in the paragraph, then open Paragraph Borders and Shading from the Paragraph panel menu. From there, you can add a border or coloured shading, adjust each side with offsets, and save the result in a Paragraph Style so it resizes automatically with the copy.
How to Add Paragraph Borders and Shading in Adobe InDesign
Sometimes a paragraph needs to do a bit more than just sit there looking like ordinary body copy. It might be an opening paragraph, a pull quote, a factoid, pricing information, or something that needs to be found quickly on the page.
InDesign's Paragraph Borders and Shading feature is brilliant for this. Instead of drawing boxes manually, you can attach borders and coloured backgrounds directly to a paragraph. The good bit is that they grow and shrink along with the text. Add more copy, remove copy, paste the style somewhere else, and the effect comes along for the ride.
Open the Paragraph Borders and Shading controls
Start with the Type tool and place the text cursor anywhere inside the paragraph you want to format. You do not need to highlight every character in it. Just make sure the insertion point is flashing in the right paragraph.
Then open the Paragraph panel menu, the little hamburger menu in the top-right area of the panel or control bar. Choose Paragraph Borders and Shading.
Turn on Preview first. It makes this whole process much less mysterious because you can see the result as you adjust the settings.
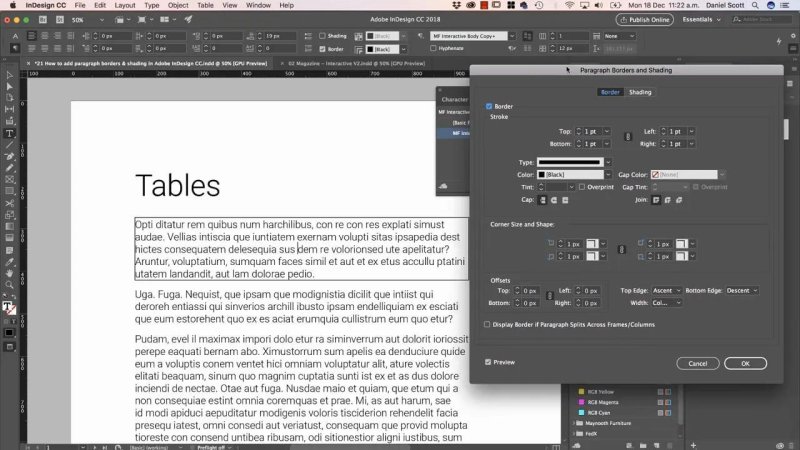
The Border tab gives you control over the line, its colour, and the space surrounding the paragraph.
Create a border around a paragraph
For a simple line around the outside of a paragraph, switch to the Border tab and enable Border On. That creates the basic enclosing line, but it will probably sit far too close to the text initially.
Use offsets as paragraph padding
The key controls are the Offsets. Think of these as padding between the copy and the border. Increase the offset and the border moves away from the paragraph.
By default, the four offset values are linked. Adjust one and all four sides move together, which is useful when you want an even border around the paragraph. If you need a less symmetrical effect, unlink the values and set each side separately.
Increase all offsets together for a neat box with breathing room.
Increase the bottom offset if the border needs more room before the next paragraph.
Adjust one side independently to create a deliberately uneven or more graphic treatment.
You may also need to increase Space After in the Paragraph settings. The border can extend beyond the paragraph itself, but Space After pushes the following paragraph down so the layout does not feel cramped.
Choose the border colour and corner treatment
Pick a swatch for the border colour, then choose the corner treatment you want to use. If you are going for something a little more playful, choose a corner such as the bottom-right one, unlink the corner controls, and apply a decorative option like Fancy.
Do not be surprised if the fancy corner appears almost invisible at first. Increase its size value until the effect becomes obvious. It is a slightly naff little corner treatment, sure, but sometimes that is exactly the job.
Save the border as a Paragraph Style
A border becomes properly useful when it is part of a Paragraph Style. Once the first paragraph has the border, text colour, and spacing you want, create a new Paragraph Style and give it a sensible name, such as First Para.
Now you can click into any paragraph and apply the style. The border, colour, spacing, and any other formatting all appear at once.
Be careful with Based On
When creating a Paragraph Style, InDesign may automatically base it on another existing style. This means the new style inherits settings from the original style and adds its own changes on top.
That is great when you understand the relationship and are working in a large document with a well-planned style system. But it can get confusing quickly. Delete or alter the parent style later, and other styles based on it may change too.
For many everyday documents, keeping a style set to Based On: No Paragraph Style is the safer option. It becomes a self-contained style with its own font, colour, border, and spacing, so there are fewer surprises later.
Add paragraph shading instead of a border
The Shading tab works in much the same way, except it fills an area behind the paragraph rather than drawing a line around it. Enable Shading On, choose a swatch, and set the tint to 100% if you want a solid colour.
Again, the offsets do the real work. Increase them to create space around the text and form a coloured panel behind the paragraph. You can unlink the values and use a rounded corner on one side to make it a little less boxy.
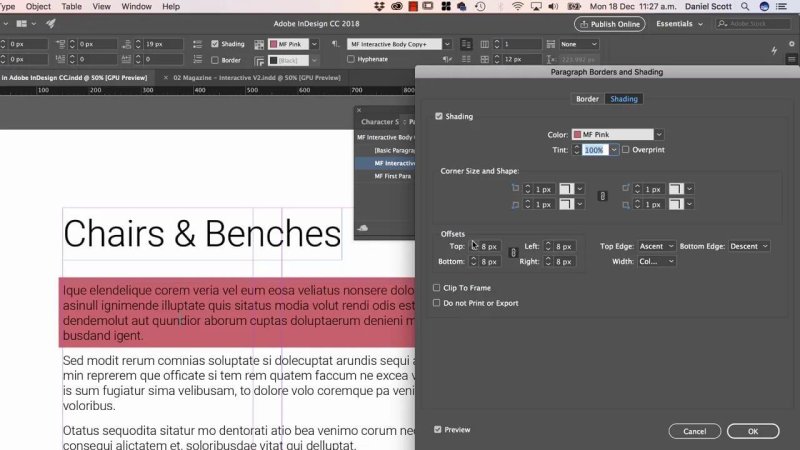
A solid shading colour and generous offsets turn an ordinary first paragraph into a strong introductory panel.
If the text needs to remain readable over a darker swatch, change the character colour as well. A light text colour on a dark shaded paragraph can make a proper visual feature of that opening block.
Create a vertical side marker with negative offsets
One of the nicest uses of paragraph shading is not shading the whole paragraph at all. Instead, use it to create a coloured marker down the side of the text.
Open the Shading controls, turn shading on, unlink the offsets, and push the right-hand offset into a large negative value. This pulls the shaded area away from the paragraph, leaving a narrow coloured strip beside it. Adjust the left offset a little if needed, and keep nudging the right value until the strip sits where you want it.
For bigger jumps, hold Shift while clicking the offset controls. InDesign changes the value in larger increments, which saves a lot of clickety-clicking.
This is useful for a first paragraph, but it also works beautifully for:
Pull quotes
Important facts or statistics
Pricing details
Short callouts within longer copy
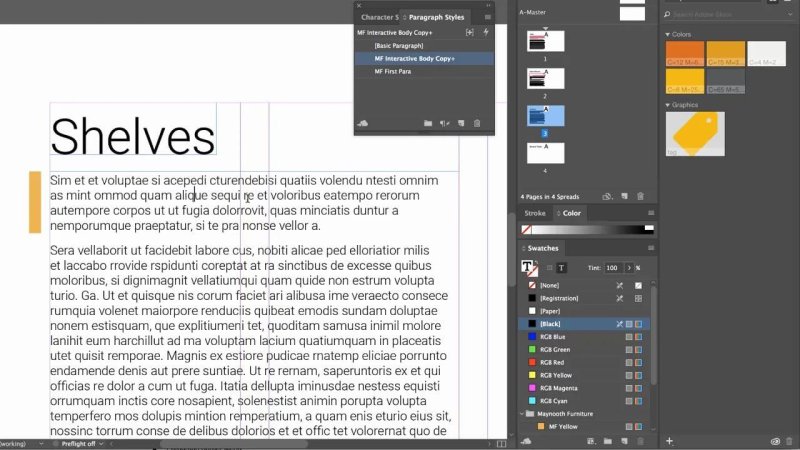
A narrow shaded strip creates a clear visual cue without covering the paragraph in colour.
You could draw a separate rectangle next to the text, of course. But a manually drawn shape does not know anything about the paragraph. If the copy gets longer, you have to resize and reposition it yourself. Paragraph shading simply adjusts to fit the paragraph automatically.
Make shading run off the side of the page
For a more graphic layout treatment, use shading that extends beyond the text frame and runs off the side of the page. This works especially nicely behind a title or a first paragraph.
In the Shading tab, unlink the offsets and increase the left offset until the colour reaches and passes the page edge. Add a small amount of offset at the top, bottom, and right to keep the shape looking intentional rather than accidentally clipped.
Set the character colour to Paper if you are placing light text over a darker shade. The result is a coloured band that feels like part of the page design rather than an object awkwardly placed behind the copy.
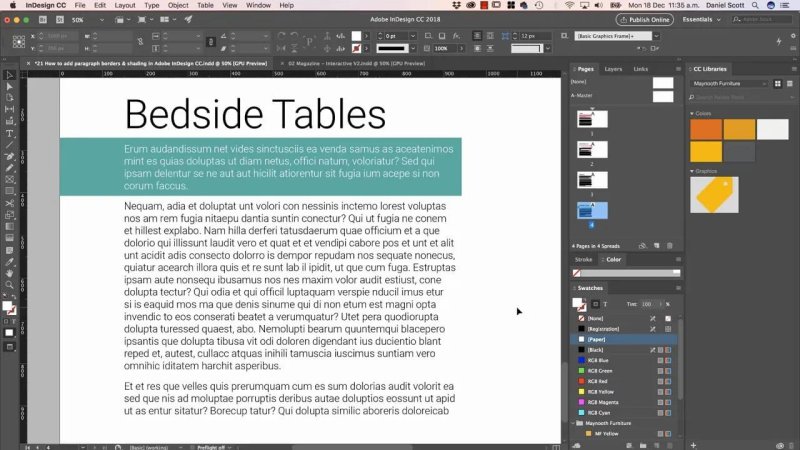
Extending the shading beyond the text frame creates a simple, confident full-bleed-style graphic accent.
Why paragraph borders and shading beat drawn boxes
The real advantage here is responsiveness. Borders and shading belong to the paragraph, not to a separate rectangle on the page. As the paragraph becomes larger or smaller, the effect adjusts with it.
That means you can paste more copy into the paragraph, cut it down, move it to another page, or apply the Paragraph Style elsewhere without having to rebuild the design treatment. It stays attached, it stays updateable, and it stays useful.
There are three solid approaches to keep in your InDesign toolkit:
Paragraph borders for a line around the outside of text.
Full paragraph shading for coloured opening paragraphs, callouts, and highlights.
Offset shading for side markers and shading that runs right off the page.
Start with something simple, then play with the offsets. That is where most of the paragraph shading awesomeness lives.
FAQ's
Do I need to select the whole paragraph to add a border in InDesign?
No. Place the text cursor anywhere within the paragraph, then open Paragraph Borders and Shading. The formatting applies to the entire paragraph.
Will a paragraph border resize when I edit the text?
Yes. Paragraph borders and shading are attached to the paragraph, so they expand and contract as the copy changes.
How can I make a coloured bar beside a paragraph in InDesign?
Use Paragraph Shading, unlink the offset values, and apply a large negative offset to one side. This pulls the shaded area away from the text and leaves a narrow coloured side marker.
Written by Daniel Walter Scott — Founder of Bring Your Own Laptop & Chief Instructor
