Importing Colors & Setting Default Colors In Adobe InDesign CC
Questions


Student Gallery
Be the first to share something.
Course info
Overview
- You will need a copy of Adobe InDesign 2018 or above. But you find that 95% of all the features in this course will work with earlier version of InDesign (e.g. CS6). A free trial can be downloaded from Adobe.
What am I going to get from this course?
- 70 lectures 5+ hours of well structured content.
- Create PDF Forms
- Master Long Documents.
- Advanced Fonts
- Master Styles
- Shortcut Sheet
- Create Charts & Infographics
- Create Interactive Documents
- Workflow Tactics
- Shortcuts & Speed Tips
- Advanced Creative Cloud Features
- Tips for working with Photoshop & Illustrator
- Using Scripts
- Exporting, Prepress & Printing tricks
- You will get the finished files so you never fall behind.
- Downloadable exercise files & cheat sheet.
- Forum support from me and the rest of the BYOL crew.
- Techniques used by professional graphic designers.
- Professional workflows and shortcuts.
- A wealth of other resources and websites to help your accelerate your career.
What is the target audience?
- This course is for people who already know InDesign and want to take their skills and speed to the maximum level.
- This is an advanced InDesign course, so you’ll need basic InDesign skills to find this course useful.
- This course is perfect for anyone that already knows how to insert images & add text.
- If you a completely new to InDesign try my InDesign Essentials course before starting this one.
- This course is perfect for anyone that has completed my InDesign Essentials course.
Course duration 7 hours 45 mins + your study.

Daniel Walter Scott
Founder of Bring Your Own Laptop & Chief Instructor
I discovered the world of design as an art student when I stumbled upon a lab full of green & blue iMac G3’s. My initial curiosity around using the computer to create ‘art’ developed into a full-blown passion, eventually leading me to become a digital designer and founder of Bring Your Own Laptop.
Sharing and teaching are a huge part of who I am. As a certified Adobe instructor, I've had the honor of winning multiple Adobe teaching awards at their annual MAX conference. I see Bring Your Own Laptop as the supportive community I wished for when I was first starting out and intimidated by design. Through teaching, I hope to bring others along for the ride and empower my students to bring their stories, labors of love, and art into the world.
True to my Kiwi roots, I've lived in many places, and currently, I reside in Ireland with my wife and kids.
Downloads & Exercise files
How do I import brand colours into InDesign and keep them for future documents?
Use the Swatches panel menu to load swatches from an existing InDesign file, then organise them into colour groups. To make them appear in every new document, load the swatches while no documents are open. Existing documents will not update automatically.
How to Import, Organise and Save Brand Colours in Adobe InDesign
If you have already built a set of brand colours in another InDesign job, there is no reason to rebuild every swatch by hand. You can pull those colours directly from an old InDesign document, store several client palettes in tidy groups, and even set up your own default swatches for every new file.
This is especially handy for freelancers working across several brands, or for in house designers who always need the same company colours ready to go.
Import swatches from an existing InDesign document
You could create a new swatch, double click it, and enter the CMYK values manually. That works perfectly well when you have the values in front of you. But if the colours already exist in another InDesign document, there is a much quicker option.
Open the Swatches panel through Window > Color > Swatches. From the panel menu, choose Load Swatches.
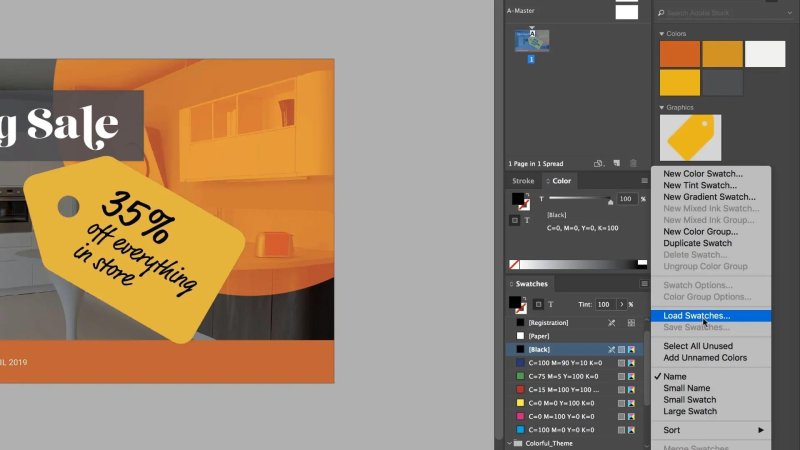
Load Swatches is the quick route to colours already saved in another InDesign file.
InDesign supports Adobe Swatch Exchange files, also known as ASE files, which are designed specifically for moving swatches between Adobe applications. However, in most real world workflows, it is easier simply to use an existing InDesign file.
Choose Load Swatches from the Swatches panel menu.
Locate an INDD file that already contains the colours you need.
Select the file and click Open.
InDesign looks inside the selected document and imports its available swatches. That means an old flyer, article, brochure, or campaign file can become a quick source for a brand palette. Nice and easy. Steal the colours from the old document and get on with the job.
Make imported colours your default swatches
There is one little catch. If you import colours into an open document and then create a new one, the colours will not come with you. The new document uses InDesign's standard default swatches instead.
To make a swatch set stick for all new documents, you need to change the defaults while no documents are open.
Close all open InDesign documents.
Make sure the application is back at the start screen or has no document open.
Open the Swatches panel.
Choose Load Swatches from the panel menu.
Select the InDesign file containing your brand colours.
Now create a fresh document. The imported colours should be sitting in the Swatches panel, ready to use. Quick, simple, easy, awesome.
Important: defaults only affect new files
Changing the default swatches does not retroactively add colours to every document you have ever made. Older documents keep the swatches they had when they were created.
That is the slightly annoying limitation: your new default palette applies only to documents created after you make the change.
Organise multiple client palettes with colour groups
If you work for one company all the time, a single permanent brand palette is great. If you are a freelancer working across lots of clients, though, a long unorganised swatch list gets ugly very quickly.
The answer is colour groups. They behave like folders in the Swatches panel, letting you bundle each client's palette into a collapsible group.
Click the first swatch you want in the group.
Hold Shift and click the last swatch to select the range.
Click the folder icon at the bottom of the Swatches panel.
Name the new group after the client or brand.
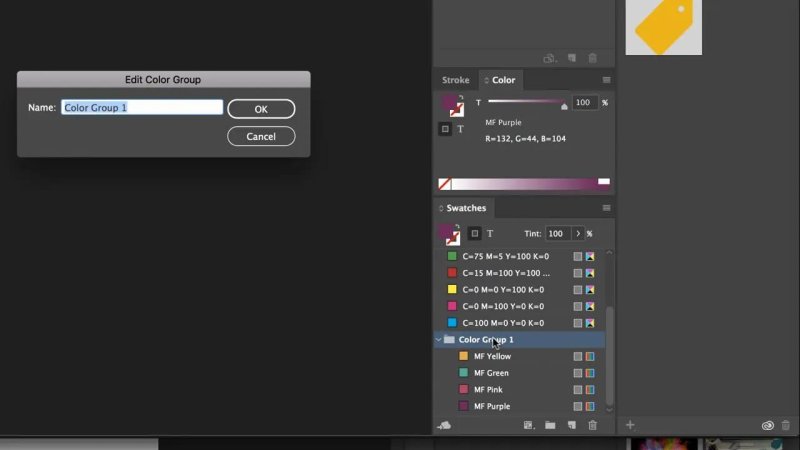
Colour groups keep each client's palette together instead of leaving a giant messy swatch list.
You can then collapse the group when you do not need it. Load another client's swatches, select those colours, and put them in their own group as well. A panel containing groups such as Menuth Furniture, FedEx, and Google is much easier to work with than a pile of random colour names.
Once you have this set up as a default, every new document starts with a tidy collection of client colour groups ready to go.
Create a blank InDesign colour library file
Because default swatches only apply to new documents, it is useful to make a dedicated colour library document. This is simply a blank InDesign file whose only job is to hold your swatches.
Create a new document that contains all your grouped brand colours, save it somewhere sensible, such as a shared server or a reliable folder, and give it an obvious name like Brand Colours.
You do not need to put any design work into this file. A blank page is fine. Its value is in the Swatches panel.
When an older document needs your full palette, open that document, choose Load Swatches, and point InDesign at your colour library file. It becomes a reusable source for all the swatches you need, without depending on one old campaign document being around forever.
Remove unwanted default swatches
Once you are setting up your own defaults, you may decide you do not want InDesign's standard colour mixes cluttering the panel. If there are colours you never use, select them and click the bin icon.
When you delete those swatches while no documents are open, they are removed from the default set. New documents will no longer start with them.
You might keep a colour you use regularly, such as magenta for warnings or temporary design marks. The point is to make the panel suit the way you actually work.
Do not use Registration for ordinary black
One swatch worth understanding is Registration. It is not normal black. Registration uses 100% of cyan, magenta, yellow, and black, so it prints on every separation.
Unless you specifically know why it is needed, do not use Registration for text, shapes, or design elements. Use the regular Black swatch instead.
You will also notice that certain bracketed default swatches cannot be deleted. That is normal. InDesign protects them.
Clean up unused swatches at the end of a job
A document can gradually collect loads of unnamed colours, accidental swatches, and leftovers from earlier versions. By the end of a project, that can make finding the colour you actually need much harder than it should be.
InDesign has a very handy cleanup command for this.
Make sure nothing is selected. Use the black Selection tool and click on an empty area of the pasteboard.
Open the Swatches panel menu.
Choose Select All Unused.
Click the bin icon to delete the selected swatches.
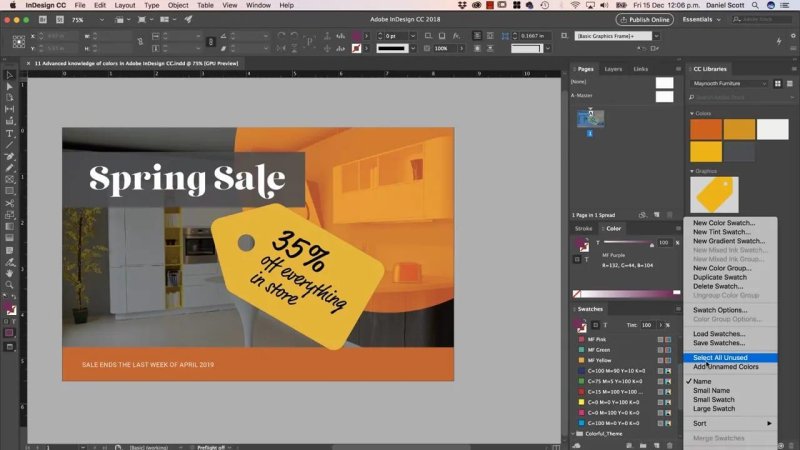
Select All Unused quickly identifies swatches that are no longer doing anything in the document.
InDesign checks the entire document and selects colours that are not being used. You can then remove them in one go and leave the panel much cleaner.
Do take a quick look before binning everything. Occasionally a swatch can appear unused even though you expected it to be present, so it is worth knowing what is being removed. But as a general end of job cleanup tool, Select All Unused is brilliant.
A cleaner colour workflow in InDesign
The useful workflow is simple:
Import existing colours from an old INDD file instead of rebuilding them.
Load swatches with no documents open to make them defaults for future files.
Use colour groups to keep every client palette organised.
Save a blank colour library document for loading swatches into older jobs.
Remove unwanted defaults if they are just getting in the way.
Use Select All Unused to clean up swatches when a project is finished.
Once this is set up, the Swatches panel stops being a random dumping ground and becomes a proper, reusable brand colour system.
FAQ's
Can I import swatches from another InDesign file?
Yes. Open the Swatches panel menu, choose Load Swatches, select the existing INDD file, and InDesign will import the swatches it finds.
Why do my imported swatches disappear in a new InDesign document?
Swatches loaded into an open document belong to that document. To make them available in new files, close all documents first and load the swatches with no document open.
Do default swatches update old InDesign documents?
No. Default swatch changes apply only to new documents. For older files, load swatches manually from your colour library document.
What is the best way to manage colours for multiple clients in InDesign?
Create a colour group for each client or brand. This keeps each palette together, collapsible, and much easier to find in a busy Swatches panel.
Can I delete the Registration swatch in InDesign?
No. Registration is a protected default swatch. It should not be used as ordinary black because it prints at 100% on every colour separation.
Written by Daniel Walter Scott — Founder of Bring Your Own Laptop & Chief Instructor
