How To Use The Color Theme Tool In Adobe InDesign CC
Questions


Student Gallery
Course info
Overview
- You will need a copy of Adobe InDesign 2018 or above. But you find that 95% of all the features in this course will work with earlier version of InDesign (e.g. CS6). A free trial can be downloaded from Adobe.
What am I going to get from this course?
- 70 lectures 5+ hours of well structured content.
- Create PDF Forms
- Master Long Documents.
- Advanced Fonts
- Master Styles
- Shortcut Sheet
- Create Charts & Infographics
- Create Interactive Documents
- Workflow Tactics
- Shortcuts & Speed Tips
- Advanced Creative Cloud Features
- Tips for working with Photoshop & Illustrator
- Using Scripts
- Exporting, Prepress & Printing tricks
- You will get the finished files so you never fall behind.
- Downloadable exercise files & cheat sheet.
- Forum support from me and the rest of the BYOL crew.
- Techniques used by professional graphic designers.
- Professional workflows and shortcuts.
- A wealth of other resources and websites to help your accelerate your career.
What is the target audience?
- This course is for people who already know InDesign and want to take their skills and speed to the maximum level.
- This is an advanced InDesign course, so you’ll need basic InDesign skills to find this course useful.
- This course is perfect for anyone that already knows how to insert images & add text.
- If you a completely new to InDesign try my InDesign Essentials course before starting this one.
- This course is perfect for anyone that has completed my InDesign Essentials course.
Course duration 7 hours 45 mins + your study.

Daniel Walter Scott
Founder of Bring Your Own Laptop & Chief Instructor
I discovered the world of design as an art student when I stumbled upon a lab full of green & blue iMac G3’s. My initial curiosity around using the computer to create ‘art’ developed into a full-blown passion, eventually leading me to become a digital designer and founder of Bring Your Own Laptop.
Sharing and teaching are a huge part of who I am. As a certified Adobe instructor, I've had the honor of winning multiple Adobe teaching awards at their annual MAX conference. I see Bring Your Own Laptop as the supportive community I wished for when I was first starting out and intimidated by design. Through teaching, I hope to bring others along for the ride and empower my students to bring their stories, labors of love, and art into the world.
True to my Kiwi roots, I've lived in many places, and currently, I reside in Ireland with my wife and kids.
Downloads & Exercise files
How do you pick colours from an image in InDesign?
Use the Color Theme tool to generate a palette from the artwork on your page, then save those colours to Swatches or a Creative Cloud library. It is a quick way to replace random colours with shades that actually belong with the image and make the whole layout feel more intentional.
How to Use the InDesign Color Theme Tool to Match Colours from an Image
If a flyer, poster, or social graphic has a colour that feels a bit randomly chosen, the background image is usually the best place to look for a better palette. InDesign’s Color Theme tool can pull a set of colours from the page and turn them into reusable swatches.
In this example, the bright green sale tag does not really connect with the kitchen image behind it. The goal is to sample colours from that image, save a useful palette, then use those colours throughout the document.
Find the Color Theme tool in InDesign
The Color Theme tool is tucked in with the Eyedropper tool. Click and hold the Eyedropper icon in the Tools panel, then choose Color Theme Tool from the fly-out menu.
With the tool active, click anywhere on the page. InDesign analyses the artwork and creates a group of five colour swatches based on the colours it finds.
The important thing to know is that the click location does not limit the sampling area. Even if you click directly on the background image, InDesign considers colours from the entire page.
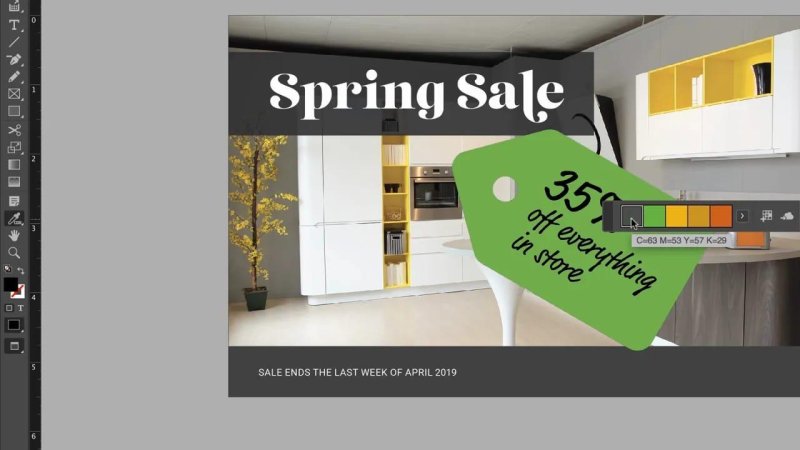
The Color Theme tool builds a palette from the colours currently present across the page.
Remove colours you do not want sampled
This whole-page sampling behaviour matters. If an unwanted element is sitting on top of the image, its colour can show up in the generated theme.
Here, the green sale tag is the colour we are trying to replace, but it is being included in the first palette. The simple fix is to cut that tag temporarily, leaving it on the clipboard. Generate the theme again and the green is no longer influencing the result.
That gives you a palette led by the background image instead of the distracting colour you are trying to get rid of.
Choose a colour variation that fits the design
After creating a colour theme, use the small arrow in the Color Theme panel to try different variations. The default is Colorful, but there are also options such as:
Dark
Deep
Muted
These variations can be quite similar, but they give you a quick way to steer the mood of the palette. For this flyer, the colorful option keeps the warmer orange and yellow tones from the kitchen image, which works nicely for a spring sale design.
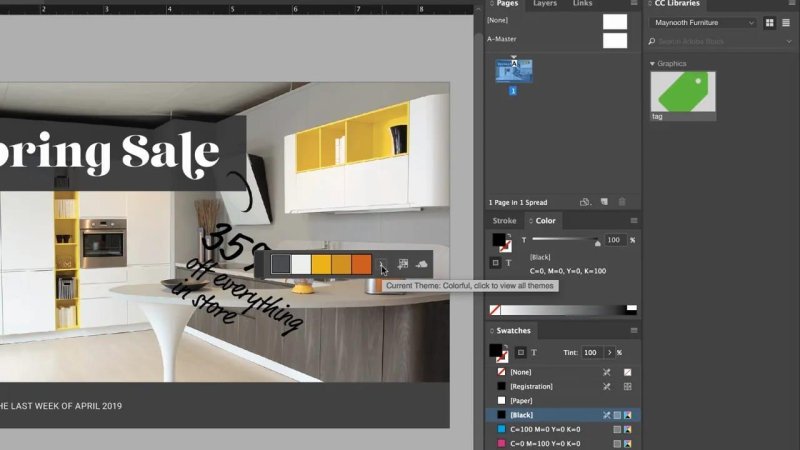
Use the theme menu to test colorful, dark, deep, or muted versions before committing to a palette.
Save the generated palette to Swatches
Once you have a palette you like, add it to the Swatches panel. InDesign creates a colour group containing the theme colours, so they are ready to apply again without sampling the image each time.
This is much better than manually guessing at similar colours. The choices are now connected to the image, and they remain available while you work through the rest of the layout.
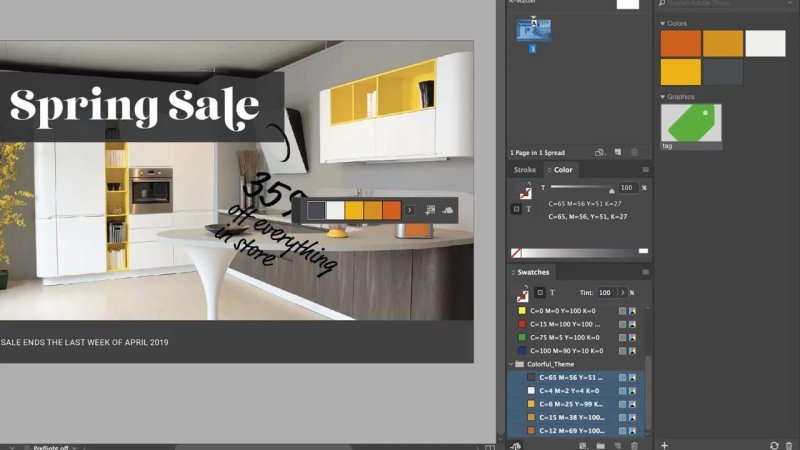
Saving the theme creates a reusable colour group for the document.
Add the colours to a Creative Cloud library
You can also add the theme colours to a Creative Cloud library. This is particularly useful when the layout includes artwork that needs to be edited in Illustrator.
Adding the palette to the library means the same image-led colours travel with you between Adobe applications. Rather than trying to rebuild the palette in Illustrator, the swatches are already there and ready to use.
Recolour an Illustrator asset with the new palette
Paste the sale tag back into the InDesign layout. If it needs to move behind another object, send it backward one level using:
Command + [ on Mac
Control + [ on Windows
Then double-click the library asset to open it in Illustrator. Because the colours were saved to the Creative Cloud library, the new swatches appear there as well.
Select the tag shape and apply one of the sampled colours. In this case, the green tag becomes a warm yellow pulled from the kitchen image. Save the Illustrator file, close it, and return to InDesign. Give it a moment and the linked asset updates in the layout.
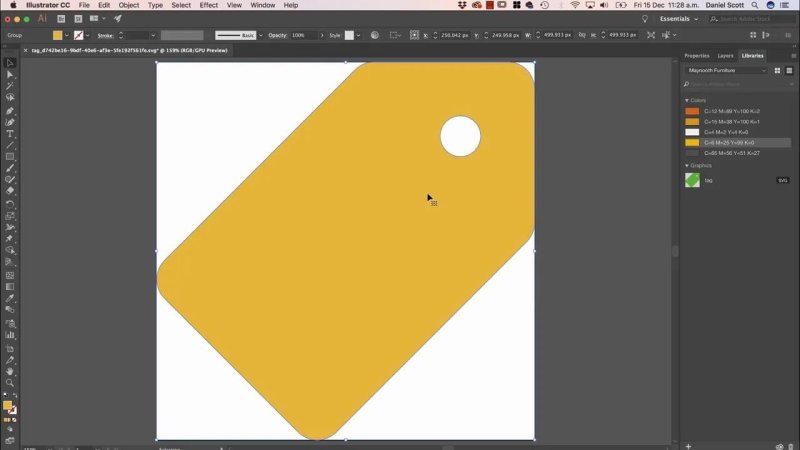
The tag is recoloured in Illustrator using a swatch taken from the InDesign colour theme.
Use the Color Theme tool like an eyedropper
The tool is also handy for applying individual colours directly in the document. Select an object, then use a colour from the generated theme to recolour it.
For the flyer, that means using the warmer orange tone on the bottom bar and applying other sampled shades where needed. There are only a few coloured blocks in this design, but the principle scales well: keep pulling from the same image-led palette and the layout starts to feel cohesive.
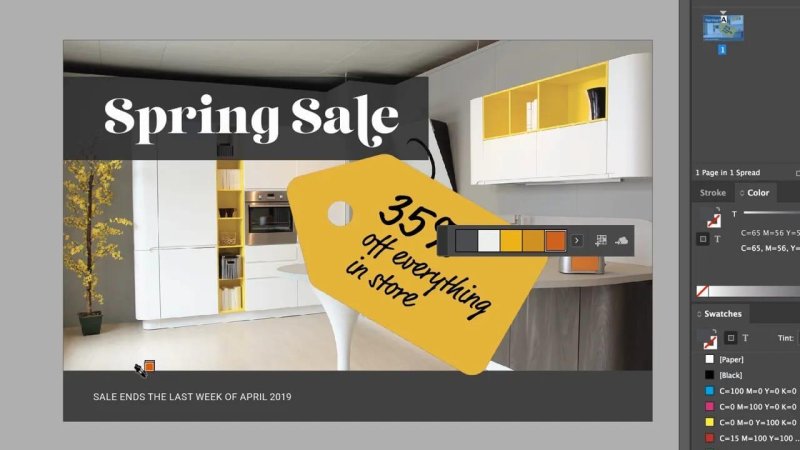
Replacing the random green with colours sampled from the photo makes the flyer feel much more connected.
A simple workflow for matching colours in InDesign
Choose the image that should lead the design’s colour direction.
Temporarily remove any objects with colours you do not want included.
Use the Color Theme tool to generate a palette.
Try the Colorful, Dark, Deep, and Muted variations.
Save the useful theme to Swatches.
Add it to a Creative Cloud library when Illustrator assets are involved.
Recolour layout elements and linked artwork using the sampled palette.
The result is not just a nicer tag or footer bar. It is a document where the design colours feel like they came from the same place as the image, rather than being dropped in from somewhere else.
FAQ's
Where is the Color Theme tool in InDesign?
Click and hold the Eyedropper tool in the Tools panel, then choose the Color Theme tool from the fly-out options.
Does the Color Theme tool sample only where I click?
No. Although you click on the page to create a theme, InDesign pulls colours from the whole page. Temporarily remove unwanted elements if their colours are affecting the palette.
Can I reuse an InDesign colour theme in Illustrator?
Yes. Add the theme to a Creative Cloud library, then open the Illustrator asset from that library. The saved colour swatches are available for recolouring the artwork.
Written by Daniel Walter Scott — Founder of Bring Your Own Laptop & Chief Instructor
