Adding Maps & Calendars To Interactive Documents In InDesign CC
Questions
Student Gallery
Be the first to share something.
Course info
Overview
- You will need a copy of Adobe InDesign 2018 or above. But you find that 95% of all the features in this course will work with earlier version of InDesign (e.g. CS6). A free trial can be downloaded from Adobe.
What am I going to get from this course?
- 70 lectures 5+ hours of well structured content.
- Create PDF Forms
- Master Long Documents.
- Advanced Fonts
- Master Styles
- Shortcut Sheet
- Create Charts & Infographics
- Create Interactive Documents
- Workflow Tactics
- Shortcuts & Speed Tips
- Advanced Creative Cloud Features
- Tips for working with Photoshop & Illustrator
- Using Scripts
- Exporting, Prepress & Printing tricks
- You will get the finished files so you never fall behind.
- Downloadable exercise files & cheat sheet.
- Forum support from me and the rest of the BYOL crew.
- Techniques used by professional graphic designers.
- Professional workflows and shortcuts.
- A wealth of other resources and websites to help your accelerate your career.
What is the target audience?
- This course is for people who already know InDesign and want to take their skills and speed to the maximum level.
- This is an advanced InDesign course, so you’ll need basic InDesign skills to find this course useful.
- This course is perfect for anyone that already knows how to insert images & add text.
- If you a completely new to InDesign try my InDesign Essentials course before starting this one.
- This course is perfect for anyone that has completed my InDesign Essentials course.
Course duration 7 hours 45 mins + your study.

Daniel Walter Scott
Founder of Bring Your Own Laptop & Chief Instructor
I discovered the world of design as an art student when I stumbled upon a lab full of green & blue iMac G3’s. My initial curiosity around using the computer to create ‘art’ developed into a full-blown passion, eventually leading me to become a digital designer and founder of Bring Your Own Laptop.
Sharing and teaching are a huge part of who I am. As a certified Adobe instructor, I've had the honor of winning multiple Adobe teaching awards at their annual MAX conference. I see Bring Your Own Laptop as the supportive community I wished for when I was first starting out and intimidated by design. Through teaching, I hope to bring others along for the ride and empower my students to bring their stories, labors of love, and art into the world.
True to my Kiwi roots, I've lived in many places, and currently, I reside in Ireland with my wife and kids.
Downloads & Exercise files
Transcript
Hi there, in this video we're going to look at Embed codes. Basically in this one, we're going to look at maps. You can see, I've got a page, it's in Publish Online and look, it's fully interactive. Cool, huh!
So let's look at how to do that now in Adobe InDesign. First thing to do is, I'm on Page A, don't want to make a new page. Not going to worry about the transitions. This is where I'm going to paste my map. So, to get the code that we need, we're going to jump to Google Maps. Find the place, I found-- this just happens to be the place below my office, because my office doesn't have a pin in Google Map, so I just picked him. This is where I get my lunch, so I had lunch today.
Information you did not need to know, or you do need to know, is click on 'Share', and click on this one that says 'Embed Map'. Now I'm going to pick the 'Large' size map. And I'm going to select all this code in here, and hit copy on my keyboard. So 'Command C', or 'Control C' on a PC. Back in here, I'm going to go to 'Object', and I'm going to going to 'Insert HTML'. I'll 'paste' it in there, click 'OK'. I'll drag it up here. I'll make it nice and big, give it a second. Hopefully… now it loads. You need to be connected to the net, this may take a while. One, two, three… I'll speed this up. I give up, just waiting for it to work.
I'm going to click on 'EPUB Interactivity', hit 'Play', and hope for the best. We got a tiny map, there it is there, we can see him. So, when I'm dragging this out, so it was there, that little gray dot there. So when I drag it out, I need to hold down the 'Command Shift' key, just to make it bigger. Maybe just the 'Command' key to resize it. Now, hopefully…
Let's go to 'EPUB Interactivity'. Hit 'Play'. There's my map. Don't worry if it doesn't load properly in InDesign. It's where the red appears here in EPUB, or double check in your Publish Online. That can be a little tricky sometimes, getting the right sizes, and getting it in. So, to resize it properly, hold down the 'Command' key rather than you just dragging the edges of it, because it stays in that little box there. So hold down 'Command Shift' if you want to do it proportionately squared, then check in here, hit 'Play', it's going to be a slightly different size now. So that is how to embed a map on your Publish Online document.
Now if you can find anything that has an embed code like a Twitter feed, or a Facebook feed, you can embed that as well. Google Calendars has a way to embed on sites. So depending on what you're using, have a look, see if it has an Embed. I know Eventbrite Ticketing does it there. I think PayPal has PayPal buttons that can be embedded. There's all sorts of things that can go into your Publish Online document by just copying and pasting the embed code, that's the key word, look for that. All right, next video.
How do I add an interactive Map to InDesign Publish Online?
Get the location’s embed code from Google Maps, then paste it into InDesign using Object > Insert HTML. Resize the inserted HTML object with the correct modifier keys, then test it in EPUB Interactivity or Publish Online to make sure the map loads and remains interactive.
How to Embed a Google Map in an Adobe InDesign Publish Online Document
An interactive map is a really handy addition to a digital brochure, event guide, restaurant menu, portfolio, or anything else published online through Adobe InDesign. Instead of giving people a static address, you can put the actual map right into the document, ready to zoom, pan, and explore.
The trick is not really the map itself. It is the embed code. Once you know where to get that code and how to insert it, you can use the same approach for plenty of other online content too.
Get the Google Maps embed code
Start in Google Maps and find the place you want to show. This could be an office, venue, shop, event location, or any other pinned location.
Open the location in Google Maps.
Click Share.
Choose the Embed a map tab.
Select the map size you want. The large option is a good starting point when the map will be a major part of the page.
Select the entire HTML code supplied by Google Maps.
Copy it using Command + C on a Mac or Control + C on a PC.
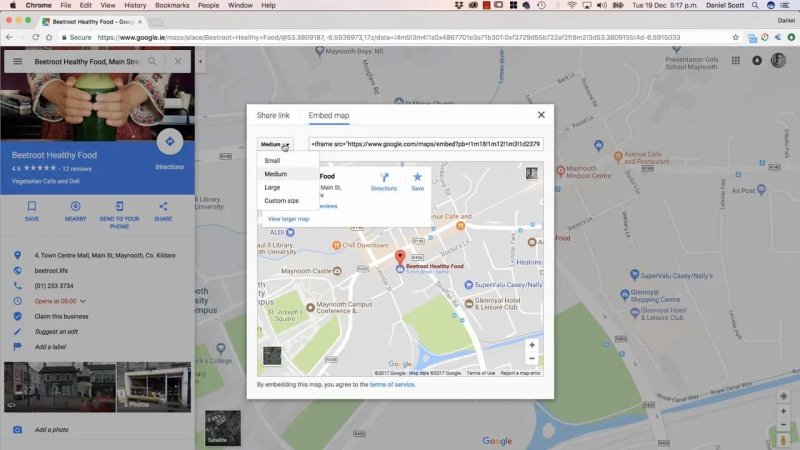
Google Maps provides the embed code directly from the Share panel, along with map size options.
That block of code is what lets InDesign bring the live map into a published online document. You do not need to write or edit the code yourself. Just make sure you copy all of it.
Insert the map HTML in Adobe InDesign
Back in InDesign, create or move to the page where the map should live. If you are building a multi-page document, it often makes sense to give the map its own page or leave it plenty of room beside the address and contact details.
Then go to:
Object > Insert HTML
Paste the Google Maps code into the Insert HTML dialogue box and click OK. InDesign will place the embedded content on the page as an HTML object.
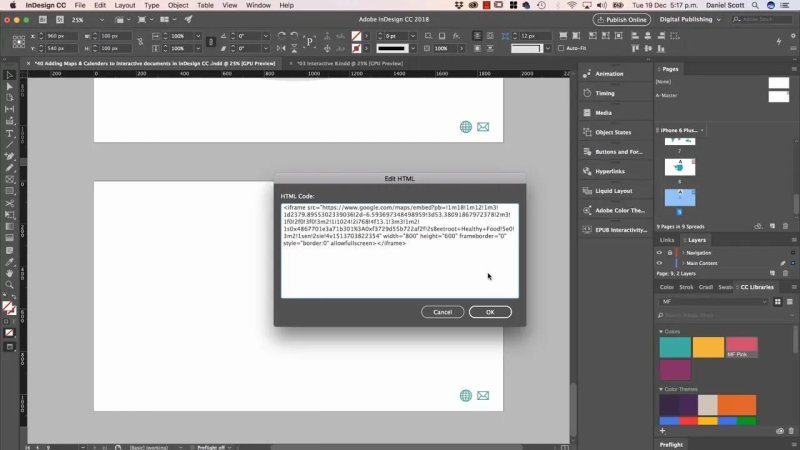
Paste the complete Google Maps embed code into InDesign's Insert HTML dialogue box.
At first, the embedded map may appear as a tiny placeholder, a grey box, or something that does not look particularly promising. That is normal. Embedded web content can be a bit unreliable inside the InDesign workspace while it is loading.
Resize the embedded map correctly
This is the bit that catches people out. Dragging the edges of the HTML object normally does not properly enlarge the map content. It can remain stuck in a small internal box, even though the frame looks bigger.
To resize it properly, select the embedded HTML object and hold down the modifier keys while dragging:
Command on a Mac helps resize the embedded content rather than only its outer frame.
Command + Shift can be used when you want to keep the resize proportional.
Use the equivalent modifier keys on a PC where appropriate.
Give the map enough space to be useful. A tiny map technically works, but it is not much good if streets, place names, and controls are difficult to read. Make it large enough for the document layout and the information people need to find.
Preview and test the interactive map
You need an internet connection for the map to load. Sometimes it may not display properly right away on the InDesign canvas, so do not panic if you are staring at a blank or grey rectangle for a moment.
Use the EPUB Interactivity Preview panel and press play to check whether the map is loading. The map may initially appear at an odd size, which is a good signal to go back and resize the HTML object using the correct modifier keys.
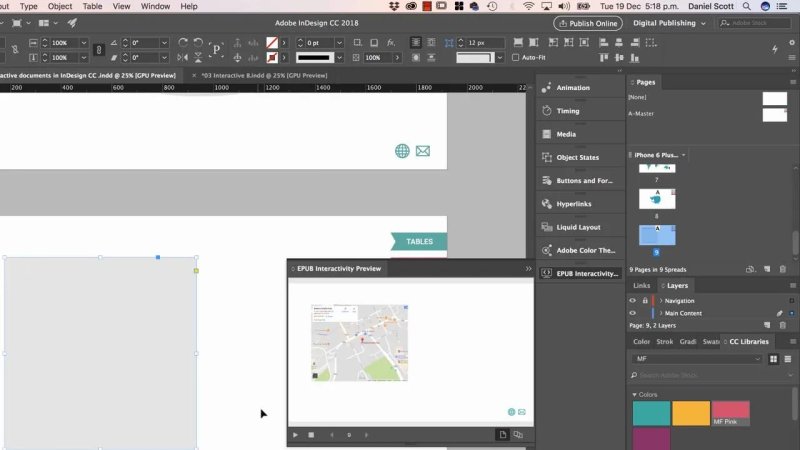
The EPUB Interactivity Preview is a quick way to confirm that the embedded map is loading and responding at the intended size.
The real test is your final output. If it is visible and interactive in your Publish Online document, you are sorted. The in-app preview can occasionally be a little fussy, especially while external content is loading.
Embed codes are not just for maps
Once you have used Object > Insert HTML, you have opened up a much wider set of possibilities for interactive Publish Online documents. The key phrase to look for on any service is embed code.
Depending on the service and the content you are creating, you may be able to embed:
Twitter or Facebook feeds
Google Calendars
PayPal buttons
Other web-based content that provides HTML embed code
Not every web service offers embeds in exactly the same way, but the workflow is broadly the same: find the embed option, copy the supplied code, paste it through InDesign’s Insert HTML command, resize it correctly, and test the finished published document.
That is the useful thing to remember. Google Maps is just one example. If a platform gives you an embed code, there is a good chance it can become an interactive part of your Adobe InDesign Publish Online document.
FAQ's
Why is my Google Map tiny in InDesign?
The HTML object may have been enlarged without resizing the embedded content itself. Select the object and hold Command while dragging to resize it properly. Use Command and Shift if you want to preserve its proportions.
Why is my embedded map not loading in InDesign?
Embedded maps require an internet connection and can take a little time to load. Check the map in EPUB Interactivity Preview and then confirm it in the final Publish Online document.
Can I embed a Google Calendar in an InDesign document?
Yes, if Google Calendar provides an embed code for the calendar you want to use. Copy that code and insert it through Object > Insert HTML, just as you would with a Google Map.
Written by Daniel Walter Scott — Founder of Bring Your Own Laptop & Chief Instructor
