How to create automatic captions in Premiere Pro

Course contents
SECTION: 4
Preferences 10:03
SECTION: 10
Freeze, Hold & Pause 7:20
SECTION: 14
Storyboarding / Planning 3:04
SECTION: 21
Workspaces 2:38

Questions

1
You are not following this thread
1
You are not following this thread
1
You are not following this thread
1
You are not following this thread
1
You are not following this thread
0
You are not following this thread
0
You are not following this thread
0
You are not following this thread
2
You are not following this thread

Course info

146 lessons / 17 hours 49 quiz questions 14 projects Certificate of achievement

Overview

Hi there, my name is Daniel Walter Scott & I’m an award winning Adobe Certified Instructor. Welcome to the Premiere Pro Advanced Course.

This course is aimed at people who already know the fundamentals of Adobe Premiere Pro. If you have developed your own way of doing things but you realise there are so many tools, updates & time saving techniques that you haven't had time to explore then this course is definitely for you.
• We look at the best productivity hacks & little known features to super speed your timeline editing. 
• We explore color management, color grading, color replacement & skin tone correction.
• You will master all the new Lumetri color methods and harness the power of scopes. 
• You will learn new ways to successfully create traditional & new style transitions. 
• You will quickly become a master at fixing shaky handheld and drone footage.
• There won’t be anything you can’t mask or blur.
• We will get your computer running at warp speed using Proxies, Scratch Disk & Cache management. 
• You’ll master high frame rate footage to enable you to produce spectacular slow motion video. 
• You will create high quality professional motion graphics & data driven infographics. 
• You’ll learn all about Premiere Pro’s responsive time and design tools so you can make graphics & animation once that can be used across multiple future productions. 
• You will learn file and footage techniques which will enable you to work with multiple editors. 
• Multi-camera editing will be a breeze. 
• You will learn stunning techniques to help clean up your audio by removing noise, hiss & echo. 
• Learn how to manipulate & extend your music in Premiere Pro & also in Adobe Audition. 
• You’ll learn which tools & techniques are best for removing the monotony of repurposing the same footage across multiple sizes for social media. 
• Learn about markers, subtitles and amazing plugins, 
• You will learn all the best tricks and settings which will enable you to get the most from your rendering in Premiere Pro and also in Adobe Media Encoder.   
We cover all these topics and more in this course. 
Take a look at the contents and read reviews from other students and you’ll see this is the course that will get you from adequate - to EXCELLENT in Premiere Pro.

In this course we use real world, practical projects and use exercise files which you can download and then work alongside me.

If you can’t remember the last time you sat down & went through the features & updates in Premiere Pro, let this course be your all-in-one professional development & upgrade.  

You owe it to yourself -  sign up and get ready to become a Premiere Pro Super Hero.
Daniel Walter Scott

Daniel Walter Scott

Founder of Bring Your Own Laptop & Chief Instructor

I discovered the world of design as an art student when I stumbled upon a lab full of green & blue iMac G3’s. My initial curiosity around using the computer to create ‘art’ developed into a full-blown passion, eventually leading me to become a digital designer and founder of Bring Your Own Laptop.

Sharing and teaching are a huge part of who I am. As a certified Adobe instructor, I've had the honor of winning multiple Adobe teaching awards at their annual MAX conference. I see Bring Your Own Laptop as the supportive community I wished for when I was first starting out and intimidated by design. Through teaching, I hope to bring others along for the ride and empower my students to bring their stories, labors of love, and art into the world.

True to my Kiwi roots, I've lived in many places, and currently, I reside in Ireland with my wife and kids.

Certificates

We’re awarding certificates for this course!

Check out the How to earn your certificate video for instructions on how to earn yours and click the available certificate levels below for more information.

How to earn your certificate

Work your way towards your certificate for this course by following these simple steps.

  • Watch the course videos
  • Complete the Class Projects - look out for the videos marked with
  • Upload your class projects into the My Projects area in your account
  • Complete and pass the Knowledge Quiz (Merit level courses only)
  • Complete the Distinction Certificate Project (Distinction level courses only) - look out for the video marked with
  • Upload your Distinction project to the My Projects area in your account
  • Request your certificate when you've completed the requirements for the certificate level you're working towards

Good luck!

Pass certificates

We're awarding 'Pass' level certificates for this course.

You can work your way towards your 'Pass' certificate by following these simple steps.

  • Watch the course videos
  • Complete the Class Projects - look out for the videos marked with
  • Upload your class projects into the My Projects area in your account
  • Don't forget to request your certificate when all your projects are complete

Good luck!

Merit certificates

We're awarding 'Merit' level certificates for this course.

You can work your way towards your 'Merit' certificate by following these simple steps.

  • Watch the course videos
  • Complete the Class Projects - look out for the videos marked with
  • Upload your class projects into the My Projects area in your account
  • Complete and pass the Knowledge Quiz
  • Don't forget to request your certificate when you have passed the quiz and completed all your projects

Good luck!

Distinction certificates

We're awarding 'Distinction' level certificates for this course.

You can work your way towards your 'Distinction' certificate by following these simple steps.

  • Watch the course videos
  • Complete the Class Projects - look out for the videos marked with
  • Upload your class projects into the My Projects area in your account
  • Complete and pass the Knowledge Quiz
  • Complete the Distinction Certificate Project - look out for the video marked with
  • Upload your Distinction project to the My Projects area in your account
  • Don't forget to request your certificate when you have passed the quiz and completed all your projects

Good luck!

Downloads & Exercise files

Transcript

Hi everyone, yes, you read right, you can automatically make captions, goes from speech in your Timeline down here, through something called transcriptions, which we know about, and then we can click 'Create Captions', and it's magic, watch, there was no typing, and we've got captions all the way through. It's automatic, it's awesome, it's in 13 languages, let me show you how it works. 

All right, to get started I've got a bit of dialogue, it's from an earlier project, remember Tourism Island, I'm not using that sequence, I'm just keeping everything clean here. So if you do want to bring it in, under 'Exercise Files', under 'Tourism Island', under 'Audio', this is the audio file that I'm using, 'Old Irish Blessing', you can see it there, I've put on my Timeline, and I've dumped a couple of videos from under footage in there. It doesn't really matter, it's all about the audio. 

So first thing we need to do is, let's switch our kind of workspace to 'Captions', it's a bit boring but it's going to bring up this chunk. If you can't find it, under 'Window', find it under Captions, no, it's called 'Text', there it is there. The way this works, remember, is that you create a transcript first and then make captions, so it's weird that way. So let's transcribe the sequence automatically, this is fancy and new. 

So 'Create Transcript', and basically which track is it on, you can mix it, so it's going to go through, all of the tracks but that's not good if you've got music playing, and I've got this weird audio that's on this bit of footage, so I don't need that, so I'm just going to say, actually, just use Audio Track 2, see this one here, it's got all the waveform on it, and that's it, this will all be off by default. I'll go through them in a bit more detail, but I bet you, 99% of the time that's all you're going to do, it's going to go off and do things. 

The one thing that I kind of skipped over there, is that it's actually uploading it to the Cloud, so your data is going off to the internet, and I guess Adobe wants you to know that it is going to the internet, it is secure on the internet, but you know, with your permission, it's uploading it and processing it in the Cloud, yeah, so there you go, so it is done, let's have a little look at what's created. 

So remember, a transcript is created at the moment, not a sequence, so let's play it. "Let the road rise up to meet you, may the wind always be at your back." Cool, huh. It's just like match it all up, you don't have to type it out, and like, the voice recognition is amazing, like this is really new, literally came out yesterday, I've updated this video, and so, I don't know, I think for a first version it's doing pretty amazing, with this accent in English, so you have to let me know in the comments, if you're finding it troublesome in other languages. It is, I think it's released with like 14 languages or something, so that's cool. 

So yeah, we've got a transcript, so what do we do with it? Well, nothing really, we basically create that transcript, so that we can then click this button, 'Create Captions', and again, just leave everything as the default. We'll run through a little bit more details, but 99% of the time, I bet you, this is going to work, and now we've got our little captions along the top, look at them here, ready? "May the road rise up to meet you, may the wind always be…" It is so good, if you've done this manually, or maybe sent it off to get done, and paying somebody to do it, man, it's pretty good doing it here for ourselves in Premiere Pro. Again, this tool is new, so I haven't really put it through much of its paces, I've been trying to, but yeah, I'm sure I'll find some limitations, but I don't know, "and rains fall soft upon your fields, and until…" it's pretty amazing. 

Now other things in this, let's have a little look. So let's say that we're going to go back and look at just a bit more details, because this is the advanced class, I'm going to select all the captions along here and delete them, because I don't want the captions at the moment. I'm going to go back to the transcript as well, see, Captions, Transcript, and at the moment there's no, like delete transcript, so you can re-transcribe the sequence and it kind of replaces what's there. So let's do that to have a little bit more detail. 

So this is one that says Audio Clips Tagged as Dialogue, just do those ones because you might have a lot in here, and you might have different clips and sound effects. You don't want the whole track done, you just want the bits that you've tagged as dialogue. We do that, remember, when we go, you, I've got 'Essential Sound', you're the 'Dialogue', and now this one will be transcribed, and automatch while we're there. So now when we go 'Read Transcribe', we can say, actually just do the ones tapped Dialogue, so you can individually pick the ones. 

Obviously, you can pick a language, there's a bunch in there, let me know, when you're doing your work, obviously, not this particular one, because it'll be very similar, but the work that you're doing, throw something into Premiere Pro right now for me, after this video, and give me a out of 10 score of like how good it got to it. It'd be good to see over time how good these things are, and how better they go. So English, other things, let's look at the most important other feature, is, this Recognize Different Speakers Talking. This seems really good, so I'm going to cancel out of that, at the moment I only have one woman talking, so I'm going to grab another bit of audio. So I'm going to say, from our 'Exercise Files', under 'Sound', there's one in there called 'Sound 02'. Now it could be one track with different people talking, I had a look through our exercise files and we don't have anything, and I couldn't find anything on my machine, so we're going to fake it by doing this, there you go. 

We'll pretend that this, my friend, is, just me and this woman having a conversation, so what you can do is you can say 'Re-transcribe', and you can say, all 'Tagged on Dialogue', or we could do Audio Track too, wouldn't matter, but this one here, it says, 'I want to opt in', to kind of know the speakers, who's who. One thing it says is that, you know, there are new laws, there are laws around kind of this biometric privacy, about recognizing people without asking, or face recognition and audio recognition, it's all weaved into here. 

Basically Adobe wants you to know, like, "Hey, you need to have permission, to be uploading these to our servers", and be trying to recognize them. They only recognize them as speaker 1 and speaker 2, but you know, it depends on how you feel about this. You've got to at least know you've got to have permission to do it, so I'm going to enable it. You'll notice in there, that says, you can't do it in Illinois, I think it's one of the states in America, that forbid this to happen, as part of their law. I think, Texas do it as well, that might change, that might go away, it might get worse, but let's hit 'Transcribe', and what it's going to try and do, is break out the two different speakers, even when they're in the same track, so that, yeah, you can identify the different people, and separate them out, rather than it kind of blending together. 

All right, let's speed this up. So it's got it, like, let's have a look. "Be at your back, may the Sun shine warm upon your face," "All right, so this is…" Great example, Dan. In here you can see it, speakers, and I can say, actually this is, Kathy, and this is, handsome Dan, or just ansome Dan, there you go. Now I can generate captions, and we'll have our two separate speakers. Now while we're in here let's look at some of the more details on creating captions. You can create a blank track, that is when you want to hand type it in, rather than getting it automatically done from the transcript we just made. 

Everything else in here is useful, I guess, there's Caption Presets, there are, captioning presets for different specific kind of use cases. I'm not really knowledgeable about the different outputs, so you might be, you might go into a special place, and it needs, you know, you might have Teletext, and you can click in here to get the right kind of captioning done. Format and Style kind of seems similar, about Format Again, it's to do with the kinds of preset, in the way that it's displayed on here, and again, with a stream it depends on what you're doing. So if the format changes, you know what you're doing with the format, you can pick the different kinds of streams, I don't, I'm kind of blagging my way through this a bit. In terms of the style, that's something I do know about, is-- we'll do style in another video, that's when you can change the fonts and stuff, pick a default style and update it in here. 

Other things you can do when you're creating captions, how many characters go into the words that appear on the screen, do you want it to be really long lines or really short lines, you can have a play around with that. There are obviously some industry standard defaults, that are in here but you can play around with them. What is the duration in seconds, how long do they stay on screen, you might feel like I'm speaking too fast, and it needs to be slower or faster, again, the gap between captions, when one disappears and the other one appears, do you want it to be 0, so they just flash up on screen, or do you want a bit of a pause between them? Does your captions display on the text, you know, on the screen, in a single or double line? All these things you can go and adjust, but the default's pretty handy. 

Other things that you might want to do, advanced stuff is, let's go back to, our 'Captions', actually, I'm going to delete these captions again, go back to my 'Transcript', you get your transcript looking good first, and then make your captions, it's easier process. So in here I'm going to recreate them, and what you might do is set an in and out point, say you only want captions for this part, so I set my in and out points, which is my I on my keyboard, and O, wherever your Playhead is, then I can re-transcribe and I can say, actually, just do the in and out points, because you might have a very long document, I'm going to turn off the different speakers. 

The other option in here is that you might merge with an existing transcription. I couldn't think of a way that this would be useful, so you have a transcription instead of like redoing it again so it's new, you can add new audio, and then smoosh it with the existing one, I don't know when that's useful. You probably can think of it already, I can't, but you can do that. Let's cancel that just because the other options you might look at in here, we've looked at Re-transcribe. 

Now when you export your transcript it feels like, "Oh great, I'm going to export my transcript because I want some text." If you do this you end up with this really weird format. I'll put it on to my poor old desktop, my desktop's not in here, where are you, desktop? There it is. Let's stick it in and let's see what we get. Now you're going to get this weird file that you don't want, so again, Daniel Scott, Desktop, lost my shortcut, You get this one, pr, you know, prtranscript, it's a weird file, like if you try and open this in something, you get this, I can't work out something that actually, you know, that actually works with. 

So you might know, you might be like, "Oh great, it's the prtranscript that I've been looking for," that's how you do it, but what you probably want and what I want, is Export to Text File, then you export Plain Text, and you get this kind of file, not that one, you want 'Export File', and you get-- let's stick it on the desktop again, let's have a look, and that transcript.txt file, and that's probably more what you want, then you can use that, I don't know, for a text transcript for your website, or maybe going out as dialogue to people, but that's another thing you can do once you've got your transcript. 

Other things out there, pretty self-explanatory, Pauses, you can, instead of just having like, you know, not having a gap, you can actually add the dot dot, '..' to show a pause, and the Disable Auto Scrolling is this. So auto scrolling on means that when I do this, can you see, it moves along, and kind of moves up and down, depending on what's being played, You can turn that off by clicking that button there. Now there's a bit more to transcriptions, but this video is already getting long, so I'll separate them out in other videos, including how to style them, and do them manually. 

The other thing to note is that this particular feature, the automatic transcript making is a new feature, like literally came out yesterday, so yours might change a little bit, there might be a little bit of jiggling around, or another option in here, or they've changed the words, they've moved this up and this down, so if there is something a little different, check the comments below, I'll update them down there, if they're just teeny tiny ones. I'll re-record the video if there are big things, but you might just find other new features, because you're advanced now, you can look around and go, "Actually, I reckon I can work that out," if something does change, I'm totally trying to get out of making updated video for this one. I'm hoping this could be the one forever, please, Adobe, don't change it, but if they do, have a look around, check the comments, and yeah, that is automatic transcript, but really we want the automatic captions. 

All right, let's jump into the next video.

Written Guide

How do I automatically generate captions in Premiere Pro?

Open the Text panel, transcribe your sequence, then choose Create Captions from the finished transcript. Premiere Pro turns the recognised speech into timed caption clips on your timeline, so you do not have to type every line yourself. Choose the right audio source first, then check the wording before you finish.

How to Create Automatic Captions in Adobe Premiere Pro


Key takeaways

  • Automatic captions start with a transcript. They are two separate steps.

  • Choose the dialogue track or clips tagged as dialogue to avoid transcribing music and unwanted audio.

  • Check and correct the transcript before creating captions.

  • Caption settings let you control line length, timing, gaps and the number of lines on screen.

  • You can identify different speakers, transcribe only part of a sequence and export a plain-text transcript.


Start with the dialogue, not the footage

I have a short Irish blessing on the timeline, with a couple of video clips above it. The pictures make the sequence look nice, but they are not doing the work here. It is the spoken audio that Premiere Pro needs.

If you are following along with the exercise files, the audio is under Tourism Island → Audio, in the file called All Irish Blessing. Your own dialogue works just as well. Put it in a sequence and make a note of which audio track contains the speech.


Step 1: Open the Text panel and transcribe the sequence

Switch to the Captions workspace. If you cannot find the panel, look under Window → Text. The naming is a little easy to trip over: the workspace is Captions, but the panel you need is Text.

From the Text panel, choose to transcribe the sequence. Premiere Pro creates a written transcript first. It does not create caption clips at this stage.

Before starting, check the transcription options, especially the audio source. You can use a mix of tracks, but that is not ideal if your sequence also contains music, sound effects or audio attached to footage. In my sequence, the blessing is on audio track two, so I select that track rather than asking Premiere Pro to listen to everything.
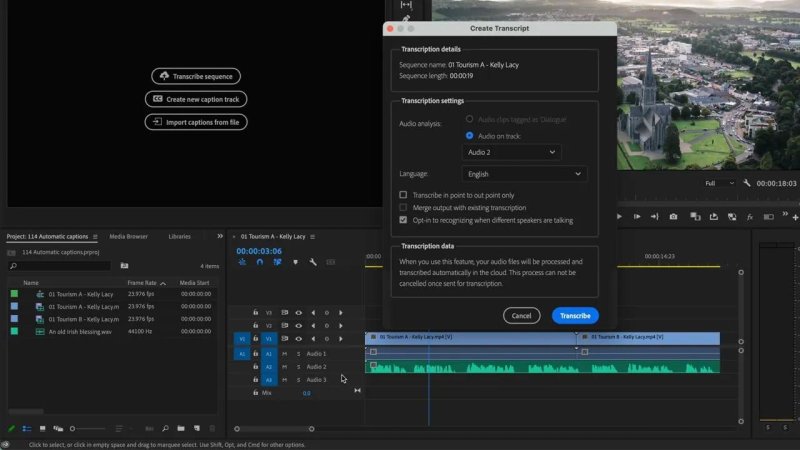
Premiere Pro workspace showing the Create Transcript popup dialog set to English on Audio 2 with

Choosing the dialogue source keeps unrelated timeline audio out of the transcript.

Then run the transcription. In the version shown here, the audio is uploaded for cloud processing, so make sure you have permission to process the material that way. When it finishes, play through the sequence and compare the words with the speech. The recognition can be impressively good, even with an accent, but it still deserves a check.


Step 2: Create captions from the transcript

Once the transcript looks right, click Create Captions. For a straightforward job, the default settings are a good place to start. Premiere Pro generates timed caption clips on a track above your video.

That is the lovely bit. One moment you have spoken dialogue and a transcript; the next you have captions appearing with the blessing, beginning with the line about the road rising to meet you. No line-by-line typing.
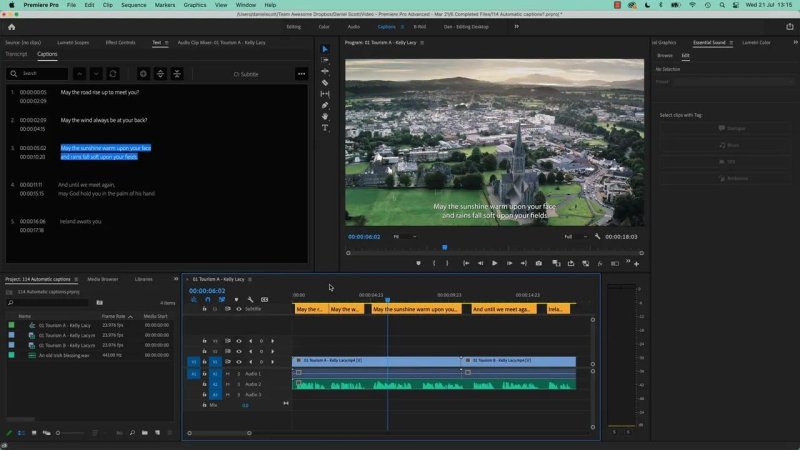
Premiere Pro interface displaying the Captions tab in the Text panel with synchronized dialogue lines, matched to an orange Subtitle track on the timeline and white subtitle text centered over an aerial landscape.

The generated captions appear as separate clips above the video and audio.

Do give the result a proper read. Listen for words the speech recognition may have missed, and check that each caption appears at a comfortable moment. Automatic is brilliant for removing the bulk of the work, not for skipping the final review.


Choose exactly what gets transcribed

Selecting one audio track is usually enough, but sometimes that track contains a mixture of dialogue and other sounds. In that case, you can tag the clips you want as Dialogue in Essential Sound, then choose the transcription option that uses clips tagged as dialogue. Premiere Pro will focus on those clips rather than everything on the track.

If you need to change your choices after the first pass, use Retranscribe Sequence. In this version of the Text panel, that is also the practical way to replace an existing transcript; there is not a separate delete-transcript command.

The transcription settings also let you choose a supported language. Make sure it matches the speech before you run the job.


Separate different speakers

For a conversation, enable the option to recognise different speakers when you transcribe. This can separate voices even if they are recorded on the same track. The result identifies them as speakers rather than knowing their names, and you can edit those labels afterwards.

To try it, I added a second voice to the Irish blessing sequence. After retranscribing with speaker recognition enabled, I could open Edit Speakers and give the two voices names. That makes the written dialogue much easier to follow before generating captions.
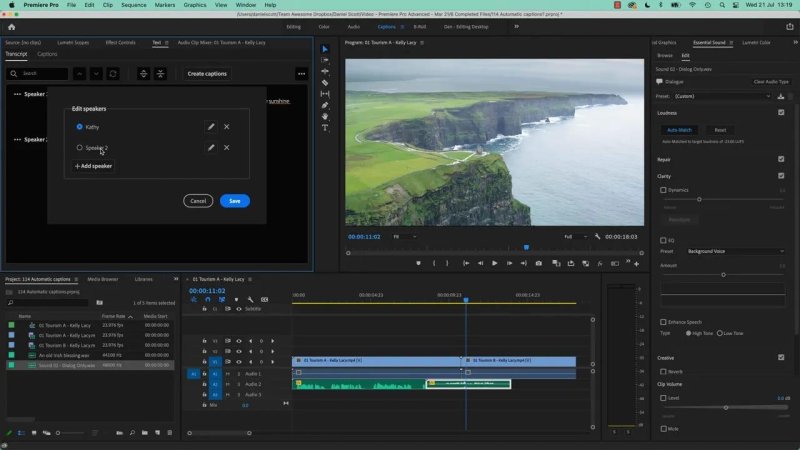
Premiere Pro Text panel showing the Edit speakers modal window with Speaker 1 renamed to Kathy and Speaker 2 selected, set against a coastline cliffs preview in the Program Monitor.

Speaker labels can be renamed once Premiere Pro has separated the voices.

There is an important permission check here. Speaker recognition involves processing people’s voices, and the option includes a privacy notice. Make sure you have the appropriate permission before uploading audio and enabling it. Availability may also depend on local rules.


Adjust how your captions appear

The Create Captionsblank caption track if you would rather enter captions manually, or generate them from the transcript you have just made.

For automatic captions, the most useful controls are:

  • Caption preset and format: Choose an option suited to your intended output if you have specific delivery requirements.

  • Style: Select a caption style. This is where the appearance of the captions comes into the picture.

  • Maximum characters: Decide whether the text should be broken into shorter or longer lines.

  • Minimum duration: Set how long a caption stays on screen.

  • Gap between captions: Control whether captions follow one another closely or have a pause between them.

  • Lines: Choose whether captions appear on one line or two.

If you have a specialist captioning format or stream to deliver, use the settings required for that destination. Otherwise, do not feel you have to change every control. The defaults are handy, and you can come back to the details when a particular project calls for them.
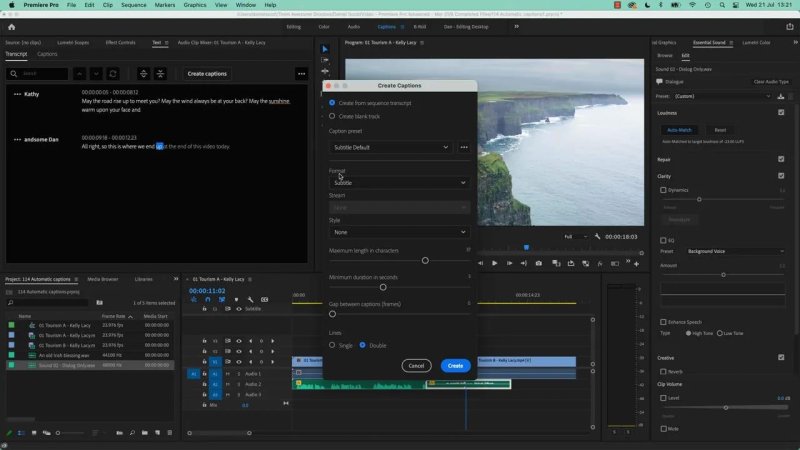
Premiere Pro window displaying the Create Captions dialog box open over a transcript labeled with Kathy and Dan, showing configuration options for Caption preset, character count, and line styling.

The creation dialog is where I adjust caption length, timing and layout when the defaults are not quite right.

Transcribe only part of a long sequence

You do not always need the whole timeline. Set an In point with I and an Out point with O at the section you want. When you retranscribe, choose the option to work within those In and Out points. That is particularly useful when you only need captions for one passage of a longer edit.

There is also an option to merge a new transcription with an existing one, rather than replacing it. It is worth knowing it is there if you add more dialogue after your first transcription.


Export a transcript you can actually use

A transcript is useful beyond captions. You might want the dialogue as text for a website or to share with someone else on the project. Watch which export option you choose, though.

Export Transcript produces a Premiere transcript file. If what you want is ordinary, readable text, choose Export to Text File instead. That gives you a .txt file you can open and use outside Premiere Pro.

The Text panel has a couple of smaller conveniences, too. You can show pauses with an ellipsis, and you can turn off auto-scrolling if you do not want the transcript to follow playback up and down the panel.


A sensible finishing workflow

  1. Put the spoken audio in your sequence and identify its track.

  2. Open the Text panel and transcribe the right audio source.

  3. Review the transcript, including any speaker labels.

  4. Create captions and adjust the layout settings if needed.

  5. Play the sequence once more to check the words, breaks and timing.

That is the whole trick: get the transcript looking good first, then make the captions. Premiere Pro may move a menu or rename an option as the feature develops, but the basic path from speech to transcript to captions is the part to remember.


Key terms

Transcript

The written version of speech recognised from your sequence. It is the source used to generate automatic captions.

Caption clip

A timed piece of on-screen text on the caption track. Premiere Pro creates these clips from the transcript.

Speaker recognition

An optional transcription setting that separates different voices and assigns speaker labels, which you can edit.

In and Out points

Markers defining the section of a timeline you want to work with. You can use them to limit a transcription to part of a sequence.


FAQs

Do I need a transcript before creating automatic captions?

Yes. In this workflow, Premiere Pro transcribes the speech first, then creates timed captions from that transcript.

How do I stop Premiere Pro transcribing music or unwanted audio?

Select the audio track containing the speech, or tag the relevant clips as Dialogue in Essential Sound and transcribe only clips with that tag.

Can I export the transcript as a plain-text file?

Yes. Choose Export to Text File rather than Export Transcript if you want a standard .txt file.

Daniel Walter Scott

Written by Daniel Walter Scott — Founder of Bring Your Own Laptop & Chief Instructor

  • Powered by Marvin
  • Terms of use
  • Privacy policy
  • Cookie policy
  • © Bring your Own Laptop Ltd 2026
🎬 After Effects Essentials is Now LIVE!

🎬 After Effects Essentials is Now LIVE!

Kyle Hamrick’s brand-new After Effects Essentials course has officially launched!

Jump in and start bringing your ideas to life with motion, animation, and visual effects, all taught step-by-step from the ground up. 🚀

Whether you’re completely new to After Effects or ready to build your confidence, there’s plenty to explore, create, and animate.