Replace video on the timeline with new files in Premiere Pro
Questions


Student Gallery
Be the first to share something.
Course info
Overview

Daniel Walter Scott
Founder of Bring Your Own Laptop & Chief Instructor
I discovered the world of design as an art student when I stumbled upon a lab full of green & blue iMac G3’s. My initial curiosity around using the computer to create ‘art’ developed into a full-blown passion, eventually leading me to become a digital designer and founder of Bring Your Own Laptop.
Sharing and teaching are a huge part of who I am. As a certified Adobe instructor, I've had the honor of winning multiple Adobe teaching awards at their annual MAX conference. I see Bring Your Own Laptop as the supportive community I wished for when I was first starting out and intimidated by design. Through teaching, I hope to bring others along for the ride and empower my students to bring their stories, labors of love, and art into the world.
True to my Kiwi roots, I've lived in many places, and currently, I reside in Ireland with my wife and kids.
Certificates
We’re awarding certificates for this course!
Check out the How to earn your certificate video for instructions on how to earn yours and click the available certificate levels below for more information.
Downloads & Exercise files
Transcript
How do I replace a clip in Premiere Pro without losing my edits?
Drag the new footage from the Project panel directly over the existing timeline clip while holding Option on Mac or Alt on PC. Premiere Pro replaces the media while keeping the original clip’s cuts and applied effects, making it a seriously quick fix for changed footage or client feedback.
How to Replace a Video Clip on the Premiere Pro Timeline
Key takeaways
Replace timeline footage without rebuilding the edit.
Keep existing cuts, effects, and colour work on the replacement clip.
Use Option on Mac or Alt on PC for the fast drag-and-drop method.
Use the right-click Replace Clip command when you prefer a menu-based workflow.
Apply the same technique to video, images, and audio.
Replace Footage Without Rebuilding Your Timeline
Timeline editing tricks are the things that make you faster as an editor. Once the computer-side performance stuff is sorted, the real gains come from knowing how to make changes without undoing work you have already done.
A common situation is that a shot in the timeline needs to change. Perhaps you have decided the original clip is not the best choice, or a client has come back asking for something different. The problem is that the clip is no longer just raw footage. It might already be cut into sections, have an effect applied, such as noise, and include Lumetri colour grading or other adjustments.
Instead of deleting the old clip, inserting the new one, then recreating every cut and effect, replace it. Premiere Pro can switch the underlying footage while preserving the timeline work already attached to that clip.
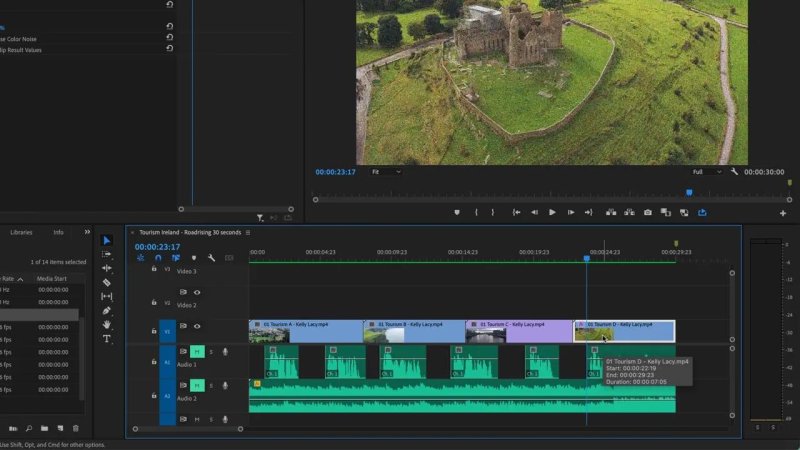
Replacing the source footage means the existing timeline structure can stay in place.
The Fast Method: Alt or Option Drag to Replace a Clip
The quickest way to replace a clip is through the Project panel.
Find the new footage in the Project panel.
Click and hold the new clip.
Drag it over the clip you want to replace on the timeline.
While dragging, hold Option on a Mac or Alt on a PC.
Drop the new footage directly on top of the existing timeline clip.
That is it. Premiere Pro matches the existing cuts on the timeline and carries across the effects applied to the original clip. So if the old shot had a noise effect, Lumetri colour work, or another applied effect, the replacement takes that work on as well.
This is especially handy when the edit itself is right, but the selected shot is wrong. You can keep the timing and editorial decisions while swapping in a better piece of media.
What the replacement preserves
Timeline cuts: The replacement follows the same edits already made to the original clip.
Applied effects: Effects such as noise stay with the timeline clip.
Other existing adjustments: Any effects already applied to the clip are retained during the swap.
The technique is not limited to video footage either. You can use it with images, audio, and other supported media in the same way.
The Menu Method: Replace Clip from the Bin or Source Monitor
There is also a longer route if you prefer to use Premiere Pro’s menus.
First, select the clip you want to replace in the timeline. Then make sure the replacement media is selected in the Project panel, which Premiere Pro calls a bin, or open the new media in the Source Monitor.
Right-click the timeline clip and choose Replace Clip. From there, choose the option that corresponds to where your new footage is ready:
From Bin when the replacement media is selected in the Project panel.
From Source Monitor when the replacement media is open in the Source Monitor.
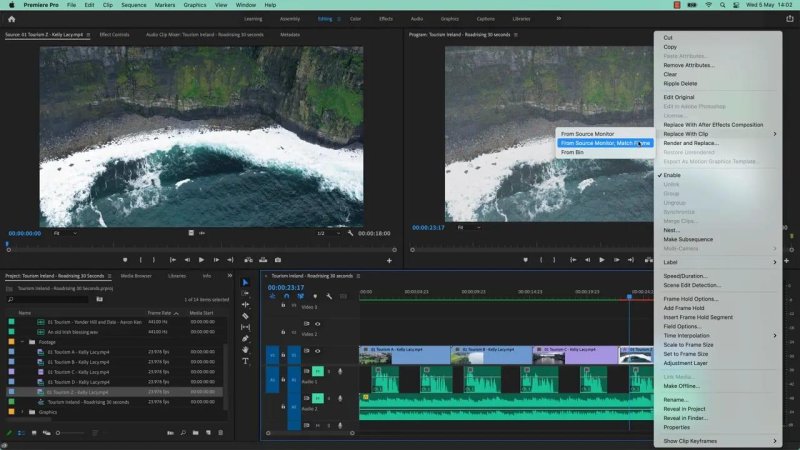
The Replace Clip menu gives you a clear alternative when the new footage is selected in the bin or loaded in the Source Monitor.
Both approaches get you to the same result. The menu command is useful when you want to be deliberate about the source of the replacement. The Alt or Option drag is the one to commit to muscle memory when speed matters.
Make the Shortcut Worth Remembering
There are plenty of Premiere Pro shortcuts, and there is no need to memorise every single one. Focus on the shortcuts that save you from repetitive editing work.
For replacing a clip on the timeline, keep this one close:
Mac: Hold Option while dragging the new clip over the old one.
PC: Hold Alt while dragging the new clip over the old one.
If you keep shortcut sheets, circle the commands that matter to your own workflow. This is a great one because it avoids the tedious process of reconstructing cuts and reapplying effects every time a shot changes.
Key Terms
Timeline
The Premiere Pro workspace where clips are arranged, trimmed, and combined into an edit. It is where the replacement clip is dropped over the existing media.
Project panel or bin
The area that holds media imported into a Premiere Pro project. Select replacement footage here when using the Replace Clip command from the bin.
Source Monitor
A panel for opening and preparing a source clip before editing it into a sequence. It can also provide the replacement media through the Replace Clip menu.
Lumetri Colour
Premiere Pro’s colour correction and grading tools. When replacing a clip in this workflow, existing applied effects such as Lumetri work are retained.
FAQs
What is the shortcut to replace a clip in Premiere Pro?
Drag the new clip over the existing timeline clip while holding Option on a Mac or Alt on a PC.
Does replacing a clip keep its effects in Premiere Pro?
Yes. Replacing the clip this way retains the existing cuts and applied effects, including effects such as noise and Lumetri Colour adjustments.
Can I replace a clip from the Source Monitor?
Yes. Select the timeline clip, open the replacement media in the Source Monitor, then right-click and choose Replace Clip from the Source Monitor.
Can I use Replace Clip for audio and images?
Yes. The same replacement approach works for video footage, images, audio, and other media you need to switch in the timeline.
Written by Daniel Walter Scott — Founder of Bring Your Own Laptop & Chief Instructor
