How to use Text to Vector Ai in Illustrator
Questions






Student Gallery
Course info
Overview
- - How to use artificial intelligence to boost your creativity in ideation.
- - The quick way to take hand-drawn sketches and vectorize and color them.
- - The building blocks needed to set you loose on a huge variety of beautiful effects and techniques.
- - To make beautiful charts and graphs for your documents.
- - Color mastery to make quick color adjustments, Pantones, and blend it all together beautifully.
- - How to master images inside of your illustrator workflow.
- - To harness all the secret gems that'll help you level up your typography skills.
- - All the tricks of the trade for drawing complex shapes easily.
- - To double your creativity with the Transform and Distort section.
- - To speed up your personal workflow to get the most out of your creative day.
- The Curvature Tool
- How to master corners with corner widget effects
- How to work with Compound Paths
- The difference between Expand & Expand Appearance
- How to create Graphic Styles
- How to make Symbols
- How to use the Smooth Tool
- Advanced use of Simplify Path
- What Live Shape Effects are for
- How to make Repeating Grids & Concentric Circles
- How to make Random Objects
- Advanced Keyboard Shortcuts in Illustrator
- How to add a Gradient on a Stroke
- How to add a Gradient in Text
- How to use the Freeform Gradient tool
- How to use Advanced Color Swatches
- How to use Global Color Swatches
- What is the difference between RGB vs CMYK color modes?
- How to proof colors
- How to use Pantone Spot Colors
- Recolor Artwork & Changing all colors at once
- How to use Blending Modes
- How to work with Images & Blending Modes
- How to make Black & White Images
- Learn Advanced Workflow Tricks
- All the Super Selection Mastery
- How to use the History Panel
- Advanced Fonts Tricks & Tips
- Use Retype to know what Font is being used
- How to put Text Inside a Letter or Shape
- How to use the Touch Type Tool
- How to add a Connected Stroke Around Multiple Shapes
- How to Offset a Stroke with Text
- How to make a Bar Chart in Illustrator
- How to make a Pie Chart in Illustrator
- Layer Power Moves
- Advanced Artboard & Pages Tricks
- How to Unlink vs Embedded Images
- How to Crop Images Rather than Mask
- How to Mask Inside Text & Multiple Shapes
- How to you use the Puppet Warp Tool
- How to use the Distort Envelope Shape & Type
- How to use the Envelope Mesh
- How to blend lines together
- How to make a Linocut Effect
- How to make 3D Gradient Lettering Blends
- How to spin text into a ring
- How to turn text into a 3D donut shape
- How to make a Duotone image effect
- How to make a Roughen Stamp Vector Effect
- How to make a Neon Sign Glow Effect
- How to use a Halftone Effect using Plugins
- Advanced Exporting Assets Tricks in Illustrator
- How to use the Dimension Tool
So what're you waiting for? Let's start the course now!

Daniel Walter Scott
Founder of Bring Your Own Laptop & Chief Instructor
I discovered the world of design as an art student when I stumbled upon a lab full of green & blue iMac G3’s. My initial curiosity around using the computer to create ‘art’ developed into a full-blown passion, eventually leading me to become a digital designer and founder of Bring Your Own Laptop.
Sharing and teaching are a huge part of who I am. As a certified Adobe instructor, I've had the honor of winning multiple Adobe teaching awards at their annual MAX conference. I see Bring Your Own Laptop as the supportive community I wished for when I was first starting out and intimidated by design. Through teaching, I hope to bring others along for the ride and empower my students to bring their stories, labors of love, and art into the world.
True to my Kiwi roots, I've lived in many places, and currently, I reside in Ireland with my wife and kids.
Certificates
We’re awarding certificates for this course!
Check out the How to earn your certificate video for instructions on how to earn yours and click the available certificate levels below for more information.
Downloads & Exercise files
Transcript
We're gonna start with some basic prompts. We're gonna get those prompts to match some of the styles that are on our art boards. I'm gonna show you some cool tricks where we can pull styles. See this here, this is a vector graphic, but the designs and colors is pulled from this graffiti. Cool, huh? It gets better.
Look at this illustration style. That's the sample image. And look, these are the vectors that were pulled from it. They match the colors and the style Super well. I find it's a way easier way to use um, some of this generative stuff to give it a sample image rather than to spend ages in the prompts. The prompts are good.
Picking styles from references is even better. Alright, let's jump in and become the boss of Text Vector in Illustrator. Alright, to get started, uh, in your exercise files there's a file in here called Text to Vector. Oh one. Can you open up that Illustrator file for me? Uh, it might say that it's an older version of Illustrator.
I back save it so that everyone can open it without problems. Um, we're gonna start on this first art board here. This white doc. Okay? And just the quick run through. Um, well, we'll even start with a tip when using it.
You can go and use it in your properties panel. I find it tricky in here. Okay, I like all this other stuff in here. So I'm gonna get a window and I'm gonna go down to uh, text to Vector. Okay. And have it as its own panel.
Um, I'm gonna clear out the thing that I was demoing, playing with. And the other thing is, is that you can actually just type in, let's type in candle and it will just generate it on the kind of nearest art board that you're working on. Okay? You can give it a little bit of help. Let me speed through this. There we go.
Okay. So it's great. Okay. It's given us uh, at the moment we're on subject. Okay? It's given us a candle and it's given us just a size.
You can say, actually I want a small one. Okay, so you drag out the rectangle first. Doesn't really matter what's in it, okay? Whether it, mine's got a white fill and a um, no stroke, it doesn't matter. But with it selected and you do the exact same thing, it'll try and squish it into there so you can get the proportions right. There you go.
Got a small candle. And this is more important when we are doing things like the scene option. This one here. So subject is, think of it as like, yeah, object or creature or illustration. Regular old thing. I'm gonna draw out the size of the art board 'cause I want the scene to fill it.
Otherwise it just makes a square. So I'm gonna say, so candle makers shop in the steam punk style. Okay, I've hit subject. I'm gonna go to scene and do it again. There you go. So scene will set the background scene's.
Funny one, it's all very vague and stuff. It's cool. It's a good starting point. But if we draw the rectangle first, at least we get it kind of like cropped into the kind of shape that we want. Now I'm going to just move this over and some of the big wow, the big learnings that I had is when you've got nothing on your art board, you get kind of like some sort of new shape that kind of came out of um, whatever you've typed in the prompt. If you're like me And you are not as clean and tidying, you're really messy.
So let's go to art board two. Okay? Do the same thing. I'm gonna grab my rectangle tool. I like doing the rectangle first. I don't know why you don't have to, but if I do it over here and I say I want a candle, I'm gonna make sure it's on the subject.
And I had generate, you know what I didn't realize for a long time is that there's an option under the style setting here that actually, let's have a look. Can you see what it's done? Okay, it's gone in by default. This is, this is on at the moment. By default it might be off. I'm not sure.
Okay, you have to check yours. But under styles and settings, okay? And here the match active outboard style is on and it's really clear here. Can you see that? It's things just happened to be on my art board, not 'cause I wanted to match them, it's just they were there. I was like working on another project.
It's cool. You can see this kind of skull pattern going on and picked all the colors from it. It's very similar to this stuff. So just be mindful if you're looking for like some sort of unique character or subject or scene, you need to make sure that is turned off. So I go blo, turn it off and do the exact same thing. Rectangle tool.
Actually what I'm gonna do is duplicate this one. So I'm gonna select it. Hold down my option. Ke mac al ke a pc. You stay there. Go back to this one here.
And I can say with it off, do the exact same thing. Do it again please. You can see there it's gone and kind of created something new. So that's one thing. Be mindful of uh, match active style. Now what I find even more useful is this one here says pick styles from a reference.
Okay, so let's go and do this one up here. So we're gonna go to the graffiti. I'm gonna draw a rectangle. I use the M key. It's the shortcut for mm square. Um, but so hit the M key.
Draw out a rectangle and I'm gonna make it a bit smaller. And I'm gonna do, I want a subject. Okay, I want to pick a style. Okay. And can you see it highlights the um, the image. Okay.
Don't have to be on an outboard and just click on it. Okay? And you can pick it from anything I'm picking from a um, pixel image. It's brilliant. Okay? And I'm gonna go candle and I'm gonna hit generate and we are going to get ready.
Oh my goodness, look at that. It's gone through. And like pick the style from the jpeg. Oh, it's so good. Let's have a look at some of the other options. Oh good, good, good.
The colors. It's not just the colors though. Can you see it's tried to do some graffiti ish kind of stuff. It's a really good way to kind of like it. Even if you're not using this image, it's a sample image. Okay?
Even if you're not using it, it might be just the way to get where you want to go rather than using the prompt. 'cause sometimes you're like prompt with graffiti on side using vibrant colors but not that color. Okay. You can use this to kind of, you know, just use it as a style guide. And let's do this one here. This one's pretty awesome.
So let's go here. Rectangle tool. Let's draw a candle. I'm gonna have to reset the style and then I'm gonna click the styles again. Click on this. This will change the changing this panel quite a lot.
So you'll find It. There'll be a style set in here. So I've picked my style. I'm gonna hit the same thing. All I've got in my prompt is candle. I'm not sure if you've done it.
I've tried to like black and white sketch drawing type thing and it's getting better, but it's so much quicker and easier just to grab an image that kind of looks like what you want and look at that. Oh, so good. Look at it. I'm just so impressed with myself. Um, so have a look at some of the old, I'm gonna hold down my option. Keana, Mac alt and a PC to drag out a couple of coffees.
'cause it's nice to kind of, instead of just flicking through them as just to have them all, all off on screen and go, oh, that one kind of works. I love the color they've added. Where does they pull that color from? I'm not sure, but it's a great complimentary color. What I find it useful for as well is when you're designing icons, this is one of the designs from the Illustrator Essentials course. Um, Melvin.
Neos. Okay here, turtle. Love it. Okay, I am gonna go here. And let's say I need a corresponding icon that is a candle. So I'm gonna go to Icon, okay?
And I'm gonna say let's, uh, reset the style. Let's pick it from the Turtle. Okay? I find Icon sometimes it's good and it gives you way too much detail. So under Icon, basically it's, what it's really doing is, can you see the minimal versus complex? So icon, I don't know.
I feel like it's just a drag down subject, which is kind of what it is for me. It's a little hit and miss if you find yours not as great. Me too. It will get better though. The cool thing about this tool is that this is the worst it's gonna be. It's only gonna get better.
So I pick the style from that. Let's go generate icon. Minimal vectors, see what we get. Okay? I give it to you, illustrator, you've done a pretty good job this time. Find out when I'm using it in my own kind of work.
Maybe candle's. Just a nice simple thing that it can make. I'm finding it's generating a little bit much detailed. It's not perfect. It's got the stroker on the outside. That doesn't really happen there.
I'm hoping that will get better as well. But man, you can't deny. Look how good these are.
How do you get better results with Illustrator's Generate Vectors?
The quickest upgrade is to stop relying on prompts alone. Use rectangles to control the output size and composition, turn off automatic artboard style matching when it gets in the way, and use reference images whenever you want the generated vector to inherit a specific look, colour palette, or illustration style.
Illustrator AI Text to Vector: How to Get Much Better Results
Illustrator's built in AI for Text to Vector can be genuinely useful, but only if you know how to steer it. If you've tried it and thought, "Yeah, sort of works," that is a fair first impression.
The difference between random results and good results usually comes down to three things: how you frame the artwork, which generation mode you choose, and whether you use style references instead of trying to write the perfect prompt.
Once those click, Text to Vector becomes much easier to control.
Open the right panel first
You can access Text to Vector through the Properties panel, but it is much easier to use when it has its own dedicated panel.
In Illustrator, open it from Window > Text to Vector. That gives you more room to work and makes the options easier to spot, especially when you start switching between subject, scene, icon, and style settings.
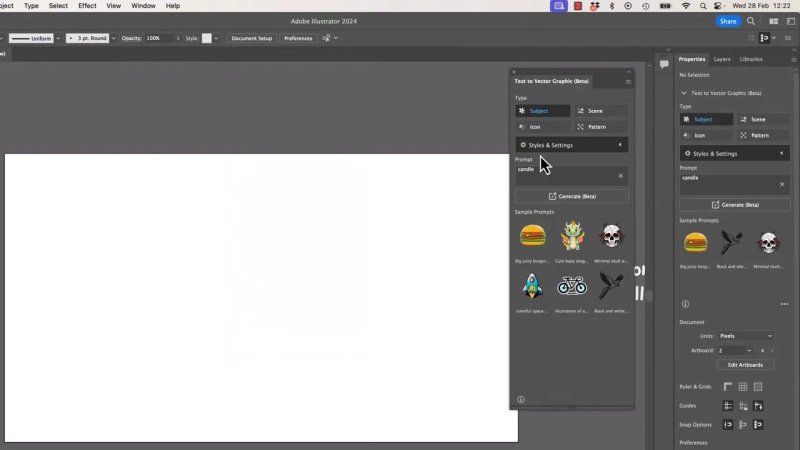
Giving Text to Vector its own panel makes the controls much easier to manage.
If you've been trying to use it from the crowded Properties area, that alone can make the feature feel more awkward than it really is.
Start simple: type a prompt and generate
At its most basic, Text to Vector lets you type a word or short phrase and generate artwork from it. A simple prompt like candle is enough to get started.
If nothing is selected, Illustrator will place the result on the active artboard using its own default size and proportions. That works fine for quick experiments, but it is not the best way to stay in control.
Use a rectangle to control size and proportions
One of the most useful habits is to draw a rectangle before generating. The contents of the rectangle do not matter. It can have any fill or no stroke. What matters is that the shape gives Illustrator a target area to work inside.
When you select that rectangle and run the same prompt again, Illustrator tries to fit the generated vector into that shape. This is a simple way to control:
overall size
aspect ratio
placement on the artboard
how roomy or compact the result feels
For a small standalone object, draw a small rectangle. For a wide composition, draw a wide rectangle. This becomes especially important when you switch from individual objects to full scenes.
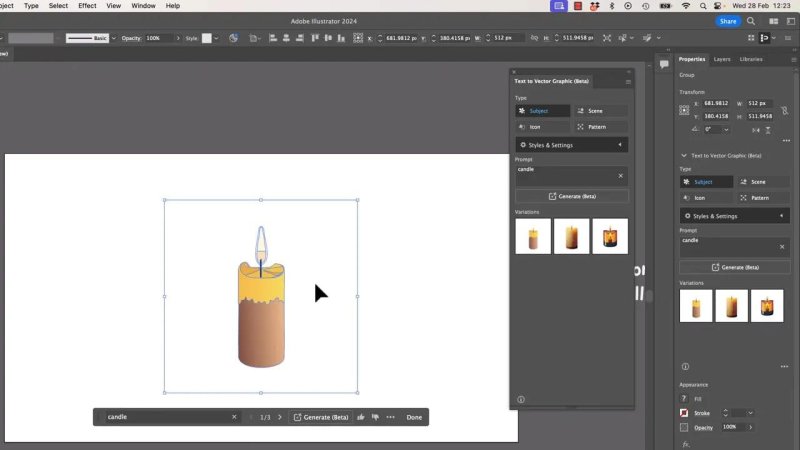
A simple prompt can work well, but the rectangle is what helps the result land at the size you actually need.
Know the difference between Subject, Scene, and Icon
Subject
Subject is the general purpose mode. Think objects, creatures, illustrations, and single standalone elements. If you want a candle, a turtle, a flower, or some other individual item, this is usually the place to begin.
Scene
Scene is for wider compositions with background and environment included. If you prompt something like a candle maker's shop in a steampunk style, Scene tries to build the setting around the idea instead of giving you just one isolated object.
Scene can feel a bit loose and unpredictable, but it is still useful as a starting point. The important trick is to draw the rectangle first, ideally matching the shape of the artboard or the space you want to fill. Otherwise, the result can default to a square that does not suit your layout.
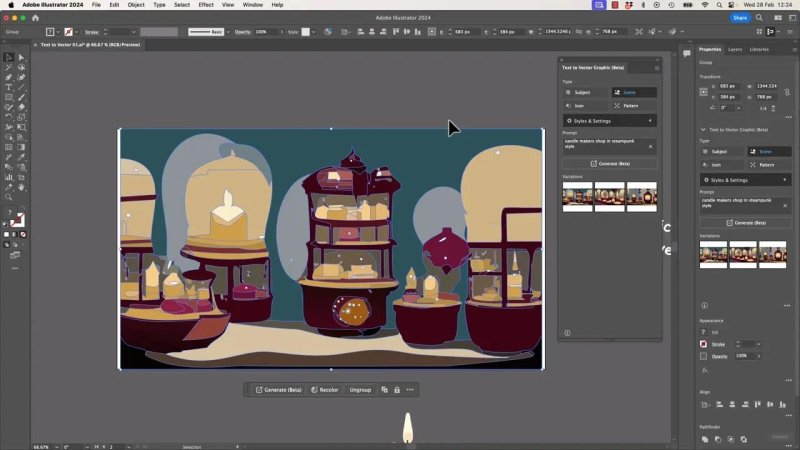
Scene mode is much more convincing when you give it a wide frame to fill.
Icon
Icon aims for simpler graphic results, but it can be a bit hit and miss. In practice, it behaves a lot like Subject with the detail level turned down.
There is usually a balance between minimal and complex, and that is really the core control here. If your icons are coming out fussier than you'd like, this is the setting to pay attention to.
Even then, icon generation is not perfect. Sometimes it adds too much detail or introduces outlines and treatment that do not quite match the source style. Still, when it works, it can save a lot of time.
The hidden reason your results might look weird
If your generated artwork keeps borrowing colours or design cues that you never asked for, there is a good chance Illustrator is matching the style of whatever happens to be on the active artboard.
Inside the style settings, there is an option called Match Active Artboard Style. This can be brilliant when you want it, but confusing when you do not.
Here is the catch. The feature does not care whether the other artwork on the artboard is there intentionally as a style reference or just because your file is messy. If there are skull graphics, badges, or colour swatches hanging around, Text to Vector may pull from them anyway.
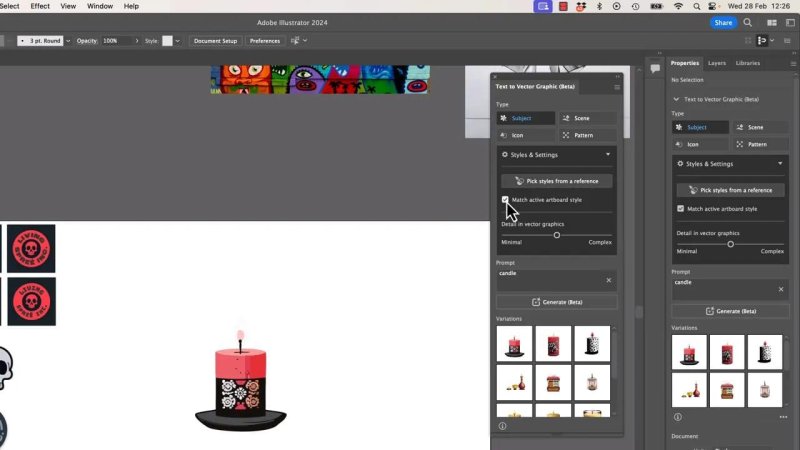
If your prompt keeps inheriting random colours or motifs, this setting is the first place to check.
That means you need to make a deliberate choice:
Turn it on when you want your new vector to visually belong with the artwork already on that artboard.
Turn it off when you want a fresh interpretation based only on the prompt.
This one setting explains a lot of those "why did it make that?" moments.
Reference images are often better than better prompts
This is where Text to Vector gets much more powerful.
Instead of spending ages trying to describe a style in words, you can pick a reference image and let Illustrator borrow the visual language from it. That includes colour, mood, surface treatment, and often a surprising amount of the overall aesthetic.
There is a style option that lets you pick styles from a reference. Once that is active, click the image you want to use as the style sample. It does not even have to be vector artwork. A pixel image works too.
That is the magic part. You can feed it a JPEG and still get vector artwork that feels like it belongs to that world.
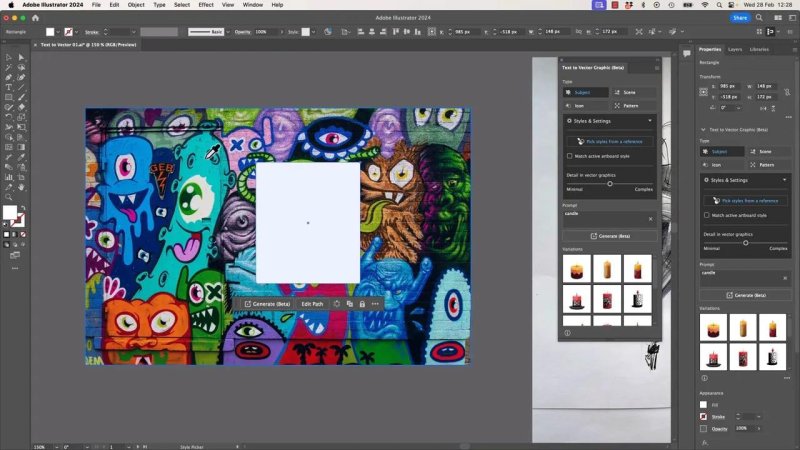
A strong reference image can do more for the result than a long complicated prompt ever will.
Example: generating a candle in graffiti style
Say your prompt is still just candle. Very plain. Nothing fancy.
Now instead of trying to write something like "graffiti style, vibrant colours, street art texture, playful shapes," you simply select a graffiti image as your style reference and generate.
The result can come back with:
colours sampled from the source image
shapes and line energy that echo the original artwork
a much stronger sense of visual personality
That is far easier than wrestling a prompt into submission. The prompt supplies the subject. The reference image supplies the style.
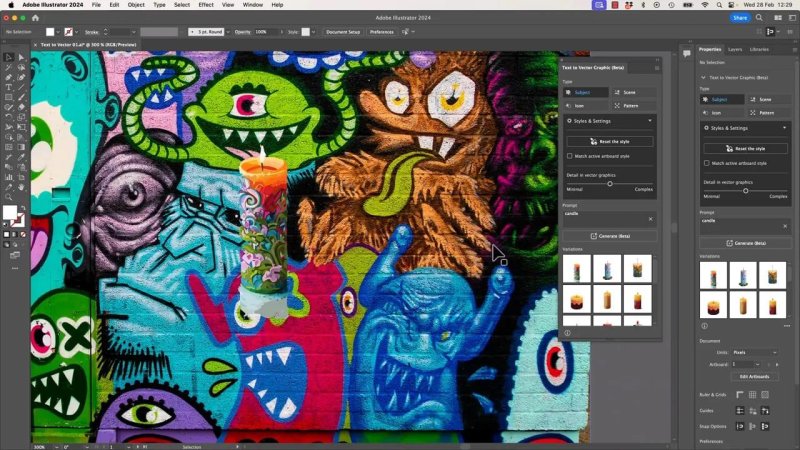
The prompt is still just candle, but the style reference pulls the result into the right visual world.
This is one of the best practical uses for generative vector work in Illustrator. Even if the reference image is just there as a guide and never appears in the final project, it can get you to the look you want much faster.
Another example: pulling a black and white illustration style
The same idea works beautifully with a monochrome artwork reference.
If you want a candle that feels like a loose sketch or fashion illustration, writing that into the prompt may or may not get you there. But if you pick a black and white sample image with the exact kind of drawing style you want, Text to Vector has a much clearer visual direction.
That makes it easier to generate vectors that inherit:
the black and white palette
the hand drawn or painterly feel
the overall illustration character
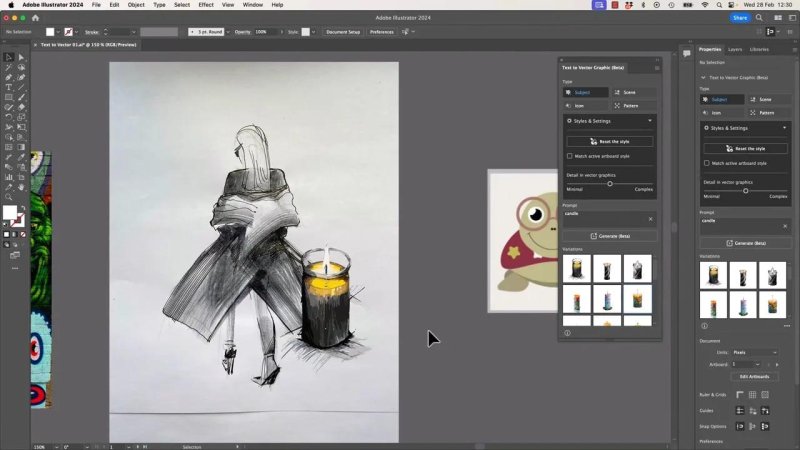
Reference based styling is especially strong when you need the new vector to sit naturally beside existing illustration work.
Again, the big lesson is that visual references often outperform descriptive prompts.
Keep multiple versions visible while you decide
One easy workflow improvement is to duplicate promising results and keep several options on the artboard at the same time instead of flicking through them one by one.
Dragging out copies lets you compare differences in:
shape
detail level
colour balance
how well each version matches the surrounding artwork
That side by side comparison is much better for judging what is working. Sometimes one version has the nicest silhouette, another has the best colour, and another fits the composition more cleanly.
If you are designing, not just experimenting, that little workflow tweak matters.
Using Text to Vector for icons
Icon generation is worth trying, especially when you already have an existing icon set or illustration style and need a matching extra item.
For example, if you have a turtle icon and need a candle icon that feels like part of the same family, you can use the existing turtle artwork as the style reference and generate a candle in Icon mode.
When it goes well, Illustrator produces a pretty convincing match. It can echo the colours, simplify the form, and create something that at least feels related.
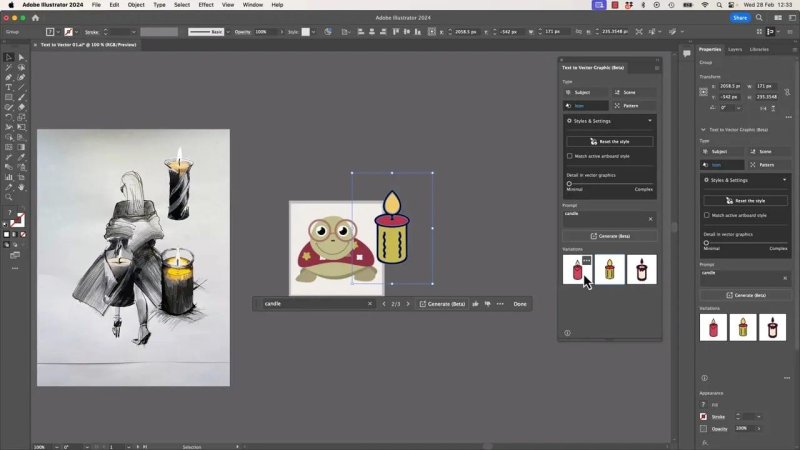
Icon mode can work nicely when you borrow style from artwork that already has the personality you want.
That said, it is still the least reliable of the three modes. You may get more detail than you want, or an outline treatment that does not quite belong. Treat it as a fast first pass, not finished artwork every time.
A practical way to think about prompts
If you want more consistent results, keep your prompts focused on what the thing is, not on trying to describe every visual nuance.
A simple workflow looks like this:
Choose the right mode: Subject, Scene, or Icon.
Draw a rectangle if you need size or composition control.
Use a short, clear prompt such as candle.
Turn off Match Active Artboard Style if you want a clean result.
Use a reference image when style really matters.
Generate multiple options and compare them side by side.
That approach is usually faster and more reliable than writing giant prompts full of adjectives.
What Text to Vector is good at right now
At the moment, this tool is particularly useful for:
rapid concept generation for objects and illustrated elements
matching new artwork to an existing style
building starter scenes that you can refine later
creating related icons for a larger set
exploring visual directions quickly without drawing everything from scratch
It is not flawless, but it is already very handy if you treat it as a collaborative tool rather than a magic finish button.
What still needs work
There are a few limits worth keeping in mind.
Scene mode can be vague.
Icon mode can add too much detail.
Style matching can borrow from the wrong artwork if you leave the active artboard option on by accident.
Some generated vectors still need tidying before they are production ready.
But even with those rough edges, the direction is promising. And honestly, this is as bad as the tool is likely to be. It should only improve from here.
FAQ
Why does Illustrator Text to Vector keep using colours from other artwork on my page?
That usually happens because Match Active Artboard Style is enabled. Illustrator is sampling the style of artwork on the current artboard, even if that artwork is only there by coincidence.
Should I use prompts or reference images for better style control?
Reference images are often the better option when style matters. A short prompt can define the subject, while the reference image handles colour, mood, and illustration style much more effectively than a long descriptive prompt.
What does drawing a rectangle before generating actually do?
It gives Illustrator a target area for the generated vector. That helps control size, shape, and cropping, and it is especially useful for scenes or any artwork that needs to fit a specific layout space.
What is the difference between Subject, Scene, and Icon in Text to Vector?
Subject is best for standalone objects or illustrations, Scene is for wider environment based compositions, and Icon aims for simpler graphic results. Icon can still be inconsistent, so it is best used as a starting point rather than a guaranteed finished asset.
Can Illustrator use a photo or JPEG as a style reference for vector generation?
Yes. That is one of the most useful parts of the feature. You can pick a pixel based image as the reference, and Illustrator will still generate vector artwork that borrows from its colours and overall style.
Written by Daniel Walter Scott — Founder of Bring Your Own Laptop & Chief Instructor
