How to use Generative Recolor Ai in Illustrator
Questions

Student Gallery
Course info
Overview
- - How to use artificial intelligence to boost your creativity in ideation.
- - The quick way to take hand-drawn sketches and vectorize and color them.
- - The building blocks needed to set you loose on a huge variety of beautiful effects and techniques.
- - To make beautiful charts and graphs for your documents.
- - Color mastery to make quick color adjustments, Pantones, and blend it all together beautifully.
- - How to master images inside of your illustrator workflow.
- - To harness all the secret gems that'll help you level up your typography skills.
- - All the tricks of the trade for drawing complex shapes easily.
- - To double your creativity with the Transform and Distort section.
- - To speed up your personal workflow to get the most out of your creative day.
- The Curvature Tool
- How to master corners with corner widget effects
- How to work with Compound Paths
- The difference between Expand & Expand Appearance
- How to create Graphic Styles
- How to make Symbols
- How to use the Smooth Tool
- Advanced use of Simplify Path
- What Live Shape Effects are for
- How to make Repeating Grids & Concentric Circles
- How to make Random Objects
- Advanced Keyboard Shortcuts in Illustrator
- How to add a Gradient on a Stroke
- How to add a Gradient in Text
- How to use the Freeform Gradient tool
- How to use Advanced Color Swatches
- How to use Global Color Swatches
- What is the difference between RGB vs CMYK color modes?
- How to proof colors
- How to use Pantone Spot Colors
- Recolor Artwork & Changing all colors at once
- How to use Blending Modes
- How to work with Images & Blending Modes
- How to make Black & White Images
- Learn Advanced Workflow Tricks
- All the Super Selection Mastery
- How to use the History Panel
- Advanced Fonts Tricks & Tips
- Use Retype to know what Font is being used
- How to put Text Inside a Letter or Shape
- How to use the Touch Type Tool
- How to add a Connected Stroke Around Multiple Shapes
- How to Offset a Stroke with Text
- How to make a Bar Chart in Illustrator
- How to make a Pie Chart in Illustrator
- Layer Power Moves
- Advanced Artboard & Pages Tricks
- How to Unlink vs Embedded Images
- How to Crop Images Rather than Mask
- How to Mask Inside Text & Multiple Shapes
- How to you use the Puppet Warp Tool
- How to use the Distort Envelope Shape & Type
- How to use the Envelope Mesh
- How to blend lines together
- How to make a Linocut Effect
- How to make 3D Gradient Lettering Blends
- How to spin text into a ring
- How to turn text into a 3D donut shape
- How to make a Duotone image effect
- How to make a Roughen Stamp Vector Effect
- How to make a Neon Sign Glow Effect
- How to use a Halftone Effect using Plugins
- Advanced Exporting Assets Tricks in Illustrator
- How to use the Dimension Tool
So what're you waiting for? Let's start the course now!

Daniel Walter Scott
Founder of Bring Your Own Laptop & Chief Instructor
I discovered the world of design as an art student when I stumbled upon a lab full of green & blue iMac G3’s. My initial curiosity around using the computer to create ‘art’ developed into a full-blown passion, eventually leading me to become a digital designer and founder of Bring Your Own Laptop.
Sharing and teaching are a huge part of who I am. As a certified Adobe instructor, I've had the honor of winning multiple Adobe teaching awards at their annual MAX conference. I see Bring Your Own Laptop as the supportive community I wished for when I was first starting out and intimidated by design. Through teaching, I hope to bring others along for the ride and empower my students to bring their stories, labors of love, and art into the world.
True to my Kiwi roots, I've lived in many places, and currently, I reside in Ireland with my wife and kids.
Certificates
We’re awarding certificates for this course!
Check out the How to earn your certificate video for instructions on how to earn yours and click the available certificate levels below for more information.
Downloads & Exercise files
How do you use Generative Recolor in Adobe Illustrator without getting random, unusable colour results?
Start with a prompt that describes the mood you want, then use sample colours only as gentle guidance rather than exact targets. If the result is close but not quite there, switch to the edit controls and fine tune brightness and saturation instead of regenerating forever.
Adobe Illustrator Generative Recolor: How to Get Better, More Controlled Colour Results
Generative Recolor in Adobe Illustrator is one of those features that feels a bit magical when it works well, and a bit odd when it does not. It can take an illustration or logo and quickly explore fresh colour directions, but the trick is knowing how to steer it rather than expecting perfect obedience.
If you have already played with the basics, the next step is learning how to guide the AI with prompts, influence it with sample colours, and rescue almost-right results with a few manual adjustments. That is where this gets genuinely useful.
Where to find Generative Recolor in Illustrator
Start by selecting the artwork you want to recolour. In this example, it is a simple logo lockup with a donut icon and text.
You can open Generative Recolor from a few places in Illustrator:
The contextual taskbar
The Properties panel
Edit > Edit Colors > Generative Recolor
However you get there, make sure you are in the Generative Recolor area rather than the standard recolour options.
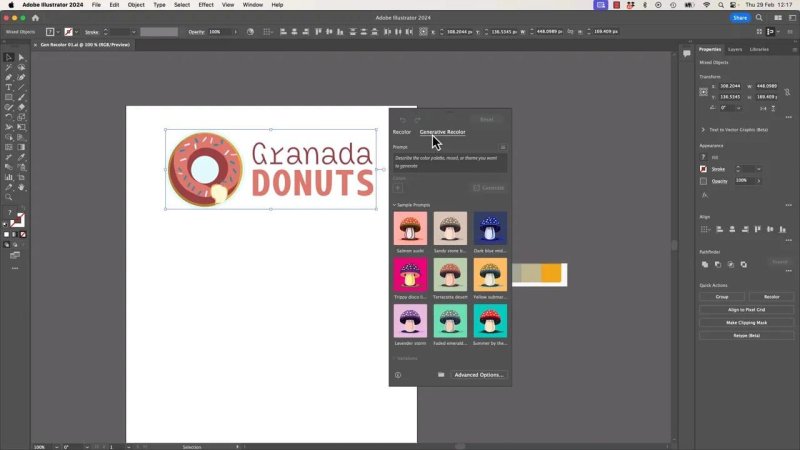
This is the panel that does the heavy lifting, with prompt suggestions and room to guide the colour direction.
Start with prompts, but expect some trial and error
The first thing Illustrator offers is prompt-based recolouring. You can click one of the sample prompts or type your own. This is where the feature feels clever, but also where it can feel a bit unpredictable.
Some phrases produce great palettes over and over again. Others that sound almost identical can go off in a completely different direction. For example, one wording might consistently create strong, appealing colours, while a near-synonym gives results that feel flat or just plain weird.
That is normal.
The prompting side of this tool is still more about exploration than precision. So if a phrase like muted, urban, vibrant urban, or even just blue gets you somewhere useful, keep it simple and build from there.
A good mindset for prompting
Describe a mood more than an exact palette
Try close variations of the same phrase
Do not assume similar words will behave similarly
Regenerate a few times before giving up on a prompt
In short, prompting here is less like giving orders and more like giving nudges.
One limitation to know before you begin
There is a slightly awkward behaviour in the current version. If you get several results you like, you cannot simply ask Illustrator to keep all of them in one go. And if you duplicate the artwork and try again, the tool does not always behave as smoothly as you might expect.
That means if you want another variation from the same prompt, you will usually need to run it again rather than collect multiple versions neatly from one pass.
It is not a deal-breaker, but it helps to know this upfront so you do not waste time trying to force the panel into a workflow it does not quite support yet.
When not to use Generative Recolor
This is an important one.
If you already know the exact colours you need, especially for brand work, do not use Generative Recolor as your main colouring method. Just apply the colours directly.
For exact colour matching, a manual approach is better:
Select the object or text
Use the Eyedropper tool if you already have the colour on the artboard
Apply the swatch or fill colour directly
Generative Recolor is best when you want to explore, not when you need strict control.
How sample colours actually influence the AI
This is where the advanced workflow starts to make more sense.
You can add colours to the prompt as visual guidance. The idea sounds brilliant: feed Illustrator a few brand colours and let it build around them. In practice, though, those colours do not get injected directly into the result.
They act more like a hint.
So if you add three colours and expect the generated palette to use those exact values, you will probably be disappointed. The AI tends to interpret them rather than obey them.
That said, sample colours are still useful. They can push the tool toward a certain family of colours or away from directions you do not want.
What sample colours are good for
Steering the overall palette toward a brand feel
Encouraging warmer, cooler, softer, or stronger tones
Helping a vague prompt become a little more specific
What sample colours are not good for
Exact colour matching
Locking the AI to a fixed palette
Replacing proper brand swatches
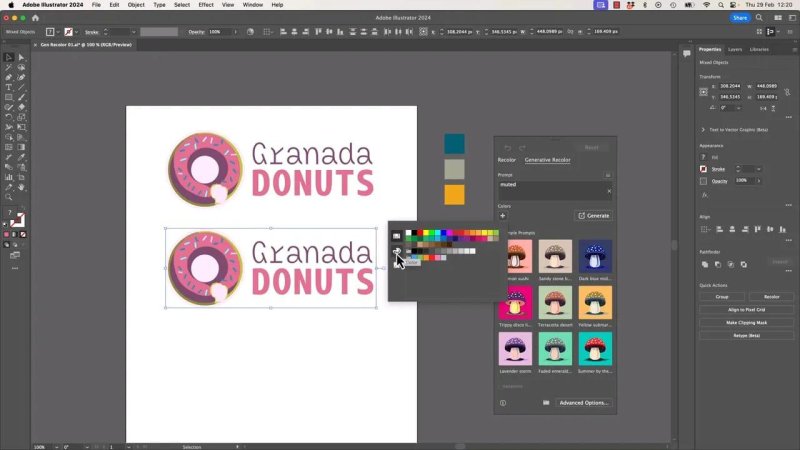
Sample colours can push the palette in the right direction, but they are guidance rather than a strict recipe.
How to add colours that Generative Recolor can use
There are two practical ways to feed colours into the tool.
Option 1: Pick an ad hoc colour in the colour picker
You can open the colour picker and choose something manually. If the defaults look awkward, switch the colour model to one that is easier to work with. HSB is often a good choice because it makes hue, saturation, and brightness easier to understand at a glance.
From there, choose a starting colour and adjust:
Hue for the basic colour family
Saturation for intensity
Brightness for lightness or darkness
This works well when you just want to point Illustrator in a rough direction.
Option 2: Add existing colours to your Swatches panel
If you already have colours on the artboard and want to use them as guidance, add them to your swatches first.
Open Window > Swatches
Select the colours you want to reuse
Choose Add Selected Colors to place them in the Swatches panel
Return to Generative Recolor
Type your prompt and add those swatch colours as influences
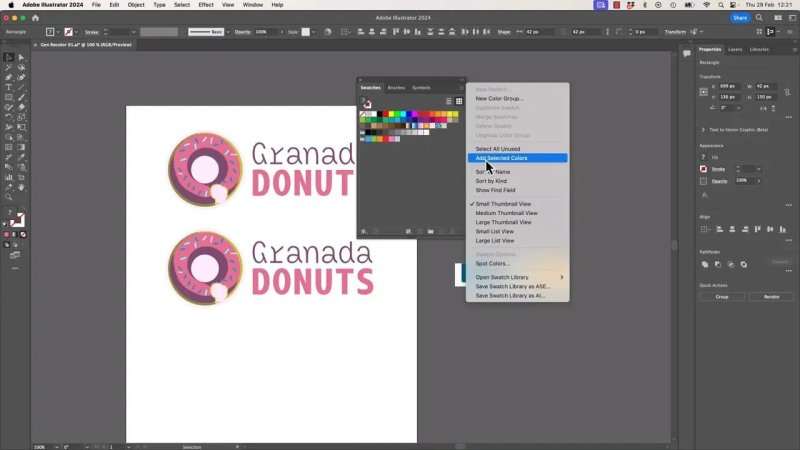
If colours are already part of the job, adding them to Swatches makes them easier to reuse as guides.
What to do when the generated results are not close enough
This is the part that makes the feature much more practical.
Quite often, Generative Recolor gets you somewhere close. Maybe the palette has the right mood, but it is too dull. Or maybe it feels almost right, but the contrast is a bit weak. Instead of throwing the whole thing away and generating endlessly, edit the result.
Select a generated option you like, then jump into the colour editing controls. You can usually get there from the little options menu or by using the quick shortcut inside the panel.
That opens the standard recolour editing view with all the generated colours selected.
The two controls that matter most
Brightness for making the palette lighter or darker
Saturation for making the colours more muted or more vivid
These two sliders are the easiest way to rescue a palette that is nearly there. If the AI has found the right relationships between colours but the whole thing feels a bit sleepy, increase the saturation a little. If it is too heavy or muddy, lift the brightness.
Small changes usually work better than dramatic ones. It is very easy to push saturation too far and end up with something loud in a bad way.
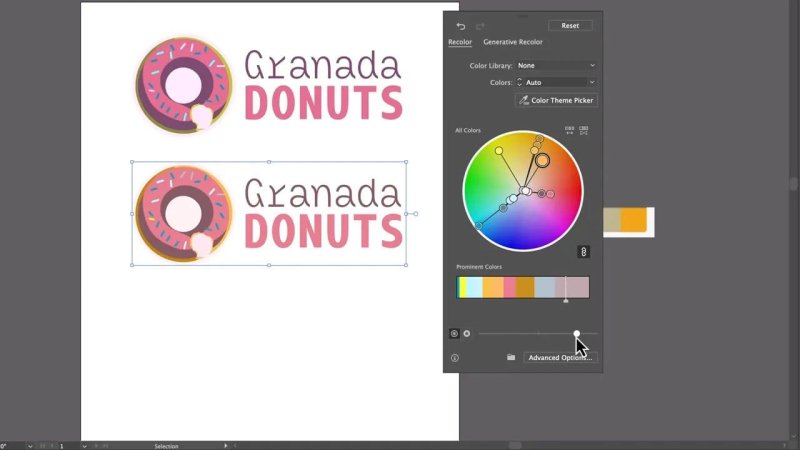
When the palette is close, these controls are usually faster than generating again from scratch.
A practical workflow that works well
If you want a reliable way to use Illustrator Generative Recolor without getting frustrated, this sequence tends to work nicely:
Start with a simple prompt based on mood or style
Generate several options
Pick the closest result rather than waiting for perfection
Add one or more sample colours if you need to nudge the direction
Generate again
Open the edit controls and adjust brightness and saturation
Apply exact colours manually if the job needs strict brand consistency
That is really the sweet spot. Use AI for exploration, then use Illustrator’s normal colour tools for the finishing touches.
Common frustrations and how to handle them
The prompt feels random
It can be. Try similar phrases, but do not expect them to behave logically every time. Save the words that consistently give you useful palettes.
The sample colours are being ignored
They are probably not being ignored entirely, but they are not treated as hard rules. Think of them as influence, not instruction.
The result is nearly right but still off
Do not keep regenerating immediately. Edit brightness and saturation first. That often fixes the problem faster.
I need exact colours for a brand
Skip the generative part for final application. Use direct fills, swatches, or the Eyedropper tool.
I want to keep several results at once
The current workflow is a bit clunky here. Duplicate your artwork and rerun the process if you want to compare versions side by side.
Final thoughts on Illustrator AI recolouring
Adobe Illustrator’s Generative Recolor is genuinely useful once you stop expecting it to be a perfect colour-matching machine. It is much better as a creative assistant than as a strict production tool.
Use it to explore directions you might not have chosen on your own. Use prompts to shape the mood. Use sample colours to nudge it. Then use manual adjustments to finish the job properly.
That balance between automation and control is where the feature shines.
FAQ
Can Generative Recolor in Illustrator use exact brand colours?
Not reliably. You can provide sample colours to influence the result, but if you need exact brand values, it is better to apply those colours manually with swatches or the Eyedropper tool.
Why do similar prompts give very different colour results?
The tool interprets mood and style language quite loosely, so small wording changes can produce noticeably different palettes. It is worth testing a few close variations and keeping note of the prompts that work well for your style of project.
What is the best way to improve a generated colour palette?
Choose the result that is closest, then edit it using brightness and saturation controls. That is usually faster and more effective than generating a completely new set of options over and over.
Do I need to add colours to Swatches before using them in Generative Recolor?
If the colours are already part of your artwork and you want easy access to them as influences, yes. Adding selected colours to the Swatches panel makes them available for a smoother recolouring workflow.
Is Generative Recolor better for logos or illustrations?
It works for both, but it is most helpful on artwork where you want to explore alternative moods quickly. For logo work tied to strict branding, it is best used during concept exploration rather than final colour production.
Written by Daniel Walter Scott — Founder of Bring Your Own Laptop & Chief Instructor
