What are Global Color Swatches in Illustrator
Questions


Student Gallery
Course info
Overview
- - How to use artificial intelligence to boost your creativity in ideation.
- - The quick way to take hand-drawn sketches and vectorize and color them.
- - The building blocks needed to set you loose on a huge variety of beautiful effects and techniques.
- - To make beautiful charts and graphs for your documents.
- - Color mastery to make quick color adjustments, Pantones, and blend it all together beautifully.
- - How to master images inside of your illustrator workflow.
- - To harness all the secret gems that'll help you level up your typography skills.
- - All the tricks of the trade for drawing complex shapes easily.
- - To double your creativity with the Transform and Distort section.
- - To speed up your personal workflow to get the most out of your creative day.
- The Curvature Tool
- How to master corners with corner widget effects
- How to work with Compound Paths
- The difference between Expand & Expand Appearance
- How to create Graphic Styles
- How to make Symbols
- How to use the Smooth Tool
- Advanced use of Simplify Path
- What Live Shape Effects are for
- How to make Repeating Grids & Concentric Circles
- How to make Random Objects
- Advanced Keyboard Shortcuts in Illustrator
- How to add a Gradient on a Stroke
- How to add a Gradient in Text
- How to use the Freeform Gradient tool
- How to use Advanced Color Swatches
- How to use Global Color Swatches
- What is the difference between RGB vs CMYK color modes?
- How to proof colors
- How to use Pantone Spot Colors
- Recolor Artwork & Changing all colors at once
- How to use Blending Modes
- How to work with Images & Blending Modes
- How to make Black & White Images
- Learn Advanced Workflow Tricks
- All the Super Selection Mastery
- How to use the History Panel
- Advanced Fonts Tricks & Tips
- Use Retype to know what Font is being used
- How to put Text Inside a Letter or Shape
- How to use the Touch Type Tool
- How to add a Connected Stroke Around Multiple Shapes
- How to Offset a Stroke with Text
- How to make a Bar Chart in Illustrator
- How to make a Pie Chart in Illustrator
- Layer Power Moves
- Advanced Artboard & Pages Tricks
- How to Unlink vs Embedded Images
- How to Crop Images Rather than Mask
- How to Mask Inside Text & Multiple Shapes
- How to you use the Puppet Warp Tool
- How to use the Distort Envelope Shape & Type
- How to use the Envelope Mesh
- How to blend lines together
- How to make a Linocut Effect
- How to make 3D Gradient Lettering Blends
- How to spin text into a ring
- How to turn text into a 3D donut shape
- How to make a Duotone image effect
- How to make a Roughen Stamp Vector Effect
- How to make a Neon Sign Glow Effect
- How to use a Halftone Effect using Plugins
- Advanced Exporting Assets Tricks in Illustrator
- How to use the Dimension Tool
So what're you waiting for? Let's start the course now!

Daniel Walter Scott
Founder of Bring Your Own Laptop & Chief Instructor
I discovered the world of design as an art student when I stumbled upon a lab full of green & blue iMac G3’s. My initial curiosity around using the computer to create ‘art’ developed into a full-blown passion, eventually leading me to become a digital designer and founder of Bring Your Own Laptop.
Sharing and teaching are a huge part of who I am. As a certified Adobe instructor, I've had the honor of winning multiple Adobe teaching awards at their annual MAX conference. I see Bring Your Own Laptop as the supportive community I wished for when I was first starting out and intimidated by design. Through teaching, I hope to bring others along for the ride and empower my students to bring their stories, labors of love, and art into the world.
True to my Kiwi roots, I've lived in many places, and currently, I reside in Ireland with my wife and kids.
Certificates
We’re awarding certificates for this course!
Check out the How to earn your certificate video for instructions on how to earn yours and click the available certificate levels below for more information.
Downloads & Exercise files
How do Global Swatches work in Illustrator?
Global Swatches let you link a colour swatch to every object using it, so when you edit the swatch, every linked object updates at once. That makes them ridiculously handy for branding work, colour revisions, and cleaning up files that would otherwise turn into a click-fest.
Adobe Illustrator Global Swatches: What They Are and Why They’re So Awesome
Global Swatches are one of those little Illustrator features that quietly save a massive amount of time.
If a colour is set up as a normal swatch, changing the swatch does not update the artwork that already uses it. If it is set up as a Global Swatch, changing that swatch updates every object linked to it throughout the document.
That is the whole superpower.
And once you start using them properly, they become one of those things you pretty much want on all the time.
What makes a Global Swatch different?
In the Swatches panel, a Global Swatch has a small marker on it, a little tab-like cutout in the corner. A regular swatch does not.
That tiny visual difference matters because it tells you whether the colour is just a saved colour chip or whether it is actually linked to the objects using it.
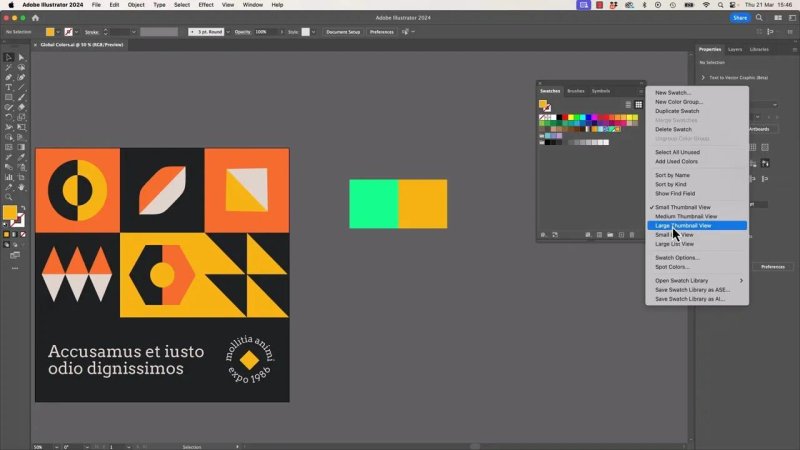
Large Thumbnail View makes it much easier to spot which swatches are set up for proper colour management.
If you want to make the panel easier to read, switch the Swatches panel to Large Thumbnail View. It is one of those small panel tweaks that instantly makes the whole thing clearer.
Why Global Swatches are worth using
Here is the practical difference.
Regular swatch: you can edit the swatch, but existing artwork using that old colour does not automatically update.
Global swatch: edit the swatch once, and every linked shape changes with it.
That means Global Swatches are ideal when:
brand colours change
you need to test colour options quickly
you are working across lots of repeated graphics
you want a cleaner, more controlled Illustrator file
If you have ever had a client come back with “can we make that yellow a bit darker?” across an entire document, this is exactly the fix.
How to create a Global Swatch in Illustrator
Making one is straightforward.
Choose a fill colour you want to keep.
Add it to the Swatches panel by clicking the plus button.
In the new swatch options, leave Global ticked.
Click OK.
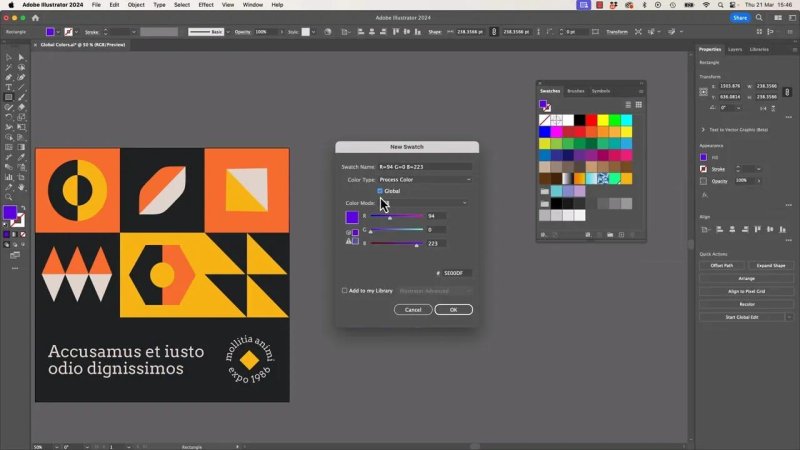
When you add a new swatch, keeping Global turned on is usually the right move.
That Global option is typically on by default, which is great, because honestly there are not many situations where I would want it off.
Once the swatch is created, you will see the little tab marker in the Swatches panel. That tells you the swatch is global and ready to do its job.
How to tell whether artwork is using a swatch
A handy clue in Illustrator is that when you click an object, the matching swatch highlights in the Swatches panel.
So if you click one object and then another, you can quickly see whether they are actually using the same swatch, not just a colour that looks similar.
That distinction becomes important later, because same-looking colour and same linked swatch are not always the same thing.
Editing a regular swatch vs editing a Global Swatch
This is where the difference really shows up.
If you have nothing selected and you double click a regular swatch, then darken or adjust it, the swatch changes in the panel but the existing artwork does not follow along.
If you do the exact same thing to a Global Swatch, every object using that swatch updates immediately.
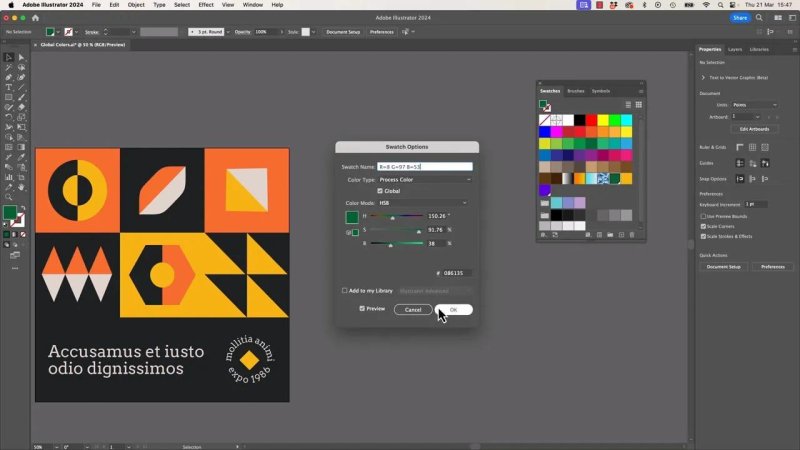
This is the magic bit: edit the swatch once and every linked object updates with it.
That is why Global Swatches are awesome. You are not just saving colours. You are creating colour relationships.
How to convert an existing colour into a Global Swatch
This is where people often trip up, because simply ticking the Global box on an existing swatch is only part of the job.
Say you have a document with a colour already used in several places, but that swatch is not global yet.
You might think this would work:
Double click the swatch.
Turn on Global.
Edit the swatch colour.
But sometimes nothing updates in the artwork.
Why? Because the artwork may still be filled with the old non-global colour definition. Turning the swatch global does not always magically relink every object that already looked like that colour.
The correct way to relink the artwork
After converting the swatch to global, you need to deliberately reapply it to the artwork that should use it.
The clean way to do that is:
Turn the swatch into a Global Swatch.
Select one object that should use that colour.
Go to Select > Same > Fill Colour.
Once Illustrator selects everything with that fill colour, click the new global swatch to apply it.
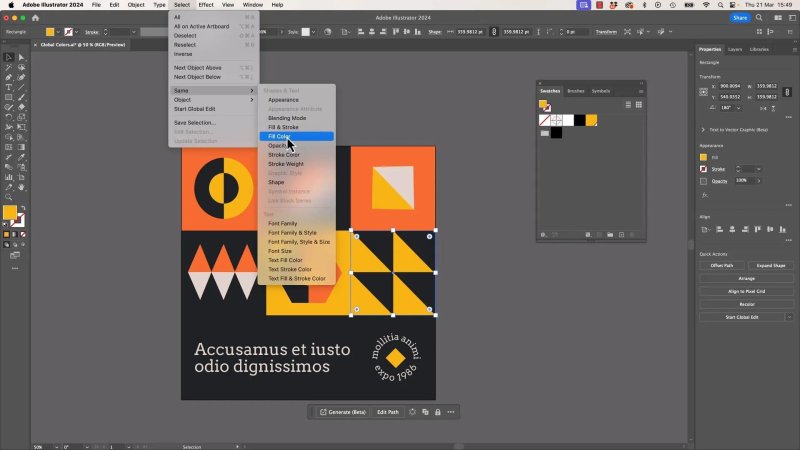 Fill Color" to grab matching elements across the artboard.">
Select Same Fill Colour is the shortcut that helps convert scattered matching colours into one linked swatch.
Visually, nothing dramatic happens at first. The colour may look exactly the same.
But under the hood, all those objects are now actually linked to the Global Swatch. After that, if you deselect everything and edit the swatch, the whole set updates properly.
The easy mistake that catches nearly everyone
There is a sneaky gotcha here, and it is a good one to know before it wastes five minutes of your life.
If you create a new Global Swatch while an object is selected, that selected object may immediately get the new global swatch applied to it. Other objects that only look the same colour are still using the old swatch or colour definition.
Then if you run Select > Same > Fill Colour from that selected object, Illustrator may only find the object already using the new swatch, not the other matching shapes you meant to grab.
That feels confusing because the colours appear identical on screen.
But Illustrator is being literal. It is looking at what is applied, not what looks close enough to the human eye.
The fix is simple:
click off everything first
select an object that still has the original fill colour
use Select Same Fill Colour
then apply the Global Swatch to that whole selection
You just need to be deliberate about what is selected when you do the conversion.
You should name your swatches
Yes, you can leave them unnamed and plough on. But naming swatches properly is the smarter move.
If you are building reusable graphics, handling multiple brand versions, or sharing files with someone else, swatch names make life much easier.
Even simple names like these help:
Primary Yellow
Accent Orange
Dark Background
Brand Green
Once the file gets bigger, unnamed colour chips become chaos pretty quickly.
How to break the link and make a swatch non-global again
Sometimes you do not want colours linked anymore.
That is fine too.
If you double click a Global Swatch and turn off Global, Illustrator breaks that relationship. The swatch stops behaving as a shared controller for those colours, and the objects effectively become independent.
That can be useful if you want to stop future document-wide changes from happening.
The fastest way to replace one swatch with another
There is one more trick here, and it is a really good one.
Let’s say you have an existing colour in the document and you want to swap every instance of it for a different swatch. Maybe the brand colour changed, or you are preparing alternate versions for different clients.
You could manually select artwork with the same fill and reassign it.
Or you can do the much faster version.
With nothing selected:
Choose the swatch you want to replace.
Hold Option on Mac or Alt on PC.
Click the new swatch you want to use instead.
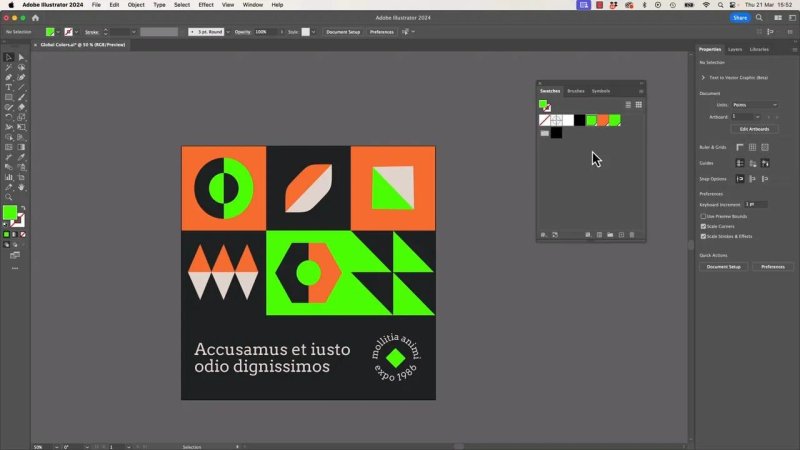
This swatch replacement trick is brilliant when the layout stays the same but the brand colour changes.
Illustrator switches that swatch usage across the artwork. It is one of those small shortcuts that feels like a cheat code once you know it.
When Global Swatches are especially useful
They are great in almost any Illustrator workflow, but they are especially useful when you are:
building brand systems
creating repeatable templates
designing multiple colour versions of the same artwork
cleaning up files from other people
making fast colour revisions without hunting through the whole document
A lot of files you inherit from someone else will not be set up with global colours. Taking a few minutes to convert key colours into Global Swatches can make the document far easier to manage.
Best practices for working with Global Swatches
Leave Global enabled by default when creating new swatches.
Use Large Thumbnail View in the Swatches panel so the icons are easier to spot.
Name important swatches if the file is more than a quick one-off.
Reapply the swatch after converting old colours so the artwork is truly linked.
Be careful with selection state when using Select Same Fill Colour.
Use Option or Alt click replacement for fast brand colour swaps.
FAQ
What is a Global Swatch in Illustrator?
A Global Swatch is a colour swatch that stays linked to every object using it. When you edit that swatch, Illustrator updates all linked artwork automatically.
How do I know if a swatch is global?
In the Swatches panel, a Global Swatch has a small tab-like marker on it. A regular swatch does not have that indicator.
Why didn’t my artwork update after I made a swatch global?
Making the swatch global is not always enough on its own. You often need to select the objects using that colour and reapply the new global swatch so the artwork is actually linked to it.
How do I select all objects with the same colour in Illustrator?
Select one object with that fill, then go to Select > Same > Fill Colour. Illustrator will select the other objects using that same fill colour.
Can I turn a Global Swatch back into a regular swatch?
Yes. Double click the swatch and turn off the Global option. That breaks the shared link so future changes to the swatch will not update all connected artwork.
What is the fastest way to replace one swatch with another?
With nothing selected, hold Option on Mac or Alt on PC and click the replacement swatch. Illustrator swaps the old swatch usage for the new one.
Global Swatches are simple, but they punch way above their weight. Once you start using them, colour changes stop being a chore and start being a two-second job.
That is a pretty good trade.
Written by Daniel Walter Scott — Founder of Bring Your Own Laptop & Chief Instructor
