File types & codecs to use in Premiere Pro
Questions


Student Gallery
Be the first to share something.
Course info
Overview
I am here to help you learn Adobe Premiere Pro and to show you the tools you need to become a successful video editor. Premiere Pro is the industry standard used by professional designers to create stunning, high class videos and, after completing this course, you too can become a confident, skillful and efficient creator of stunning videos.
This course is aimed at people who are completely new to Premiere Pro.
If you are self taught using Premiere, this course will show you techniques you never dreamed were necessary or possible and will show you efficiencies to help speed up your workflow.
The course covers many topics - all of them on a step-by-step basis. We will use real world video editing examples to work through:
- An interview
- A wedding video
- A short commercial
- A documentary
- Social media advertising videos
- YouTube ‘how to’ videos
- Talking head footage mixed with screencasts and voiceovers
We will work with text, animation, motion gfx, special effects and we will add music to our video.
We will learn how to do colour correction, colour balancing and also how to create amazing video transitions within our movie. Technical ‘guru’ topics such as HD v 4K, frames per second, exporting work, fixing up bad audio, balancing and synching audio will all become manageable tasks for you. Best of all...I will show you amazing shortcuts and techniques to speed up your workflow.
Throughout the course we will work on mini projects and I will be suggesting assignments which will add value to your portfolio.
Start your Premiere Pro training now and fast track your career as a video editor.
* Please note, you have full permission to transform and upload any work using footage of Daniel as a part of this course.

Daniel Walter Scott
Founder of Bring Your Own Laptop & Chief Instructor
I discovered the world of design as an art student when I stumbled upon a lab full of green & blue iMac G3’s. My initial curiosity around using the computer to create ‘art’ developed into a full-blown passion, eventually leading me to become a digital designer and founder of Bring Your Own Laptop.
Sharing and teaching are a huge part of who I am. As a certified Adobe instructor, I've had the honor of winning multiple Adobe teaching awards at their annual MAX conference. I see Bring Your Own Laptop as the supportive community I wished for when I was first starting out and intimidated by design. Through teaching, I hope to bring others along for the ride and empower my students to bring their stories, labors of love, and art into the world.
True to my Kiwi roots, I've lived in many places, and currently, I reside in Ireland with my wife and kids.
Certificates
We’re awarding certificates for this course!
Check out the How to earn your certificate video for instructions on how to earn yours and click the available certificate levels below for more information.
Downloads & Exercise files
When should I export an MP4 or MOV file from Premiere Pro?
For most everyday exports, choose an H.264 MP4 because it looks good, stays small, and plays almost everywhere. Choose a QuickTime MOV with Apple ProRes 422 when someone needs a higher-quality file for further editing or when an MP4 export is causing visible quality or colour problems.
How to Choose Video File Types and Codecs in Premiere Pro
Key takeaways
MP4 and MOV are file containers, often called wrappers.
The codec inside the file determines how the video is compressed.
H.264 MP4 is the dependable default for sharing and online playback.
Apple ProRes 422 MOV is a common professional delivery format with much larger files.
If a client specifies a format and codec, give them exactly what they ask for.
If nobody has a specific requirement, an H.264 MP4 is usually completely fine.
The two video file types you will use most
Video export settings can feel like a weird old world of wrappers, codecs, HD, 4K, bitrate, presets, and a lot of options that appear to have been named by people trying to make life difficult. The good news is that, most of the time, you only need to understand two main file types: MP4 and MOV.
In Premiere Pro, start an export with Command + M on a Mac or Control + M on a PC. Make sure the timeline is selected first, otherwise Premiere may export the wrong thing or not offer the options you expect.
The key choices are usually:
H.264, which commonly creates an .mp4 file
QuickTime, which creates a .mov file
There are plenty of other formats, of course, but these two will cover a huge amount of day-to-day exporting.
H.264 and MP4: the standard small-file export
An MP4 exported with H.264 is the practical, popular choice. It is heavily compressed, which keeps the file size down while still producing a video that looks great when played back.
That small size is a big deal. H.264 compression is a major reason video can be shared and played online so easily. It gives you an efficient file that is broadly compatible with phones, computers, web platforms, and standard media players.
For an everyday export, use an H.264 MP4. It is the safe option when you need to send a video, upload it, or hand it to someone who has not requested anything more specific.
There is a trade-off, though. H.264 gets its small file size by compressing the video aggressively and removing data. That is generally fine for playback, but it means it is not the ideal choice when somebody needs the best possible version for more post-production work.
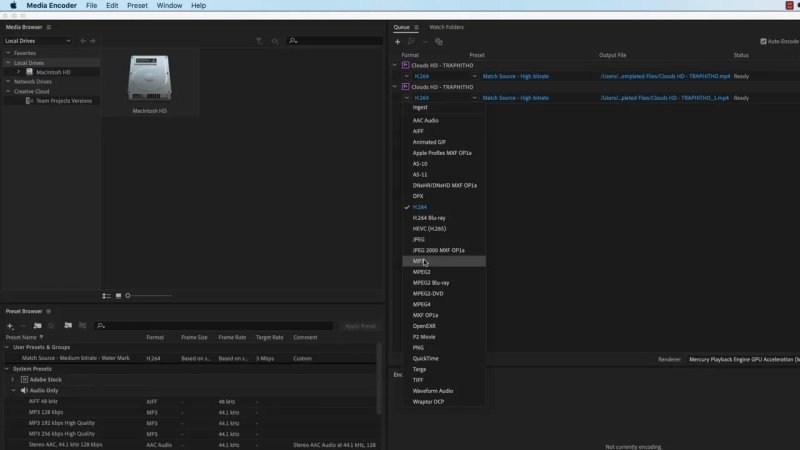
The format menu is where the file wrapper is chosen before deciding on the codec settings.
When to use an H.264 MP4
Nothing specific has been requested.
You want a manageable file size.
The video needs to play reliably on common devices.
You are sharing or uploading the finished video.
You want a sensible default without getting buried in technical settings.
QuickTime MOV: larger files with more retained quality
A QuickTime file uses the .mov extension. Compared with an MP4, a MOV can become very large, sometimes reaching gigabytes even for relatively short footage. That can sound ridiculous until you need the quality it retains.
A common professional request is a QuickTime MOV using Apple ProRes 422, often specifically ProRes 422 HQ. This is a much less aggressive approach to compression than H.264. The result is a larger file, but one that preserves more of the original video information.
This matters when the person receiving the file needs to work with it further. Sending an MP4 means some image information has already been squashed down. Sending a ProRes MOV gives them a much purer version to edit, grade, or use in another production.
It can also solve occasional export frustrations. If footage looks good in Premiere Pro but an MP4 export shows odd colours or reduced quality, exporting a MOV with ProRes 422 can often restore the result you were expecting. You pay for that quality with storage space, though. The files are enormous.
When to use a ProRes MOV
A client, editor, animator, or production team requests a MOV.
You have been asked specifically for Apple ProRes 422 or ProRes 422 HQ.
The file will go into another editing or finishing workflow.
An MP4 export is creating unexpected quality or colour issues.
File size matters less than retaining as much video quality as possible.
MP4 and MOV are wrappers, not the whole story
This is the bit that makes file formats seem more confusing than they need to be. MP4 and MOV are best thought of as wrappers, or containers. They give the file its name and extension, but they do not fully describe how the video data inside has been compressed.
The thing doing the important work is the codec. A codec determines how video is encoded into a smaller, usable file and how it is decoded for playback.
So the useful way to think about your export is not merely “I need an MP4” or “I need a MOV.” It is:
Which file format or wrapper do I need?
Which codec should sit inside it?
For the two most common workflows, the pairings are straightforward:
MP4 + H.264 for small, compatible, shareable video files
MOV + Apple ProRes 422 for high-quality professional handover files
Why H.264 remains such a useful codec
H.264 is common because it hits a very useful balance: compact files, good-looking video, and excellent playback support. The device or software playing the video has to understand the codec. Happily, H.264 is recognised by just about everything people routinely use.
There are newer codecs, such as H.265, but newer does not automatically mean it is the right choice every time. Compatibility still matters. A phone or media player may happily play an H.264 file but struggle with a codec it does not recognise or support properly.
That is why H.264 remains the dependable default. It is common, efficient, and understood by the devices that need to play it.
How to set up both exports in Adobe Media Encoder
If you need to create both versions of the same edit, send the sequence to Adobe Media Encoder and make two export jobs.
Select the timeline in Premiere Pro.
Press Command + M on Mac or Control + M on PC.
Set the first export to H.264 for an MP4.
Add it to Adobe Media Encoder.
Duplicate the job in Media Encoder.
Change the duplicated job to QuickTime.
Choose the requested codec, such as Apple ProRes 422 HQ.
Set the output location and clear file names so you can tell the exports apart.
Start the queue.
You can make the format choice in Premiere Pro before passing the job over, or change it inside Media Encoder. Either approach is fine. The important part is checking both the file format and the codec before exporting.
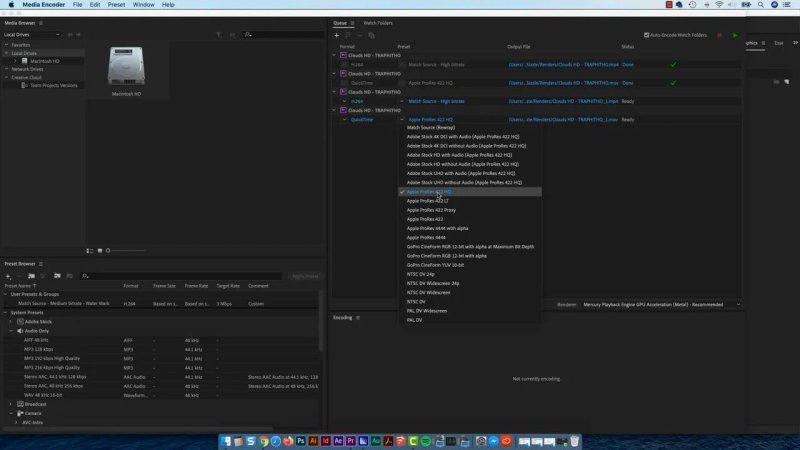
QuickTime exports offer a long list of presets, but Apple ProRes 422 is the common professional choice when it has been requested.
What about AVI and other codec requests?
On a PC, you may occasionally be asked for an AVI file. It may not appear in every export list, particularly when working on a Mac. Likewise, QuickTime options may not appear on some PCs until the free QuickTime Player has been installed, which can provide the codecs needed for those workflows.
You may also receive requests for other codecs, including animation codecs, ProRes 4444, or CineForm. Do not panic. The process stays the same: identify the required wrapper, then identify the required codec.
If someone asks for something specific, give them that specific format and codec. If they are unsure what they need, send an H.264 MP4 and the world will generally be fine.
A practical decision guide
Situation | Recommended export | Why |
|---|---|---|
General sharing or online delivery | H.264 MP4 | Small, good-looking, and widely compatible |
No delivery specification supplied | H.264 MP4 | The safest everyday default |
Client requests a high-quality master | QuickTime MOV with ProRes 422 | Retains more video information for their workflow |
Professional delivery request says ProRes 422 HQ | QuickTime MOV with ProRes 422 HQ | Give them precisely what they asked for |
MP4 export has strange colours or visible quality issues | QuickTime MOV with ProRes 422 | Less aggressive compression can preserve the expected result |
Do not feel you need to memorise every setting
Codecs are a lot to take in at first. You do not need to know every option immediately, and nobody expects you to have every format committed to memory before you start exporting real jobs.
The useful baseline is simple: use H.264 Match Source for a normal MP4 export. When a job needs something more specialised, find out exactly what format and codec are required, then work from there.
Over time, the requests become familiar. Until then, it is perfectly normal to look up an unfamiliar codec, double-check the requested setting, and carry on. The important thing is knowing that MP4 versus MOV is only the first part of the decision. The codec inside is what determines the compression, compatibility, file size, and amount of quality retained.
Key terms
MP4
An MP4 is a widely used video file container. It is commonly paired with H.264 compression to create compact, highly compatible video files.
MOV
MOV is the QuickTime video file container. It is frequently used with Apple ProRes codecs when a high-quality professional video file is needed.
Codec
A codec is the method used to encode and compress video data, then decode it for playback. It has a major effect on file size, image quality, and device compatibility.
H.264
H.264 is a common, heavily compressed codec that produces good-looking video in small files. It is the usual choice for an MP4 export.
Apple ProRes 422
Apple ProRes 422 is a professional codec that uses less aggressive compression than H.264. It creates much larger files while retaining more image information.
Wrapper
A wrapper, also called a container, is the file format around the video data, such as MP4 or MOV. The wrapper and codec are related but are not the same thing.
FAQs
Is MP4 or MOV better?
Neither is always better. H.264 MP4 is better when you need a smaller, widely playable file. A MOV using Apple ProRes 422 is better when higher retained quality is needed for professional handover or additional editing.
What is the best default Premiere Pro export format?
H.264 with a Match Source preset is the sensible default for most general exports. It creates an MP4 that balances file size, visual quality, and compatibility.
Why is my MOV file so much larger than my MP4?
A MOV using a codec such as Apple ProRes 422 uses less aggressive compression than an H.264 MP4. It retains more video information, and that means the file size can grow dramatically.
What does a client mean when they ask for ProRes 422 HQ?
They are requesting a QuickTime MOV file using the Apple ProRes 422 HQ codec. Set the format to QuickTime, select the requested ProRes preset or codec option, and export the MOV file.
Should I use H.265 instead of H.264?
H.265 is newer, but playback support is the deciding factor. H.264 remains a safer default because it is so commonly supported by phones, computers, and media players.
Written by Daniel Walter Scott — Founder of Bring Your Own Laptop & Chief Instructor
