How to add scale & position for multiple videos at once in Premiere
Questions

Oops! You need to be a member to join in.
Feel free to browse but if you'd like to jump into the conversation you'll need to join our awesome student community.
Explore 30+ Essential and Advanced courses in Figma, Photoshop, Illustrator, Lightroom, Premiere Pro, Webflow, and more. Enjoy self paced learning, personalized support, earn certificates, and exciting community challenges.

Oops! You need to be a member to join in.
Feel free to browse but if you'd like to jump into the conversation you'll need to join our awesome student community.
Explore 30+ Essential and Advanced courses in Figma, Photoshop, Illustrator, Lightroom, Premiere Pro, Webflow, and more. Enjoy self paced learning, personalized support, earn certificates, and exciting community challenges.
Student Gallery
Be the first to share something.
Course info
Overview
I am here to help you learn Adobe Premiere Pro and to show you the tools you need to become a successful video editor. Premiere Pro is the industry standard used by professional designers to create stunning, high class videos and, after completing this course, you too can become a confident, skillful and efficient creator of stunning videos.
This course is aimed at people who are completely new to Premiere Pro.
If you are self taught using Premiere, this course will show you techniques you never dreamed were necessary or possible and will show you efficiencies to help speed up your workflow.
The course covers many topics - all of them on a step-by-step basis. We will use real world video editing examples to work through:
- An interview
- A wedding video
- A short commercial
- A documentary
- Social media advertising videos
- YouTube ‘how to’ videos
- Talking head footage mixed with screencasts and voiceovers
We will work with text, animation, motion gfx, special effects and we will add music to our video.
We will learn how to do colour correction, colour balancing and also how to create amazing video transitions within our movie. Technical ‘guru’ topics such as HD v 4K, frames per second, exporting work, fixing up bad audio, balancing and synching audio will all become manageable tasks for you. Best of all...I will show you amazing shortcuts and techniques to speed up your workflow.
Throughout the course we will work on mini projects and I will be suggesting assignments which will add value to your portfolio.
Start your Premiere Pro training now and fast track your career as a video editor.
* Please note, you have full permission to transform and upload any work using footage of Daniel as a part of this course.

Daniel Walter Scott
Founder of Bring Your Own Laptop & Chief Instructor
I discovered the world of design as an art student when I stumbled upon a lab full of green & blue iMac G3’s. My initial curiosity around using the computer to create ‘art’ developed into a full-blown passion, eventually leading me to become a digital designer and founder of Bring Your Own Laptop.
Sharing and teaching are a huge part of who I am. As a certified Adobe instructor, I've had the honor of winning multiple Adobe teaching awards at their annual MAX conference. I see Bring Your Own Laptop as the supportive community I wished for when I was first starting out and intimidated by design. Through teaching, I hope to bring others along for the ride and empower my students to bring their stories, labors of love, and art into the world.
True to my Kiwi roots, I've lived in many places, and currently, I reside in Ireland with my wife and kids.
Certificates
We’re awarding certificates for this course!
Check out the How to earn your certificate video for instructions on how to earn yours and click the available certificate levels below for more information.
Downloads & Exercise files
Download Files
Please confirm you would like to download this file, some files can be large. You maybe want to consider downloading on wifi rather than mobile data.
Large file sizes may also take a while to download depending on your internet speed.
Name:
Size:
Download Files
Please confirm you would like to download this file, some files can be large. You maybe want to consider downloading on wifi rather than mobile data.
Large file sizes may also take a while to download depending on your internet speed.
Name:
Size:
How do you make still images move in Adobe Premiere Pro?
Animate a very small Scale change with two keyframes, then paste that motion onto matching clips using Paste Attributes. A subtle move, such as 103% down to 100%, gives photos a gentle sense of life without making the effect feel obvious or distracting.
How to Add Subtle Moving Images in Premiere Pro with Scale Keyframes
Still images can look surprisingly good in an edit when they move just a little. The goal is not to create some massive zoom effect. It is simply to add enough motion that the image feels less static, almost as if it could be a piece of footage.
The quickest way to do that in Adobe Premiere Pro is to animate Scale on one image, then copy that motion across the other clips. Once the first one is set up, the rest takes hardly any time at all.
Why Scale Works Better Than Position for Mixed Images
When a sequence includes images with different heights, widths, and crops, animating Position can become awkward. A positional move that looks great on one landscape image may push a portrait-oriented image in a completely different direction.
Scale is much more consistent. Regardless of an image's dimensions, scaling towards or away from its centre creates a clean, gentle movement. It is a reliable way to add motion across a collection of differently sized photos.
This approach is also useful beyond images. The same trick can be applied to video clips when you want an understated push in or pull out.
Create the Scale Animation on One Image
Start by selecting the first image in the timeline. Move the playhead to the very beginning of that clip, then open Effect Controls.
Under Motion, find Scale and click the stopwatch to create the first keyframe. For a subtle zoom-out effect, begin with the image slightly larger than its normal size.
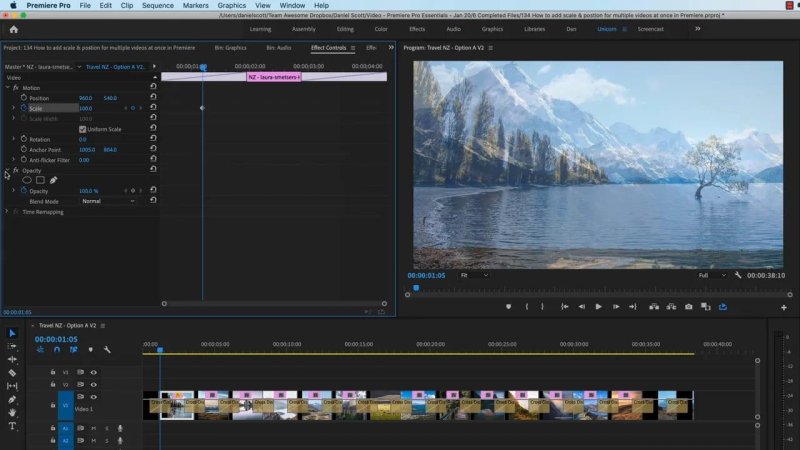
The Scale stopwatch creates the first keyframe, giving the image a starting point for its subtle movement.
A useful starting value is 103%. This means the image begins slightly zoomed in. Then move the playhead to the end of the clip and set Scale back to 100%.
That is only a 3% change, but it can feel like a lot once it plays through. The movement should be subtle enough that it does not call attention to itself. It should just make someone wonder whether the image is real footage or not.
Adjust the Values for Your Image Size
The exact Scale values will vary depending on how the image was resized in the sequence and how long it remains on screen. If an image starts at 50%, for example, a small move might be from 53% down to 50% instead.
Keep the principle the same:
Start a little larger for a slow move backwards.
Finish at the image's normal scale value.
Use a small difference rather than an aggressive zoom.
Judge the movement across the whole clip, not from a single frame.
Make the Motion Continue Through the Transition
There is one small issue to look out for. If the image has a transition at its end, the Scale animation may stop around the midpoint while the transition keeps going. That can make the motion feel as if it suddenly freezes.
The fix is simple. In Effect Controls, drag the ending Scale keyframe out towards the edge of the clip. You do not need to hold a special key. Just pull it to the end until it reaches the edge.
Now the scale movement carries through the transition rather than ending too early.
Copy the Motion to All Matching Clips
Once the first image has the movement you want, there is no reason to rebuild those keyframes for every other image.
Select the animated image clip in the timeline.
Choose Edit > Copy, or use the usual copy shortcut.
Select the other clips that have the same duration and should use the same scale movement.
Choose Edit > Paste Attributes.
Untick everything except Motion.
Click OK.
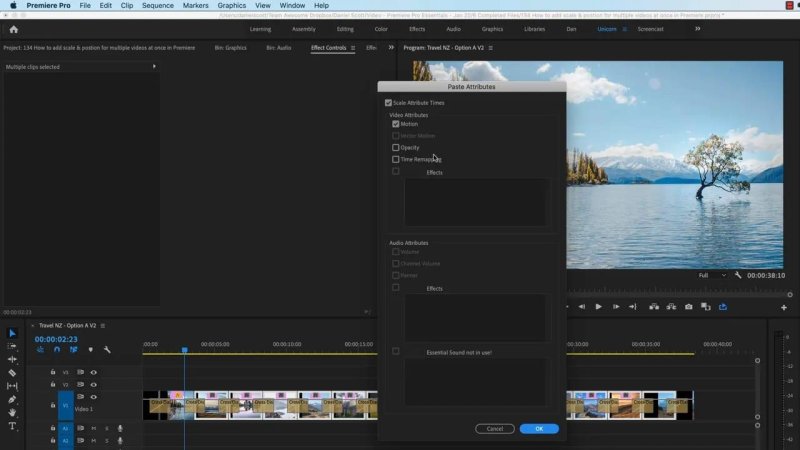
Premiere Pro workspace showing the "Paste Attributes" dialog box with "Motion" and "Scale Attribute Times" selected to paste keyframe animations across multiple clips.
Using Paste Attributes is what makes this workflow fast. All the selected images now inherit the same Scale animation, producing a consistent gentle movement across the sequence.
Know When Not to Paste the Animation
Not every clip should receive the copied Scale values. Short partial clips at the beginning or end of a sequence can be difficult because their duration does not match the main images.
Trying to calculate the exact amount of scaling for these tiny clips is usually not worth it. Since the movement is deliberately subtle, leaving those shorter clips static is unlikely to create a noticeable problem.
Apply the copied motion to the clips that match, leave the awkward short ones alone, and play the sequence through. The result is a run of images that all have a little bit of life without feeling over-animated.
Keep the Effect Subtle
The whole point is restrained motion. A 3% Scale adjustment can already create a convincing sense of movement, so resist the urge to push it too far.
When every image slowly scales in the same direction, the sequence feels more polished and connected. It is an easy Premiere Pro technique, and once the first keyframes are built, you can apply it to an entire run of images in just a few clicks.
FAQs
What Scale values should I use for a subtle image zoom in Premiere Pro?
Try a small change of around 3%. For example, animate from 103% to 100% for a gentle zoom-out. If your image was already resized, use the same small difference around its existing Scale value.
Why should I animate Scale instead of Position?
Scale is more consistent when images have different aspect ratios, heights, and widths. Position changes can behave very differently from one crop to the next, while scaling towards the centre works cleanly across all of them.
How do I copy Scale keyframes to multiple clips in Premiere Pro?
Copy the clip with the completed animation, select the matching destination clips, then choose Edit and Paste Attributes. In the dialog, select Motion only before confirming the paste.
Written by Daniel Walter Scott — Founder of Bring Your Own Laptop & Chief Instructor
