How to add a gradient in Premiere Pro
Questions


Student Gallery
Course info
Overview
I am here to help you learn Adobe Premiere Pro and to show you the tools you need to become a successful video editor. Premiere Pro is the industry standard used by professional designers to create stunning, high class videos and, after completing this course, you too can become a confident, skillful and efficient creator of stunning videos.
This course is aimed at people who are completely new to Premiere Pro.
If you are self taught using Premiere, this course will show you techniques you never dreamed were necessary or possible and will show you efficiencies to help speed up your workflow.
The course covers many topics - all of them on a step-by-step basis. We will use real world video editing examples to work through:
- An interview
- A wedding video
- A short commercial
- A documentary
- Social media advertising videos
- YouTube ‘how to’ videos
- Talking head footage mixed with screencasts and voiceovers
We will work with text, animation, motion gfx, special effects and we will add music to our video.
We will learn how to do colour correction, colour balancing and also how to create amazing video transitions within our movie. Technical ‘guru’ topics such as HD v 4K, frames per second, exporting work, fixing up bad audio, balancing and synching audio will all become manageable tasks for you. Best of all...I will show you amazing shortcuts and techniques to speed up your workflow.
Throughout the course we will work on mini projects and I will be suggesting assignments which will add value to your portfolio.
Start your Premiere Pro training now and fast track your career as a video editor.
* Please note, you have full permission to transform and upload any work using footage of Daniel as a part of this course.

Daniel Walter Scott
Founder of Bring Your Own Laptop & Chief Instructor
I discovered the world of design as an art student when I stumbled upon a lab full of green & blue iMac G3’s. My initial curiosity around using the computer to create ‘art’ developed into a full-blown passion, eventually leading me to become a digital designer and founder of Bring Your Own Laptop.
Sharing and teaching are a huge part of who I am. As a certified Adobe instructor, I've had the honor of winning multiple Adobe teaching awards at their annual MAX conference. I see Bring Your Own Laptop as the supportive community I wished for when I was first starting out and intimidated by design. Through teaching, I hope to bring others along for the ride and empower my students to bring their stories, labors of love, and art into the world.
True to my Kiwi roots, I've lived in many places, and currently, I reside in Ireland with my wife and kids.
Certificates
We’re awarding certificates for this course!
Check out the How to earn your certificate video for instructions on how to earn yours and click the available certificate levels below for more information.
Downloads & Exercise files
Transcript
Hi everyone, to apply a gradient we need to select something. In our case we're going to use this rectangle behind our little lower thirds. So I'm going to select on the clip, then I click on the actual rectangle itself that we applied. If you haven't got one existing what you can do is, you can have nothing selected, go over to here, 'Essential Graphics', go to this little turned up page here, and say, let's insert an 'Ellipse'. You can start from here. We're going to start with this existing one. Just have a random circle halfway through our clip.
So let's have it selected up here, down here under 'Fill', and it's this little drop down here, 'Solid', you need to have a Linear, which is left to right, or Radial, which is a circular gradient. Let's go with Linear Gradient for the moment, let's click 'OK'. You have to click 'OK' for it to apply. Now it's going to apply-- for some reason mine applies pretty randomly, but you've got these two little dots, these little dumbbell bar things. So one side is one color, and the other side is the other, and you can just move them around to get the angle you want, you might want them up and down. Go that way. Let's go and change the colors, so let's click on this 'Fill' again. Now to change the colors, is these two little swatches here. So if I click this first one, and drag the circle around, I can pick within the hue here.
To change the hue color, is this little, see these little chevrons here, drag it up, drag it down, let's say I'm going to go for an orange color, and I'm going to drag it down here. Click on this other side. Doesn't update live, which is annoying but, hey ho, I'm going to get down to another orange, and just pick like a darker version of it, and click 'OK' and I've got hideous orange.
Now I've lowered my opacity, earlier on, I'm going to turn it up. You can drag these around. Let's have a real quick look at Radial. Does what you imagined. It's like a circle in the middle, can you see it, well, where is he? There he is there. So this dots the middle, and this is the extent of how far it comes outside. A little circle, big circle. I find it's quite-- yeah, it's not going to-- it's up to you.
Another couple of things I want to show you is how to get colors, or color inspiration, and then get it into Premiere Pro. So there's a couple of places I go to. Grabient is one that I use loads. It's still around, which is good, might disappear in the future, just this random site that gives you nice gradients. So let's say you do like this kind of color grouping. You just click on these dots here, you're after these Hexadecimal numbers. So just, there's generally just six of them. You can have three, but all I do is, can you see I want to add it to this first little swatch here. Click in here, delete what's in there, and paste that, and that's that color.
Let's click on this other side, come back here, click on the pink. Grab that, we don't need the hash because it's kind of in there by default. I've clicked on that house, paste it in. I've got that proper gradient, but let's say you don't want-- there's not an official site, you just kind of discover it either on Grabient, or, sorry, either on Behance or Dribbble, there's a couple of good places. I just typed in gradient here, you don't really need to type it in, it's popular enough to like be, kind of through a lot of the art work here, and same with Dribbble. You might discover one, and go, "I like this, what's going on here?" So let's show you how to kind of steal it for Premiere Pro.
Probably the easiest way is, let me find something I want. Let's-- actually, I'm right there. Let's say you really like this kind of contrast, between this green and this purple here. So what you need to do is you need to open up Premiere Pro, kind of shuffle it over, you can grab the sides and just drag it or move it. Whatever you need to do to be able to see behind it, and do some sort of, like magic where you can see both of them. You might have to drag this this way, this this way, then click on your 'Fill', and if you move that other way, see the eyedropper here, you can say, this first little color, well, I'm going to click on it, and then click on this. It's a bit random, kind of randomly clicked, and it goes across, get the blue.
Let's click on the pink side here, 'Eyedropper', I'm going to grab the purple, and it brings it over. Does this work on PC? I'm not sure. Jump out-- give it a go. Let me know in the comments if it doesn't work. If it doesn't work, another way to do it, another way that I use, is-- where are we? Is I got this little plug-in for Chrome, it's called Colorzilla, if you go to the Extensions Manager, either using-- I'm using Chrome, you might be using Internet Explorer, actually they don't call it that anymore, do they? Edge, I think it is, and you could find a plug-in, and it just does the similar sort of thing, wander around, pick a color, and it tells me up there what my Hexadecimal number is.
Anyway that is how to do gradients in Premiere Pro. I'm now going to go change it from Radial to Linear, and mess about with it to try and-- it always looks better on somebody else's work. To get rid of the lines, here we go; what do I think? Yeah, I think that, but we learn how to do gradients. Let's jump into the next video.
How Do You Add Gradients in Premiere Pro?
Select a graphic shape, open its Fill settings, and change Solid to Linear Gradient or Radial Gradient. Choose the two colours, click OK, then drag the on-screen handles to adjust the blend. You can also bring in colours from gradient websites using hexadecimal codes or the eyedropper.
How to Add Gradients in Premiere Pro?
Key Takeaways
Apply a gradient to an existing lower-third background or a new shape.
Use on-screen handles to control a linear gradient’s direction or a radial gradient’s size.
Choose colours manually, paste exact hexadecimal values, or sample colours from other artwork.
Check opacity and confirm changes with OK before judging the result.
Start by Selecting a Shape
A gradient needs something to fill. I’m using the rectangle behind a lower-third name graphic, but you can start with a fresh shape just as easily.
Select the graphics clip in your timeline.
Click the actual rectangle you want to edit in the Program Monitor.
Find the shape’s Fill control in the Essential Graphics panel.
The important bit is selecting the shape itself, rather than just the clip containing it. That gets you to the fill you actually want to change.
If you haven’t already got a shape, deselect everything, go to Essential Graphics, and click the new-layer icon that looks like a page with a turned-up corner. Choose Ellipse to create a circle you can practise on. There’s no need to build a whole lower third just to try this.
Change the Fill from Solid to Gradient
Click the Fill colour swatch to open its settings. The fill-type dropdown starts on Solid. You have two gradient options:
Linear Gradient: blends colours along a straight line. It can run from left to right, top to bottom, or at an angle.
Radial Gradient: blends colours outwards from a centre point in a circular pattern.
Start with Linear Gradient, then click OK. Don’t skip that last click: you need to confirm the setting for it to apply.
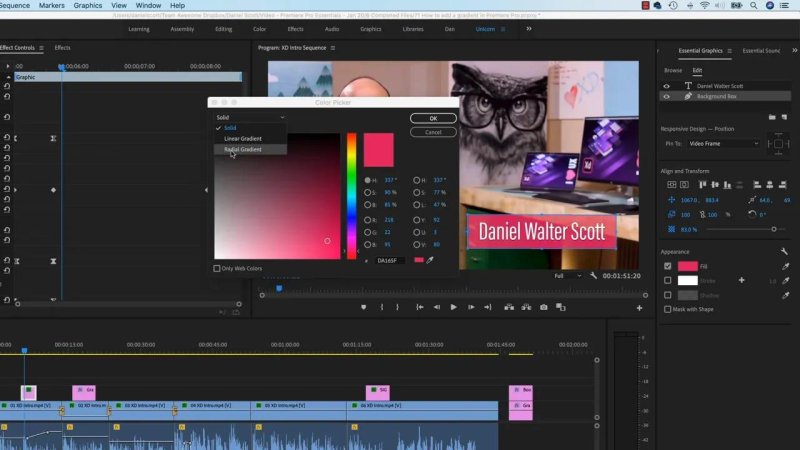
The Fill dialogue is where you choose the gradient type and edit its colours.
Adjust the Linear Gradient’s Direction
Once the gradient is applied, you’ll see two little dots joined by a line over the selected shape. They look a bit like a tiny dumbbell.
One end represents one colour; the other end represents the second colour. Drag those endpoints to position the blend. Put them side by side for a horizontal gradient, arrange them vertically for a top-to-bottom blend, or move them diagonally to change the angle.
The initial placement can look a bit random. That’s fine. Move the handles until the gradient runs where you want it, rather than accepting whatever Premiere Pro gives you first.
Choose the Two Gradient Colours
Click Fill again. In the gradient controls, select the first colour stop, then use the colour picker to change it.
Move the hue slider, using the small chevron controls, to choose a colour family.
Move the selector within the large colour field to choose the shade.
Select the second colour stop and repeat.
Click OK to apply the changes.
For a simple experiment, choose an orange for one end and a darker orange for the other. My first attempt was fairly hideous, but that’s part of the process. Getting the controls working comes before getting the colours looking lovely.
The result behind the dialogue may not update live as you expect, so confirm your changes before deciding whether they work.
Check the shape’s opacity, too. If you lowered it earlier, the gradient will appear more transparent than you intended. Turn it back up if you want to judge the colours at full strength.
Try a Radial Gradient
To switch styles, reopen Fill and choose Radial Gradient.
The controls now describe a circular blend rather than a straight one:
The centre point determines where the gradient begins.
The outer handle determines how far the blend extends.
Move the centre to reposition the effect. Drag the outer handle closer for a smaller circle or further away for a larger one.
Whether that looks better is entirely up to the graphic. I prefer the linear version for this lower third, so I’d switch back once I’d finished experimenting.
Find Better Gradient Colours with Grabient
Choosing colours from scratch isn’t always the easiest route. Sometimes you just want a combination that already looks good.
Grabient is one of the places I use for gradient inspiration. It presents ready-made combinations, and you can click the colour dots beneath a gradient to access their colour values.
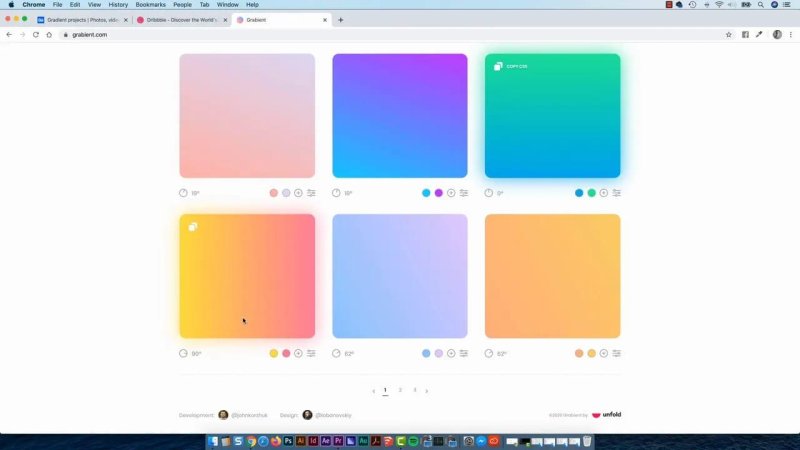
A ready-made palette gives you a useful starting point when your own colour choices are not quite working.
The values you’re after are hexadecimal colour codes. These are generally six characters long, although three-character shorthand codes also exist.
Paste Hexadecimal Colours into Premiere Pro
Choose a gradient on Grabient and open its first colour.
Copy the hexadecimal value.
Return to Premiere Pro and open your shape’s Fill settings.
Select the first gradient colour stop.
Replace the existing hexadecimal value with the copied value.
Repeat for the second colour stop using the other colour from the palette.
Click OK.
You don’t need to paste the # symbol when it is already supplied beside the field.
That brings the palette’s colours into your graphic. You can then adjust the gradient handles to get the direction and spread you want.
Sample Colours from Behance or Dribbble
You don’t have to use a dedicated gradient website. Behance and Dribbble are useful places to find colour inspiration in finished designs. Try searching for “gradient”, or simply browse until a colour pairing catches your eye.
Perhaps it’s a green against a purple, or a blue fading into something brighter. You can sample those colours rather than trying to recreate them by eye.
Use Premiere Pro’s Eyedropper
Resize or reposition Premiere Pro so the reference artwork remains visible in your browser.
Open your shape’s Fill dialogue and move it out of the way of the colours you need.
Select the first gradient colour stop.
Activate the eyedropper and click a colour in the reference artwork.
Select the second stop, activate the eyedropper again, and sample the other colour.
Confirm with OK.
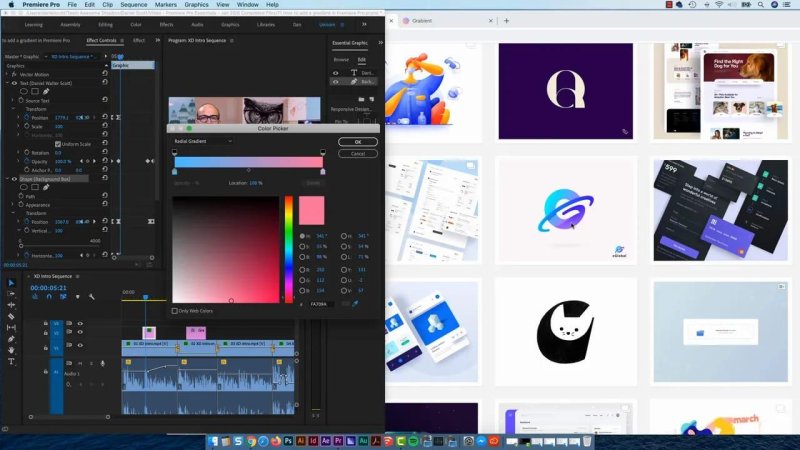
Keeping the reference artwork visible beside Premiere Pro lets you sample colours directly.
This worked in my Mac setup. I haven’t confirmed the same outside-the-application sampling behaviour on Windows, so give it a try rather than assuming it will behave identically.
Use ColorZilla If Direct Sampling Doesn’t Work
Another option is ColorZilla, a browser extension I use in Chrome.
Use its colour picker to select a colour on a webpage and obtain the hexadecimal value. Then return to Premiere Pro and paste that value into the selected gradient stop, just as you would with a palette from Grabient.
This gives you another way to transfer colours without relying on Premiere Pro’s eyedropper reaching into the browser.
Give the Finished Gradient a Final Check
Once the colours are in place, return to the graphic and adjust the handles again. A good colour pairing may still need a different angle or a wider blend to work in your shape.
Deselect the graphic to remove the editing lines and judge the result cleanly. If radial isn’t doing it for you, switch back to linear and have another go.
Somehow, gradients always seem to look better in somebody else’s work. Still, once you can change the fill, move the handles and bring in colours you like, you’ve got the tools to keep experimenting.
Key Terms
Lower third
A graphic placed in the lower part of the picture, such as the name label used here. Its background shape is the object receiving the gradient.
Linear gradient
A colour blend along a straight line. Its endpoints control the blend’s placement and direction.
Radial gradient
A circular colour blend that extends outwards from a centre point. The outer handle controls its size.
Colour stop
A selectable colour point in the gradient controls. In this two-colour workflow, you edit one for each end of the blend.
Hexadecimal colour code
A text value identifying a colour, usually written with six characters after a # symbol. Copying it lets you transfer a precise colour into Premiere Pro.
Eyedropper
A tool for sampling a colour from a visible reference rather than choosing it manually.
FAQs
Why hasn’t my gradient appeared?
Make sure you selected the actual shape, changed its Fill type from Solid to a gradient, and clicked OK. Check the shape’s opacity if the result looks unexpectedly faint.
How do I make a gradient vertical?
Apply a linear gradient, then drag its on-screen endpoints so one sits above the other. Those handles determine the direction of the blend.
Can I copy gradient colours from a website?
Yes. Copy the colours’ hexadecimal values into the gradient’s colour stops, or try sampling the reference with the eyedropper. A browser colour picker such as ColorZilla provides another way to obtain the values.
Written by Daniel Walter Scott — Founder of Bring Your Own Laptop & Chief Instructor
