Working with lost missing offline videos in Premiere Pro
Questions


Oops! You need to be a member to join in.
Feel free to browse but if you'd like to jump into the conversation you'll need to join our awesome student community.
Explore 30+ Essential and Advanced courses in Figma, Photoshop, Illustrator, Lightroom, Premiere Pro, Webflow, and more. Enjoy self paced learning, personalized support, earn certificates, and exciting community challenges.


Oops! You need to be a member to join in.
Feel free to browse but if you'd like to jump into the conversation you'll need to join our awesome student community.
Explore 30+ Essential and Advanced courses in Figma, Photoshop, Illustrator, Lightroom, Premiere Pro, Webflow, and more. Enjoy self paced learning, personalized support, earn certificates, and exciting community challenges.


Oops! You need to be a member to join in.
Feel free to browse but if you'd like to jump into the conversation you'll need to join our awesome student community.
Explore 30+ Essential and Advanced courses in Figma, Photoshop, Illustrator, Lightroom, Premiere Pro, Webflow, and more. Enjoy self paced learning, personalized support, earn certificates, and exciting community challenges.

Oops! You need to be a member to join in.
Feel free to browse but if you'd like to jump into the conversation you'll need to join our awesome student community.
Explore 30+ Essential and Advanced courses in Figma, Photoshop, Illustrator, Lightroom, Premiere Pro, Webflow, and more. Enjoy self paced learning, personalized support, earn certificates, and exciting community challenges.


Oops! You need to be a member to join in.
Feel free to browse but if you'd like to jump into the conversation you'll need to join our awesome student community.
Explore 30+ Essential and Advanced courses in Figma, Photoshop, Illustrator, Lightroom, Premiere Pro, Webflow, and more. Enjoy self paced learning, personalized support, earn certificates, and exciting community challenges.

Oops! You need to be a member to join in.
Feel free to browse but if you'd like to jump into the conversation you'll need to join our awesome student community.
Explore 30+ Essential and Advanced courses in Figma, Photoshop, Illustrator, Lightroom, Premiere Pro, Webflow, and more. Enjoy self paced learning, personalized support, earn certificates, and exciting community challenges.

Oops! You need to be a member to join in.
Feel free to browse but if you'd like to jump into the conversation you'll need to join our awesome student community.
Explore 30+ Essential and Advanced courses in Figma, Photoshop, Illustrator, Lightroom, Premiere Pro, Webflow, and more. Enjoy self paced learning, personalized support, earn certificates, and exciting community challenges.
Student Gallery
Be the first to share something.
Course info
Overview
I am here to help you learn Adobe Premiere Pro and to show you the tools you need to become a successful video editor. Premiere Pro is the industry standard used by professional designers to create stunning, high class videos and, after completing this course, you too can become a confident, skillful and efficient creator of stunning videos.
This course is aimed at people who are completely new to Premiere Pro.
If you are self taught using Premiere, this course will show you techniques you never dreamed were necessary or possible and will show you efficiencies to help speed up your workflow.
The course covers many topics - all of them on a step-by-step basis. We will use real world video editing examples to work through:
- An interview
- A wedding video
- A short commercial
- A documentary
- Social media advertising videos
- YouTube ‘how to’ videos
- Talking head footage mixed with screencasts and voiceovers
We will work with text, animation, motion gfx, special effects and we will add music to our video.
We will learn how to do colour correction, colour balancing and also how to create amazing video transitions within our movie. Technical ‘guru’ topics such as HD v 4K, frames per second, exporting work, fixing up bad audio, balancing and synching audio will all become manageable tasks for you. Best of all...I will show you amazing shortcuts and techniques to speed up your workflow.
Throughout the course we will work on mini projects and I will be suggesting assignments which will add value to your portfolio.
Start your Premiere Pro training now and fast track your career as a video editor.
* Please note, you have full permission to transform and upload any work using footage of Daniel as a part of this course.

Daniel Walter Scott
Founder of Bring Your Own Laptop & Chief Instructor
I discovered the world of design as an art student when I stumbled upon a lab full of green & blue iMac G3’s. My initial curiosity around using the computer to create ‘art’ developed into a full-blown passion, eventually leading me to become a digital designer and founder of Bring Your Own Laptop.
Sharing and teaching are a huge part of who I am. As a certified Adobe instructor, I've had the honor of winning multiple Adobe teaching awards at their annual MAX conference. I see Bring Your Own Laptop as the supportive community I wished for when I was first starting out and intimidated by design. Through teaching, I hope to bring others along for the ride and empower my students to bring their stories, labors of love, and art into the world.
True to my Kiwi roots, I've lived in many places, and currently, I reside in Ireland with my wife and kids.
Certificates
We’re awarding certificates for this course!
Check out the How to earn your certificate video for instructions on how to earn yours and click the available certificate levels below for more information.
Downloads & Exercise files
Download Files
Please confirm you would like to download this file, some files can be large. You maybe want to consider downloading on wifi rather than mobile data.
Large file sizes may also take a while to download depending on your internet speed.
Name:
Size:
Transcript
All right, the next thing that's going to cause you problems, not problems, just good to know, is when you mess around the leading footage. So I've got my project here, there's my Premiere Pro file. You can see it's quite small, 43 Megabytes, Kilobytes even. It stays nice and small by actually just linking to this footage. It doesn't actually bring it inside itself like, something like Microsoft Word or Photoshop, where it kind of like draws it into the one file, just links to them.
What happens though, if you delete one of these files it's trying to link to, let's say for instance I deleted it by accident, and I come in here and it freaks out, and goes, this window up here is the big red scary thing, and lots of languages appears. It's going to say, "I'm missing this file." You're going to say-- let's say we've deleted it and we didn't mean to.
What I'm going to do is-- I can't go and locate it because it's binned. So what I'm going to do is I'm going to offline it all. Now I need to go back and just find it. Undelete that file, or get it off the network drive that I left it on, or my USB stick, put it back where Premiere Pro can get it. It's not clever enough to go and find it, I can right click it. It will go and find it, you can either, you just have to turn Premiere Pro off and on again, and it will link to it again. Let's go to 'Replace Footage'. Let's go to you, and all's well in the world again.
All right, let's do another for instance. Let's say that I'm bringing in footage, just to kind of test it, I was like, "I wonder if this will work." I'm going to bring in something that I was messing around with. I brought that in and I kind of played with it, this is me talking. The beginning of this video, I was just checking, it looked all good. I do this all the time, I'm like checking out, I'm like, "Yeah, that looks cool," or "I don't need that anymore," and I'm going to go to my files and there it is there, I'm going to delete it. Then this thing goes, freaked out. So I've deleted it on purpose, and I just forgot I had it anywhere.
So I'm going to go offline all, and I'm going to do this, I'm going to say, you, I can trash you, what is it, 'Del' on my keyboard, get rid of it, because I don't want it on here, I just, was like a test, I was just checking it, but Premiere Pro says, if it just deletes, that's great, it hasn't been used anywhere. If this pops up, it says, "Hey, you're deleting something that actually is being used in one of your sequences." "Would you still like to delete it?", and that's when you kind of take pause and go, "Actually, I don't realize I was using that somewhere." And you need to go and look in your sequence to see where it is. I'm like, "Yep, I don't mind, go away," and it deletes it from both the Timeline and your Project Window.
Next issue, is renaming stuff. So you're going to kind of record it, it's going to come through as like, what if your camera records it in, and you want to kind of maybe, you know, name it nicely. So let's say I go in here and I need to call this one v1. Same problem's going to happen here, it's going to freak out. The red bar's going to appear at the back here. It's going to say, what would you like to do? Let's say that we-- you can do it from here, straight here, or let's say you do offline it. Let's find the big red bar. You can see in here, it's question mark.
The same kind of principle as deleting it, doesn't know where it is. What we're going to do, is slightly differently, is right click it and go to 'Replace Footage', and say, actually this is it. Where are you? That one there. It connects it back up again. So renaming will freak it out, so just be careful of that.
Next thing that is less weird and more helpful, is where I go and move footage, so let's say that I, I'm in here and I've got it all messy and I need to start, some kind of folder structure, I'm going to put in my footage, and I go and move 01 XD in there. The cool thing about Premiere Pro, goes, it kind of had a little twitch here, but I went and found it. It seems to only work if it's kind of like, near the program-- the Premiere Pro file, and kind of deeper, it doesn't seem to work as well, or at all.
I haven't put that-- I don't know exactly how this works, but if I go and stick it on my desktop it goes too far, can't find, back to the crazy red box. So if you're moving it-- I imagine it's just kind of like from the route, to where the file is, all the way through to kind of other boxes, it seems to work just fine. So I'm going to-- just know that. So you can rearrange without having to relink, but if you go too far freaks out.
Last tip in terms of this file management, let's just say that you've got footage and it's all moved-- so I'm going to hit 'Cancel'. Let's go to this one that says, this one here, I'm going to put them all on the desktop, and they're all going to freak out. Let's say I left them at work on a network drive, or on a USB stick, and it's going to go, "Ah." You don't want to have to go and find each individual ones of these, or right click them and relink footage. What you can do is, let's say that later on, you know-- I can't, man, I'm just going to cancel that. And what you can do is just put them back where it got it. Everything can go back in there. Get one back as well. And what we can do is, in here, instead of having to try and relink them, right click, Link to Footage, or doing any sort of other thing, just go to 'File', 'Close Project'. Yes, I'm saving it. Then open it up again, and Premiere Pro is pretty good, and goes, when it opens it goes and tries to search for them all, and just kind of cuts down your time having to go search for them.
All right, that is kind of it for the File stuff. You'll end up moving things around or losing them, and seeing that red screen all the time. One last thing is quite helpful when you're dealing with footage, let's say I do move it, and I'm like, it's going to desktop, and I don't know where it is. It's on my machine somewhere, I go to 'Offline', I don't know where it is, I can right click it, and say, actually let's go and replace the footage. Actually we're going to link the footage, and in here we can do a search.
So I can say I want to find this one here, I'm going to go to 'Locate', and this window here is, if you're like, "Man, this is really hard to use," it is, I hate this window. I just use a Finder window, like everyone else. Yours might be on this as well, so I'm going to go to List View. What I want to do is kind of give it a help, I'm going to say, look, I'm in my hard drive somewhere, and I want you to display only the ones that have the exact match, because that's all I'm looking for. Hit 'Search', and it will find it, it is there, hello, click on it, click 'OK'. The cool thing about it is if you're missing other ones, it will automatically go and find those at the same time. So if you do miss one, you don't know where it is, use the Link Media, and then use Locate.
All right, that is enough about File Management. Let's get back into some of the more exciting things in Premiere Pro.
How do I fix missing media in Premiere Pro?
When Premiere Pro shows the big red “Media Offline” screen, it means the project can no longer find the original video, audio, or image file. Put the file back where it belongs, use Replace Footage or Link Media to point Premiere Pro to it, then let the project reconnect everything it can.
How to Fix Missing Media in Premiere Pro and Keep Your Files Organised
File management is not the sexiest part of editing, but it is one of those things that will absolutely cause problems if you do not understand what Premiere Pro is doing.
The big thing to know is that a Premiere Pro project does not contain all your footage. Your project file stays surprisingly small because it simply links to video, audio, and image files stored elsewhere on your computer, drive, network, or USB stick.
That is great until you delete, rename, or move one of those files. Then Premiere Pro cannot find it, gets a bit upset, and gives you the scary red missing-media screen.
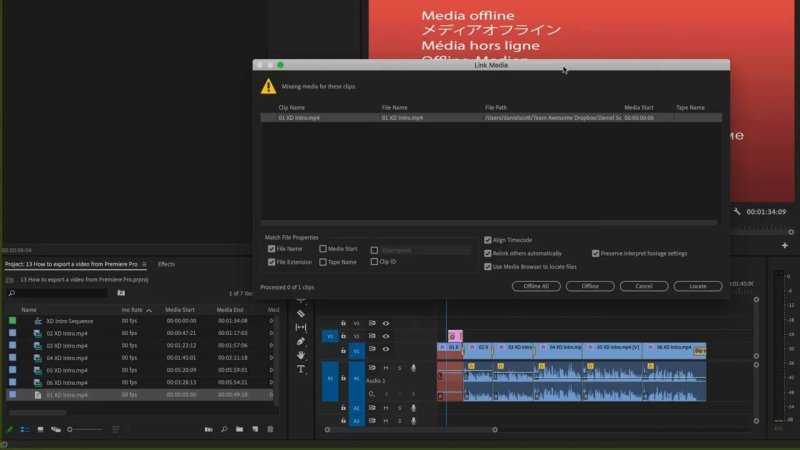
The missing-media dialog is Premiere Pro telling you that the project link has been broken, not that the edit has disappeared.
Why Premiere Pro Media Goes Offline
Your clips go offline when the file path Premiere Pro remembers no longer leads to the original media. This commonly happens when you:
Delete a video, audio, or image file from Finder or File Explorer.
Rename a file outside Premiere Pro.
Move footage to another folder, drive, desktop, network location, or USB stick.
Open a project without the external drive or network drive that holds the media.
The important bit is this: the project itself is normally fine. Premiere Pro just needs help finding the original file again.
If You Deleted Footage by Accident
Say you accidentally delete a clip that Premiere Pro is using. On opening the project, Premiere Pro will report that the file is missing. If the clip is genuinely in the bin, there is nothing useful to locate yet, so choose to take the media offline for the moment.
Then find the actual file first. That might mean:
Restoring it from the computer bin or recycle bin.
Getting it back from a network drive.
Reconnecting the USB stick or external drive it was stored on.
Putting the recovered file somewhere Premiere Pro can access.
Once the file exists again, reconnect it. You can right-click the offline item in the Project panel and choose Replace Footage, then select the recovered file. Reopening Premiere Pro can also help it recognise media that has been returned to the original location.
If the file is back where Premiere Pro originally found it, the relink can be wonderfully painless.
Deleting a Test Clip You No Longer Need
Sometimes missing media is not a problem at all. You may have imported a clip only to test something, decided you do not need it, and then deleted the source file. Premiere Pro will still notice that the linked file is gone.
If you really do not want that clip in the project, remove it from the Project panel. Premiere Pro may warn you if the item is being used in a sequence. This is your cue to pause for a second.
If it is being used, find where it appears in the timeline and decide whether deleting it is genuinely what you want. Confirming the deletion removes it from both the project and the timeline, so it is not a warning to casually click past.
Renaming Files Breaks the Link Too
Camera files often arrive with names that are not especially useful. It is tempting to rename them in Finder or File Explorer so they make more sense. The trouble is that Premiere Pro knows the original filename, so changing it can make the media go offline.
If you rename a file outside Premiere Pro and see the missing-media message, treat it much like a deleted file that has been recovered:
Take the missing item offline if needed.
Right-click the offline clip in the Project panel.
Choose Replace Footage.
Navigate to the renamed file and select it.
Premiere Pro reconnects the project item to the renamed source, and things are well again.
The general rule is simple: renaming source media outside Premiere Pro changes the link Premiere Pro is expecting. Be deliberate about it and be ready to relink.
Moving Footage: Sometimes Premiere Pro Finds It for You
Moving files is slightly less dramatic. You might start with a messy project folder and decide it is finally time to create a proper Footage folder. That is a good instinct.
Premiere Pro can sometimes follow a moved file automatically, particularly when the file is moved to a nearby folder within the same project structure. For example, moving a clip into a subfolder close to the Premiere Pro project file may cause only a brief twitch before Premiere Pro finds it again.
Do not rely on this behaviour completely. Move the file farther away, such as to the desktop or another unrelated location, and Premiere Pro may lose track of it and bring back the red screen.
A practical way to think about it is this: keeping media in a tidy folder structure alongside or below the project folder gives Premiere Pro the best chance of finding moved files. Moving things across drives or to random places makes relinking more likely.
How to Reconnect Lots of Missing Files Faster
Having one offline file is annoying. Having a whole batch of them missing is where file management becomes properly tedious.
Imagine the footage was on an external drive, USB stick, or network drive and is no longer connected. Premiere Pro may show multiple missing clips. You could right-click every individual item and relink it one by one, but that is not the fun way to spend an afternoon.
If you know where the media belongs, put the files back in that location. Then:
Choose File > Close Project.
Save the project when prompted.
Open the project again.
When Premiere Pro opens the project, it tries to search for the media again. If the files are back where they should be, it can reconnect them without making you manually hunt down every clip.
This is a really useful time-saver when an entire folder has been moved away and then restored.
Use Link Media and Locate When You Cannot Find a Clip
Sometimes the honest answer is: the file is somewhere on the machine, but you have no clue where. In that case, use Premiere Pro’s relinking tools rather than staring at the red screen and hoping for the best.
Right-click the offline clip and choose Link Media, then choose Locate. The Locate window can feel a bit clunky, so make it easier on yourself. Switch to a list view if that is more familiar, start from a likely place such as your hard drive, and narrow the search to an exact name match.
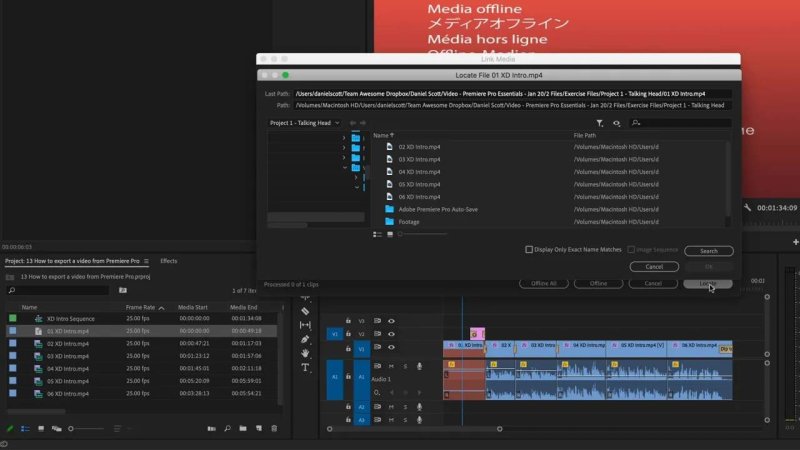
Use Link Media and Locate to point Premiere Pro towards one missing file, especially when the original location is a mystery.
Once Premiere Pro finds the file, select it and confirm the link. The really handy part is that, if other missing files live in that same location, Premiere Pro can often find and reconnect those at the same time.
So the workflow is:
Open Link Media.
Choose Locate.
Search from a sensible starting location.
Use an exact filename match to reduce the noise.
Select the correct file and confirm.
Let Premiere Pro attempt to reconnect related missing media automatically.
A Sensible Premiere Pro File Management Habit
You will move things around. You will forget where a clip was saved. You will probably see the red offline screen from time to time. That is normal.
The goal is not to never make a mess. The goal is to make a mess that is easy to recover from.
Keep your project file and media folders reasonably close together.
Create a folder structure before the project becomes enormous.
Do not delete source files until you are certain they are not needed.
When removing a clip from Premiere Pro, pay attention to warnings that it is used in a sequence.
Reconnect external, USB, and network drives before opening the project where possible.
When several files are missing, restore the folder structure and reopen the project before relinking items individually.
When one file is lost somewhere on the computer, use Link Media and Locate with an exact filename search.
Once you understand that Premiere Pro links to media rather than swallowing it into the project file, the big red box becomes much less scary. It is simply asking where the footage went.
FAQs
Why does Premiere Pro say Media Offline?
Premiere Pro says Media Offline when it cannot find the source file linked to your project. The file may have been deleted, renamed, moved, or stored on a drive that is no longer connected.
Can I rename video files after importing them into Premiere Pro?
You can, but renaming them outside Premiere Pro may break the existing link. If that happens, right-click the offline clip, choose Replace Footage, and select the renamed file.
What is the quickest way to relink many missing clips in Premiere Pro?
Return the media to the folder where Premiere Pro originally found it, close and save the project, then open it again. Premiere Pro will search for the files on launch and may reconnect the whole group without individual relinking.
What should I do if I do not know where a missing file is?
Use Link Media, choose Locate, and search from a likely drive or folder. Filtering for an exact filename match helps Premiere Pro find the correct source file much faster.
Written by Daniel Walter Scott — Founder of Bring Your Own Laptop & Chief Instructor
