Adding Film Grain using the effects panel in Premiere Pro
Questions


Student Gallery
Course info
Overview
I am here to help you learn Adobe Premiere Pro and to show you the tools you need to become a successful video editor. Premiere Pro is the industry standard used by professional designers to create stunning, high class videos and, after completing this course, you too can become a confident, skillful and efficient creator of stunning videos.
This course is aimed at people who are completely new to Premiere Pro.
If you are self taught using Premiere, this course will show you techniques you never dreamed were necessary or possible and will show you efficiencies to help speed up your workflow.
The course covers many topics - all of them on a step-by-step basis. We will use real world video editing examples to work through:
- An interview
- A wedding video
- A short commercial
- A documentary
- Social media advertising videos
- YouTube ‘how to’ videos
- Talking head footage mixed with screencasts and voiceovers
We will work with text, animation, motion gfx, special effects and we will add music to our video.
We will learn how to do colour correction, colour balancing and also how to create amazing video transitions within our movie. Technical ‘guru’ topics such as HD v 4K, frames per second, exporting work, fixing up bad audio, balancing and synching audio will all become manageable tasks for you. Best of all...I will show you amazing shortcuts and techniques to speed up your workflow.
Throughout the course we will work on mini projects and I will be suggesting assignments which will add value to your portfolio.
Start your Premiere Pro training now and fast track your career as a video editor.
* Please note, you have full permission to transform and upload any work using footage of Daniel as a part of this course.

Daniel Walter Scott
Founder of Bring Your Own Laptop & Chief Instructor
I discovered the world of design as an art student when I stumbled upon a lab full of green & blue iMac G3’s. My initial curiosity around using the computer to create ‘art’ developed into a full-blown passion, eventually leading me to become a digital designer and founder of Bring Your Own Laptop.
Sharing and teaching are a huge part of who I am. As a certified Adobe instructor, I've had the honor of winning multiple Adobe teaching awards at their annual MAX conference. I see Bring Your Own Laptop as the supportive community I wished for when I was first starting out and intimidated by design. Through teaching, I hope to bring others along for the ride and empower my students to bring their stories, labors of love, and art into the world.
True to my Kiwi roots, I've lived in many places, and currently, I reside in Ireland with my wife and kids.
Certificates
We’re awarding certificates for this course!
Check out the How to earn your certificate video for instructions on how to earn yours and click the available certificate levels below for more information.
Downloads & Exercise files
Transcript
So I'm going to show you Film Grain, but really what I want to do is introduce you to the Effects Panel. Currently we've been doing everything through Lumetri, black and white. You can do some stuff like Faded Video, some cool stuff, but in terms of like special effects, there's a panel over here in your Project Window. Click on this little double arrow, and let's click on 'Effects'. If you can't find it go to 'Window', and come down to 'Effects'. Some effects. We've done transitions, and we're going to look at this Video Effects now. So let's twirl this down.
Now I'm going to introduce a little shortcut because this is, it's not hard to find but I'll show you the way that normal heavy users of Premiere Pro, not even heavy users, just people, just see how this panel is used, because I know it's in Video Effects, and I had to go through and like, I'm pretty good at Premiere Pro, and I was like which one is it? Isn't it under Distort? No, it's under this one. Oh no, that's right under Noise and Grain. And then you find it in here, I know what it's called, it's called Noise, but what ends up being an easier way to do things, is go to 'Effects', see this little search guy at the top here? Just type in the beginnings of 'noise', and you'll see everything that has, in any panel, has the word noise. I find that's an easier way to find it.
We're going to apply it. You click, hold, and drag it either to the window, you can't do it here, drag it to the clip, but the video part of the clip, not the audio, drag it on, and we have some Film Grain. One thing when we are using this Effects Panel, let's say that we-- I just want to wrap this up, the search in case. If I delete noise, and I'm looking for-- remember our Cross Fade? I find it's easy just to type 'cross', there it is there. Constant Power, Cross Dissolve. I want to do Dip. Instead of digging through which ones they are, Dip to White, and Black are there.
The one thing with it though, is the search doesn't disappear, so you might later be going, "It's broken, Dan," it's broken. It's because this guy never disappears. You have to actually hit the little cross or just delete it, then everything comes back to life. Cool. Effects Panel, we've applied it, you're like, "Hmm, what happened?" Have we done much of this? It's clip selected, Effects Control. So you apply the effects down here, and this is the way you control it.
Technically when we added our Lumetri Color, when we did our black and white, that's been applied up here. You can see, Lumetri is the first thing we did. There's some default stuff, like our Motion Effects and our Opacity, and Lumetri's what we've added, and what you'll notice is, can you see, Lumetri Color, it's the same over here. You'll see there's basic Correction, Creative, and Curves, can you see over here? Basic Correction, Creative, Curves, they're all in two places. They've made this lovely Lumetri Panel, because it has nice little icons and sliders. Up until they made this lovely panel you had to do it through all of this junk. Ah, it's hideous. It worked, worked perfectly but doing the effects through here, works, but it's just not intuitive and nice, and it's a poor UI.
So you can do in here or over here, it doesn't matter. We're going to twirl it up for the moment. Just to get rid of Lumetri Color. We're going to look at Noise, there he is there. So you have to have your clip selected, you've dragged it across, and you can see it in here. Now, by default it's at 0, so it's done nothing. Click, hold, drag this to the right, you can type it in. I'm just dragging mine. It's very common to scrub. So click, hold, and drag left, right, left, right, in these sorts of programs.
So you can click it in here to type '20', if you're that way inclined. You can actually twirl it down, there's like a little slider here, lots of ways of doing it. So I've added Film Grain, I'm going to put in way too much just, because it's hard to see sometimes, on the video that you're watching. Now we're going to hit 'Play', and your machine's going to freak out. I'm going to hit 'Play', and even mine, super serious machine-- Effects are, depending on the effect, can really slow down your machine. That will render and play fine when they're exported, but while you're in this working view, you're probably going to need to go down to 1/4, because I don't really need it to be super high quality when it's playing.
It looks bad there, but watch, when I stop, you can see, it actually shows you the high quality output. It's only when it's playing does it go down to 1/4. And that's important for all things, when you change it down to 1/4, when it's paused it's giving you the full version, but when you play it, it's just going to give you a basic one. It's up to you whether you can live with that or not. Not sure if you can hear it but my poor laptop, the fans are flying on, trying to keep up with this effect, it's not a big effect, but anyway that's adding a bit of Film Grain. It's actually just called Noise.
You can play around with these types, whether you're going to use color noise or just black and white. You have to zoom in quite a bit to see the differences, color, non-color. Decide what works for you, there's no like right or wrong, and what I find is - I'm going to go back to 'Fit'. - is that it just needs to be subtle. It's too consistent that way. I'm going on 20%, kind of works for me, gives them that, gives me that effect without it really being overbearing. Black and white, bit of Film Grain.
Another thing I want to show you is how to turn this off and delete it. Say later on you're like, "Ah, man, don't like the grain", or the client comes back and says, "What the hang is this grain?" I thought you shot it in really good high-quality cameras, I'm like, "Yep, I did." So over here you can turn it off by hitting this little 'Effects', and you can't really see, I'll crank it up to a 100%, just a second, see it turning on and off, so on/off. Turns it off just temporarily, and if you export your video now it's going to export with it not on, or you can be a bit more hard core. Click on the word 'Noise' and hit 'Del' on your keyboard, and it's gone. It's the same when you're doing Lumetri. So Lumetri Color, say later on you're like, actually, you don't want that anymore, just delete it, and it goes away. So that's how to turn it on and off.
All right, that's Film Grain, and bit of an introduction to the Effects Panel, and getting used to this Effects Controls. All right, let's get into the next video.
How do you add film grain in Premiere Pro?
Use Premiere Pro’s built-in Noise video effect. Search for Noise in the Effects panel, drag it onto the video portion of a selected clip, then adjust the Amount of Noise in Effect Controls until the texture feels subtle rather than distracting.
How to Add Film Grain in Adobe Premiere Pro
A little film grain can give clean digital footage some character. It is that slightly noisy texture that makes an image feel less perfectly digital and, depending on the footage, can work brilliantly alongside a black-and-white grade.
The key word is subtle. Push it too far and it stops looking like a deliberate film treatment and starts looking like something has gone very wrong with the camera.
Find the Effects panel
If you have been doing colour work through Lumetri, you may not have spent much time in Premiere Pro’s Effects panel yet. Lumetri is great for colour changes such as black and white, faded video, creative looks, and curves. But for special effects like grain, this is where the action is.
In the Project area, click the double-arrow panel menu and choose Effects. If Effects is nowhere to be found, open it from Window > Effects.
Inside the panel, video effects are organised into folders. Noise lives under Video Effects > Noise & Grain. You can certainly dig through those folders, but honestly, there is a much faster way.
Use search instead of hunting through folders
At the top of the Effects panel is a search field. Type the beginning of the effect name, such as noise, and Premiere Pro filters the panel to show every relevant result.
This is a handy habit for far more than film grain. Need a transition? Search for:
cross to find options such as Cross Dissolve or Constant Power.
dip to find Dip to Black and Dip to White.
One small gotcha: the search term stays there. If the panel suddenly seems to have lost all its effects later, clear the search field using the little cross or delete the text. Everything will come back.
Apply the Noise effect to your clip
Once you have found Noise, click and drag it onto the clip in the timeline. Make sure you drop it on the video portion of the clip, not the audio portion.
At this point, it is completely normal to look at the Programme Monitor and think, “Well, what happened?” The effect has been applied, but Noise begins at zero, so it is doing nothing yet.
To control it, select the clip and open Effect Controls. This is the place where effects applied to an individual clip are adjusted.
You will probably see a few things already there:
Default clip properties, including Motion and Opacity.
Any Lumetri Color correction already applied.
The new Noise effect.
Lumetri Color may look familiar here. Its Basic Correction, Creative, and Curves controls are the same controls available in the Lumetri panel. The Lumetri panel simply presents them with a much friendlier interface. Effect Controls is still the central place to manage effects that have been placed on a clip.
Adjust the Amount of Noise
Twirl open the Noise effect in Effect Controls and raise the Amount of Noise. You can scrub the value by clicking and dragging left or right, type in a specific number, or use the small slider.
For demonstration purposes, crank it up high first. It makes it much easier to see exactly what the effect is doing. Then bring it back down until it supports the image rather than taking it over.
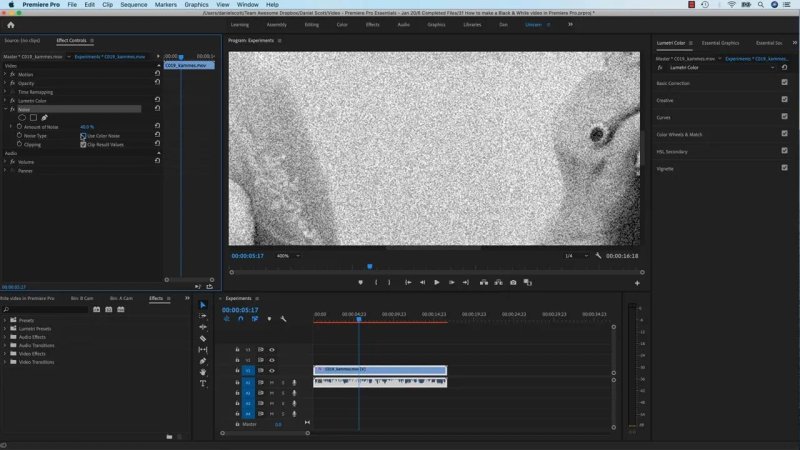
An exaggerated amount of noise makes the texture easy to inspect before bringing it back to a more useful level.
A value around 20% can create a gentle film-grain feel in this kind of black-and-white footage, without becoming overbearing. It is not a universal magic number, though. Zoom in, compare the image, and use the amount that works for the particular clip.
Choose colour or monochromatic noise
The Noise effect also lets you decide whether the texture is colour noise or non-colour noise. You will need to zoom in fairly closely to spot the difference properly.
For a black-and-white film treatment, monochromatic noise is often the obvious choice. For other projects, colour noise may fit the look you are after. There is no single correct setting here. It is a creative choice, so try both and see what suits the footage.
Why Premiere Pro playback can slow down
Effects can make Premiere Pro work harder during editing, and Noise is one of those effects that may slow down playback. Even a powerful computer can start working overtime once effects are added.
If playback gets choppy, change the playback resolution in the Programme Monitor to Quarter. You do not need full-quality playback just to check timing, movement, and the general feel of an edit.
This lower resolution affects playback while the sequence is running. When you pause, Premiere Pro can still display the full-quality image, making it easier to judge the grain properly. The exported video will render normally, so a lower playback resolution is simply a practical editing compromise.
Turn film grain off or remove it entirely
Film grain is easy to change your mind about. Maybe the grade has shifted, maybe the effect no longer fits, or maybe somebody asks why a perfectly good high-quality camera image has suddenly become grainy.
You have two options in Effect Controls:
Temporarily disable it: click the fx icon beside Noise. This switches the effect off without removing it, making before-and-after comparisons simple. If you export while it is disabled, the grain will not be included.
Delete it: click the word Noise in Effect Controls and press Delete. The effect is removed from the clip completely.
The same rule applies to Lumetri Color and other clip effects. Select the effect name in Effect Controls, press Delete, and it is gone.
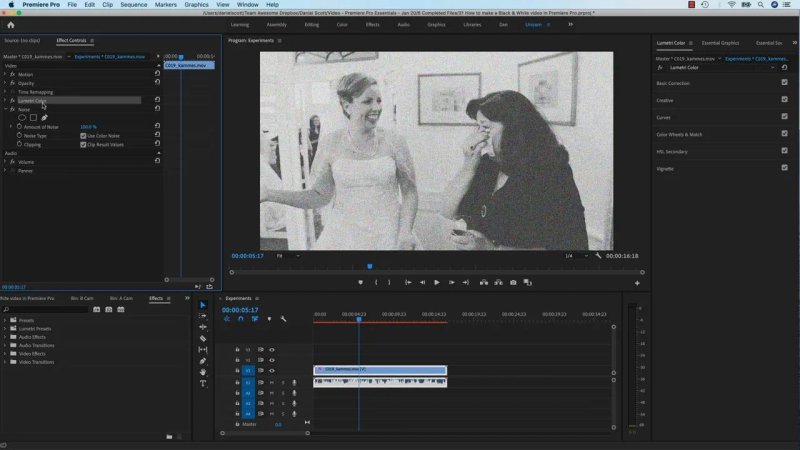
Disabling or deleting an effect is a quick way to return to the untreated clip and compare the result.
A simple recipe for a film-grain look
Select the clip in the timeline.
Open Window > Effects if the Effects panel is hidden.
Search for Noise.
Drag Noise onto the video part of the clip.
Open Effect Controls.
Raise Amount of Noise, then reduce it until the look is restrained.
Choose colour or non-colour noise based on the style of the footage.
Set playback resolution to Quarter if the effect makes editing sluggish.
Use the fx icon to test the clip with and without grain, or delete Noise if you no longer want it.
That is film grain in Premiere Pro, plus a useful introduction to the Effects panel. Once searching for effects and controlling them in Effect Controls becomes second nature, a whole lot of Premiere Pro starts to feel less hidden away.
FAQs
What is the film grain effect called in Premiere Pro?
The built-in effect is called Noise. Find it quickly by typing Noise into the search field in the Effects panel.
Where do I adjust film grain after adding Noise?
Select the clip and open Effect Controls. Expand Noise, then adjust the Amount of Noise value by scrubbing, typing a number, or using its slider.
Why does Noise make Premiere Pro playback slow?
Noise is an effect Premiere Pro must process while the sequence plays, which can slow editing playback. Lower the Programme Monitor playback resolution to Quarter for smoother performance.
Can I remove film grain without affecting the original video?
Yes. Click the fx icon to disable Noise temporarily, or select the Noise effect name in Effect Controls and press Delete to remove it from the clip.
Written by Daniel Walter Scott — Founder of Bring Your Own Laptop & Chief Instructor
