Checking video properties size dimensions in Premiere Pro
Questions


Student Gallery
Be the first to share something.
Course info
Overview
I am here to help you learn Adobe Premiere Pro and to show you the tools you need to become a successful video editor. Premiere Pro is the industry standard used by professional designers to create stunning, high class videos and, after completing this course, you too can become a confident, skillful and efficient creator of stunning videos.
This course is aimed at people who are completely new to Premiere Pro.
If you are self taught using Premiere, this course will show you techniques you never dreamed were necessary or possible and will show you efficiencies to help speed up your workflow.
The course covers many topics - all of them on a step-by-step basis. We will use real world video editing examples to work through:
- An interview
- A wedding video
- A short commercial
- A documentary
- Social media advertising videos
- YouTube ‘how to’ videos
- Talking head footage mixed with screencasts and voiceovers
We will work with text, animation, motion gfx, special effects and we will add music to our video.
We will learn how to do colour correction, colour balancing and also how to create amazing video transitions within our movie. Technical ‘guru’ topics such as HD v 4K, frames per second, exporting work, fixing up bad audio, balancing and synching audio will all become manageable tasks for you. Best of all...I will show you amazing shortcuts and techniques to speed up your workflow.
Throughout the course we will work on mini projects and I will be suggesting assignments which will add value to your portfolio.
Start your Premiere Pro training now and fast track your career as a video editor.
* Please note, you have full permission to transform and upload any work using footage of Daniel as a part of this course.

Daniel Walter Scott
Founder of Bring Your Own Laptop & Chief Instructor
I discovered the world of design as an art student when I stumbled upon a lab full of green & blue iMac G3’s. My initial curiosity around using the computer to create ‘art’ developed into a full-blown passion, eventually leading me to become a digital designer and founder of Bring Your Own Laptop.
Sharing and teaching are a huge part of who I am. As a certified Adobe instructor, I've had the honor of winning multiple Adobe teaching awards at their annual MAX conference. I see Bring Your Own Laptop as the supportive community I wished for when I was first starting out and intimidated by design. Through teaching, I hope to bring others along for the ride and empower my students to bring their stories, labors of love, and art into the world.
True to my Kiwi roots, I've lived in many places, and currently, I reside in Ireland with my wife and kids.
Certificates
We’re awarding certificates for this course!
Check out the How to earn your certificate video for instructions on how to earn yours and click the available certificate levels below for more information.
Downloads & Exercise files
How do I check a video’s resolution and frame rate in Premiere Pro?
Hover over a clip in the Project panel for a quick readout, or reveal metadata columns to compare clips properly. For full technical details, select a file and use File > Get Properties for > Selection, which shows resolution, frame rate, duration, file size and location.
How to Check Video Size, Frame Rate and File Properties in Premiere Pro
It is time to get a bit technical. Things like 4K, 8K, UHD, HD and frame rates can sound wonderfully nerdy, but knowing what your footage actually is matters if you want to edit professionally.
Before getting stuck into what all those labels mean, start with the practical side: finding the properties of a video file in Adobe Premiere Pro. Once you can identify a clip’s size, frame rate and audio details, you can make better decisions about sequences, exports and mixing footage from different sources.
Check Clip Information Quickly in the Project Panel
The fastest way to see basic information is right inside the Project panel. Find the clip you want to inspect, then hover over it briefly.
Premiere Pro displays a small information panel with useful essentials, including:
File type, such as MP4
Media type, such as a movie file
Frame size, shown as width by height in pixels
Frame rate, such as 25 frames per second
Audio sample rate, measured in hertz
This is perfect when you simply need a quick answer. You can immediately see whether a file is HD or a larger format, whether its frame rate matches the rest of the project, and whether it contains audio at the expected sample rate.
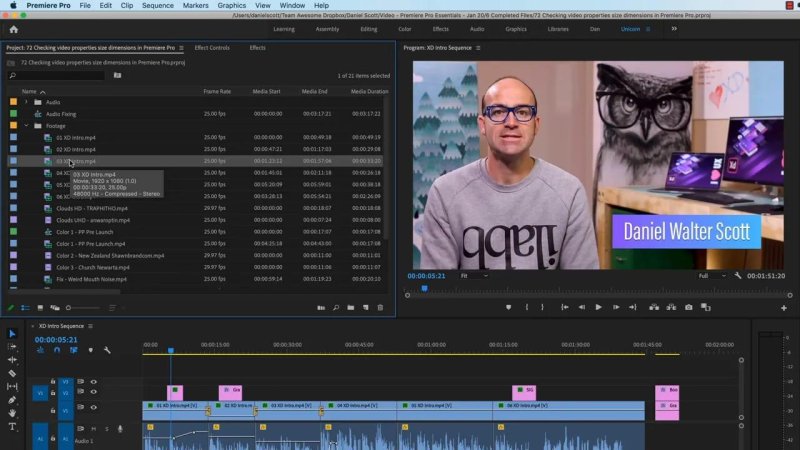
Hovering over a clip gives a quick technical snapshot without opening another window.
Reveal Metadata Columns for Easier Comparisons
Hovering is handy, but it is not the best method when comparing several clips. For that, use the horizontal scrollbar at the bottom of the Project panel and move across the available metadata columns.
The first useful column you will come across is typically Frame Rate. Keep sliding across and you will find other details, including duration and, most importantly, the video’s frame size.
This is where the pixel dimensions become especially useful. A clip that is 1080 pixels high is commonly referred to as 1080p. Another clip that is 2160 pixels high is twice that height, so it is the larger 2160 format often associated with 4K UHD footage.
Seeing those values side by side is much more useful than guessing from filenames. It helps you spot clips that may be different from the rest of the media before they become a problem later in the edit.
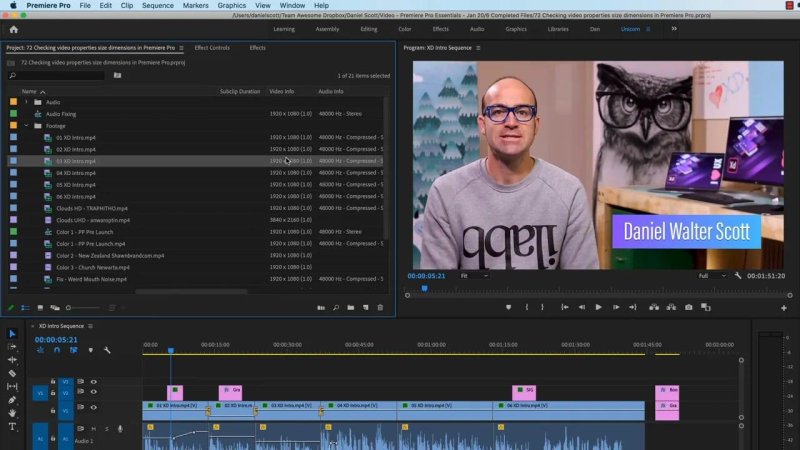
Scrolling across the Project panel reveals clip metadata such as frame rate, duration and dimensions.
Check the Duration from the Clip Name Area
There is another small hover shortcut worth knowing. Move over the clip’s name area, rather than hovering above the metadata line, and Premiere Pro can display the duration.
That may sound minor, but duration is often exactly the information you need when hunting for the right take, checking an audio recording or working out which version of an asset belongs in the timeline.
Use Get Properties for Full File Details
When a quick hover is not enough, use Premiere Pro’s more detailed properties command.
Select a clip in the Project panel.
Open File from the main menu.
Choose Get Properties for.
Select Selection.
Premiere Pro opens a properties window with a deeper breakdown of the selected file. Depending on the media, this includes:
Duration
Frame rate
Frame size
File size
File location
Audio configuration, where relevant
The important point is that Premiere Pro checks whatever is currently selected. The selection can be in the Project panel or the timeline. Select the item you want information about, then ask Premiere Pro for the properties of that selection.
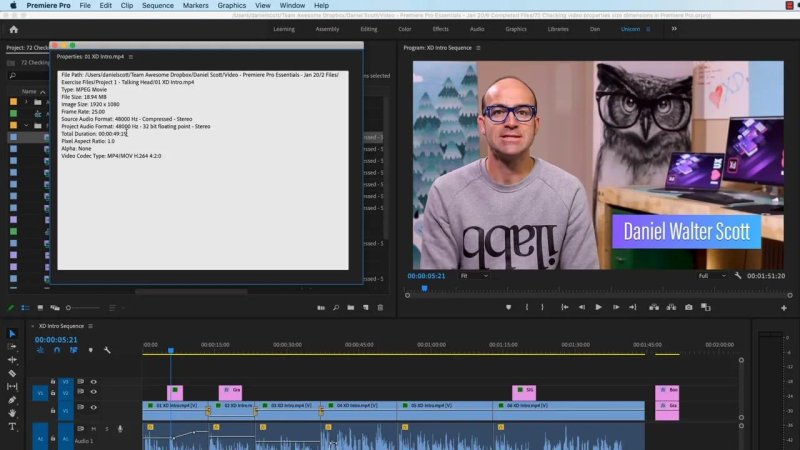
The properties window provides the detailed technical information that a quick hover cannot.
Inspect a File Before Importing It
There is also a less obvious option in the same menu: checking the properties of a file that is not already in the Premiere Pro project.
Choose File > Get Properties for > File, then browse to the media on your computer. This lets you inspect the file without importing it first.
It is useful when someone sends over a mystery file, when you are sorting through a media drive, or when you want to verify an asset before bringing it into an organised project. You are not importing the file. You are simply asking Premiere Pro what it is.
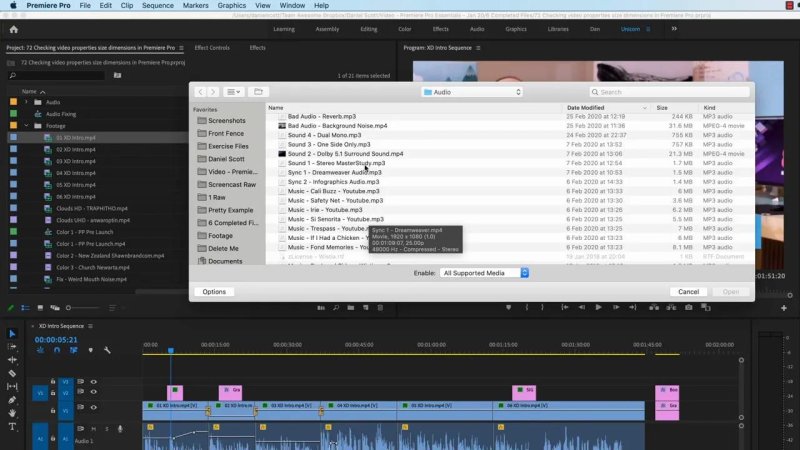
Choose any file from your computer to inspect its properties without adding it to the project.
Example: Checking an MP3 Audio File
This works for more than video. Select an MP3 through the file browser and Premiere Pro reports audio-specific details, such as whether it is stereo and the sample rate in hertz.
That makes it a useful little diagnostic tool for audio as well. If a file is not in the project yet, you can still confirm its basic format and technical setup before deciding whether to use it.
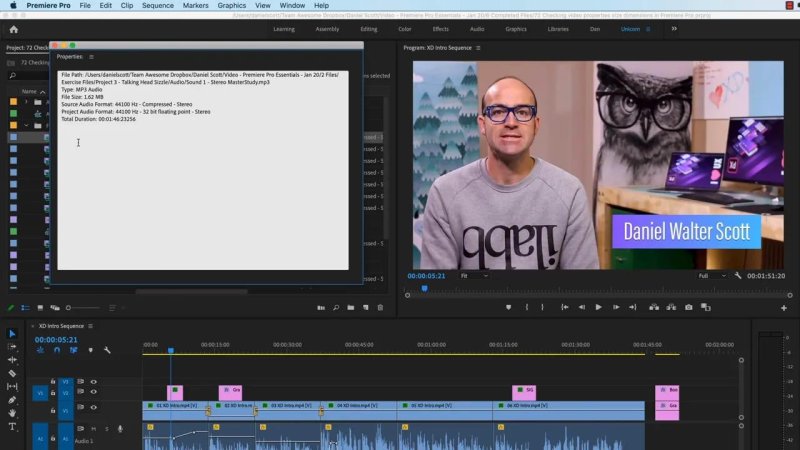
Premiere Pro can inspect external audio files too, including their channel setup and sample rate.
Build the Habit of Checking Footage First
There is no need to memorise every technical standard all at once. Start by checking your media before you edit it. Look at the frame size, frame rate, duration and audio information, then you will know what you are actually working with.
Those numbers are the foundation for understanding HD, UHD, 4K, 8K and the frame-rate choices that come next. The less you rely on assumptions, the smoother your Premiere Pro projects will be.
FAQs
Where can I see a clip’s frame rate in Premiere Pro?
Hover over the clip in the Project panel for a quick readout, or reveal the Frame Rate metadata column by scrolling horizontally across the Project panel.
How do I find a video’s resolution in Premiere Pro?
Check the frame size shown when hovering over a clip, reveal the video-size metadata column in the Project panel, or use File > Get Properties for > Selection for detailed information.
Can Premiere Pro check a file without importing it?
Yes. Choose File > Get Properties for > File, select the file from your computer, and Premiere Pro will show its technical properties without adding it to the project.
What details does Get Properties for Selection show?
It can show the selected media’s duration, frame rate, dimensions, file size, file location and relevant audio information.
Written by Daniel Walter Scott — Founder of Bring Your Own Laptop & Chief Instructor
