Introduction to B-roll & how to add it to our video in Premiere
Questions


Student Gallery
Be the first to share something.
Course info
Overview
I am here to help you learn Adobe Premiere Pro and to show you the tools you need to become a successful video editor. Premiere Pro is the industry standard used by professional designers to create stunning, high class videos and, after completing this course, you too can become a confident, skillful and efficient creator of stunning videos.
This course is aimed at people who are completely new to Premiere Pro.
If you are self taught using Premiere, this course will show you techniques you never dreamed were necessary or possible and will show you efficiencies to help speed up your workflow.
The course covers many topics - all of them on a step-by-step basis. We will use real world video editing examples to work through:
- An interview
- A wedding video
- A short commercial
- A documentary
- Social media advertising videos
- YouTube ‘how to’ videos
- Talking head footage mixed with screencasts and voiceovers
We will work with text, animation, motion gfx, special effects and we will add music to our video.
We will learn how to do colour correction, colour balancing and also how to create amazing video transitions within our movie. Technical ‘guru’ topics such as HD v 4K, frames per second, exporting work, fixing up bad audio, balancing and synching audio will all become manageable tasks for you. Best of all...I will show you amazing shortcuts and techniques to speed up your workflow.
Throughout the course we will work on mini projects and I will be suggesting assignments which will add value to your portfolio.
Start your Premiere Pro training now and fast track your career as a video editor.
* Please note, you have full permission to transform and upload any work using footage of Daniel as a part of this course.

Daniel Walter Scott
Founder of Bring Your Own Laptop & Chief Instructor
I discovered the world of design as an art student when I stumbled upon a lab full of green & blue iMac G3’s. My initial curiosity around using the computer to create ‘art’ developed into a full-blown passion, eventually leading me to become a digital designer and founder of Bring Your Own Laptop.
Sharing and teaching are a huge part of who I am. As a certified Adobe instructor, I've had the honor of winning multiple Adobe teaching awards at their annual MAX conference. I see Bring Your Own Laptop as the supportive community I wished for when I was first starting out and intimidated by design. Through teaching, I hope to bring others along for the ride and empower my students to bring their stories, labors of love, and art into the world.
True to my Kiwi roots, I've lived in many places, and currently, I reside in Ireland with my wife and kids.
Certificates
We’re awarding certificates for this course!
Check out the How to earn your certificate video for instructions on how to earn yours and click the available certificate levels below for more information.
Downloads & Exercise files
Transcript
So just a quick recap, B-roll is not your A-roll. A-roll is the main focus of the film, so at the interview, let's say, or, yeah, the kind of the main focus of it. B-roll is any kind of thing that supports it or just supplemented to it. It's not absolutely essential for the course. It just helps make a cohesive story. A pretty good example of this is, the "Miss Donut." Let's have a little look at the interview, so this is the main-- "We work, well we live and work here on Maui. We opened our store about seven months ago." So there's an interview, her discussing lots of things, she's asked lots of questions, but then the final edit, which is not my edit, let's have a listen, it's the same kind of dialogue, but let's have a look at the video.
"I'm Madame Donut, and I own Donut Dynamite, with my husband. Well, we live and work here on Maui. We opened our store about seven months ago, in the town of Waikuku." So you can see, it is-- the interview's underlying it, and they do cut back and forth from the interview throughout this, but there is a ton of B-roll. I'm just kind of scrubbing through it so you can see it, but that's happening all the way through it, but then they cut out to this supportive material B-roll. So in this case it helps tell the story. I use it quite often to cut out my bad edits. So I'll be trying to do a whole length of dialogue, and I'll just mess it up.
"Absolutely…” Watch. “…and work our way through step-by-step. We'll start with the techniques that you'll need…" So instead of having a really bad cut where I kind of go "um," I cut out the um, instead of doing another cut, I just put it over the top of, kind of an example of what we're doing. Here's another example, so me talking, always great faces. So me talking. "…on mobile, on tablet, and on desktop. We'll build four sites…" See there, I just cut to, like I drew this on my book to kind of have some B-roll to go over the top of it. So I shot my own B-roll, I am not good at B-roll, and I really want to get better at it.
In terms of inspiration for B-roll, check out-- the two people that I'm trying to kind of lift my game with, is a guy named Peter McKinnon, and Daniel Schiffer. Both of these guys, they seem to know each other, but their B-roll is amazing, and I just want to take some time out soon and kind of-- this one is a B-roll challenge that Peter did. You can see, it's kind of telling the story about-- around where he lives. B-roll. Same with Daniel, he, Wow's this. So go check out them, they've got lots of stuff on YouTube. I've got links in your Links to both of the YouTube channels. Go subscribe to both of them, tell them Dan Scott sent you, and let's talk about the reason why we have B-roll in this particular exercises.
Mainly because there's a weird transition between this guy, doing the whole looking at the city, thinking thing, to him walking. I want there to be a bit of a better transition across. Some sort of passing of time because he just kind of appears on the street. The reason we're doing it is we don't-- we're going to go out and find our own B-roll, which is not ideal. We're just one of those projects where we need to find some of our own, because this particular-- we just don't have much footage in our cut down version. So in our-- where is it, Exercise Files, we just don't have a lot. There wasn't a lot taken of actual B-roll. There's a lot of him jumping around, which is cool, but not a lot of actual B-roll.
So in here, you can see, we've only got a few, not a lot. There's some walking B-roll, which is cool, we've already used it, as opposed to, let's see this, the Madame Donut one, check out the B-roll in this one, we've looked at it before but look at, Part 2 B-roll, look at that. That's just one of the sections of B-roll. So yay for them. We had so much good stuff to go through and edit this one with. So yeah, some projects will come with lots of B-roll, some will come with very little. Because we don't have a lot of B-roll, remember, and we-- I still want to find some, we're going to have to find something generic.
What I did was, decided on some clouds. He's kind of like looking up at the clouds, and he's walking. Bit of a connection between them. Clouds are easy because nobody can really tell if it was shot on the same day or a different day, at the same place. I went through and found a bit of clouds that kind of resembled what was going on. I was looking at kind of the scenes in here, to make sure the day wasn't too different, and then grab these, like he was looking straight up. I downloaded it, and I've got it ready in your exercise files.
It's actually-- you should have already imported it. It's under Footage, and it's this one here. So I want to open up a gap. I don't want to mess with my timing, because I spent a lot of time in getting the music going over here. So what I'm going to do is, this Lamp 4 for me, is particularly long. So you're working on your own one, just find a space in here that's not the jump, because we spend a bit of time trying to time that. So I've got my clouds, what I'm going to do is I'm going to need another-- what can I do? It's going to be easiest to add another track, so that we can match it up and then sneak it in.
So we're going to right click anywhere on this right hand side here, we're going to say 'Add Track'. Make sure we're doing it for the video side, and then I'm going to go, you, and I'm just going to trim it up. So I'm going to slide along, make sure my S key is snapping. I've turned mine off in the last video, remember. So if you want-- it's not snapping anymore, tap the 'S' key, and that's just kind of how I'm going to go. "…blowing my mind that some people can jump so far." Awesome.
Couple of other things, I want to match it a little bit nicer, the clouds are probably moving too fast. I want to kind of retain the slow-mo that's going on in this first bit. So I'm just going to slow it down, I'm going to lift it out of the track. So when I mess around with it, so right clicking it, 'Speed Duration', it's maybe half the speed. It's going to get longer. I'm just going to tuck it up at the end there. Not particularly worried about what's actually on screen, let's have a look. "…blowing my mind that some people can…" Nice.
The other thing is, is that it's quite different in terms of the light. So this one here I'm going to have to select on it, and try and Color Match, or Color Correct for these other videos, so I'm going to select on it. You might just find that there are actually, a different part of-- there's quite a long clip, actually, now it's all very similar. I forget that. Let's have a look at some color correction. So 'Basic Correction' under 'Lumetri Color', I'm going to go, start at the bottom and just kind of try and match it up. Really needs to get brighter. I bet you Exposure is going to be the best one for this one. It feels like a better blend across them. We're going to use some Luts at the moment to kind of put something across of them all, to try and tie this one with this one, with this one. Get them kind of close, but then we're going to use some sort of creative Lut or Look to kind of blend them together.
So a quick little look at the clouds, let's turn the Basic Correction 'on' and 'off'. That works for me, but let's go and try and tie them together with a Lut or Look, if you remember what those are. We'll do that in the next video, let's go.
How do you use B-roll to make an edit feel smoother?
B-roll is supporting footage placed over your main audio or A-roll to add context, cover awkward cuts, and connect scenes that do not naturally flow together. In Premiere Pro, even a simple clip such as clouds can create a believable passage of time when it is trimmed, slowed down, and colour corrected to match the surrounding shots.
How to Use B-Roll in Premiere Pro for Better Video Edits
B-roll time. It is one of those things that can turn an edit from a collection of clips into something that actually feels like a story.
Sometimes B-roll gives the audience more information. Sometimes it makes a transition feel intentional. And, honestly, sometimes it is there to hide a terrible cut in the dialogue. All are completely valid reasons to use it.
What Is B-Roll?
A-roll is the main focus of a video. It might be an interview, a presenter speaking, or the central action in a scene.
B-roll is the additional footage that supports that main material. It is not always essential to understanding the basic message, but it makes the story more cohesive, interesting, and polished.
For an interview with a doughnut shop owner, the A-roll might be the owner describing the business. The B-roll could include:
Close-ups of doughnuts being prepared
Hands decorating food
Staff working in the kitchen
The shop interior and menu boards
Details of equipment, ingredients, and packaging
The interview audio can continue underneath all of those shots. Rather than sitting on the same interview framing the entire time, the edit gets to show the things being discussed.
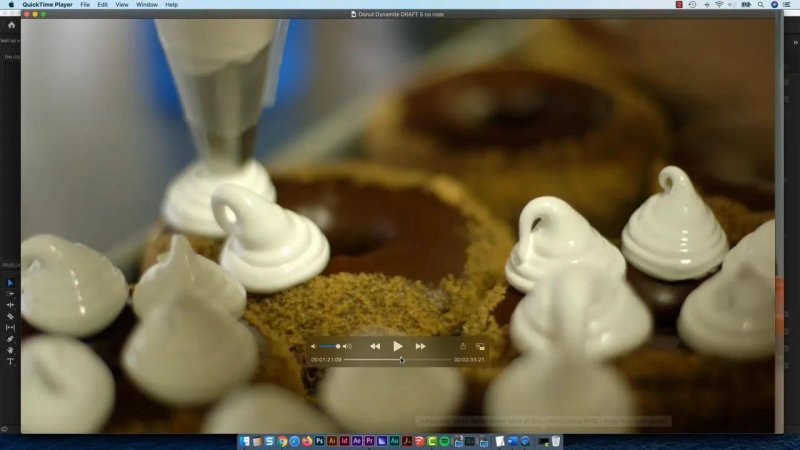
A close-up of the work adds visual detail while the main interview audio continues underneath.
That is the basic job of B-roll. It supports the words with imagery, adds variety, and helps the edit move along.
Why B-Roll Is So Useful in an Edit
It helps tell the story visually
If someone says they work in a busy doughnut shop, it is much stronger to cut away to trays, mixing equipment, staff, and finished doughnuts than to leave the edit on their face the whole time. The supporting footage turns a spoken claim into a visual experience.
It covers awkward dialogue edits
This is a big one. A long piece of dialogue often needs tightening. There might be pauses, filler words, mistakes, or a sentence that simply needs to be cut down.
Without B-roll, removing part of a talking-head clip can create a distracting jump cut. With B-roll, you can make the edit in the audio, lay a relevant shot over the top, and keep the dialogue flowing naturally.
For example, if you are explaining a process on mobile, tablet, and desktop, use a shot of a sketch, a screen, or the actual process while the explanation continues. The B-roll does real work, rather than simply looking pretty.
It creates a bridge between scenes
B-roll can also connect two moments that otherwise feel oddly abrupt. That is the situation here.
The sequence begins with someone looking thoughtfully across the city. Then suddenly, they are walking down a street. The story needs a tiny moment between those two spaces, something that suggests thought, atmosphere, or the passing of time.
Cloud footage is a simple but effective bridge. The person is already looking upwards, and clouds are naturally connected to that shot. Then the edit can move into the walking scene without it feeling as if the person magically teleported onto the street.
Plan B-Roll Around a Purpose, Not Just a Pretty Shot
Good B-roll has a reason for being there. Before adding a clip, ask what job it is doing in the edit.
Is it showing what the speaker is talking about?
Is it hiding an edit in the A-roll?
Is it creating a transition between locations or moments?
Is it establishing a mood, place, or passage of time?
In this example, the clouds are not meant to explain a complicated idea. Their job is to smooth a strange transition between a contemplative city moment and a street scene.
Once you know the purpose, finding the right footage gets much easier.
Finding B-Roll When Your Project Does Not Have Enough Footage
Some projects arrive with stacks of usable B-roll. That is lovely. You can choose from wide shots, close-ups, details, actions, and alternative angles.
Other projects have barely anything. You might have loads of footage of someone jumping around or walking, but not enough supporting material to cover edits and transitions. When that happens, you need to find or shoot something that is generic enough to fit.
Clouds are useful for exactly this reason. Unless there is a very obvious landmark or dramatic weather change, it is difficult to tell whether the shot was captured on the same day or in the same location. You can search for cloud footage that resembles the original sky and make it fit the sequence.
When choosing replacement or stock B-roll, look for visual connections:
Similar weather and time of day
Comparable brightness and contrast
A related subject or direction of movement
Shots that logically connect the scene before and after
Here, the existing footage contains a person looking up, so clouds are a natural choice. A random shot of traffic or a beach might look nice, but it would not help the story nearly as much.
Get Better B-Roll Inspiration
If shooting B-roll is not yet a strength, that is fine. It is a skill, and the quickest way to improve is to study people who do it really well.
Peter McKinnon and Daniel Schiffer are both excellent sources of inspiration for cinematic B-roll. Pay attention to how they build short sequences from details, movement, light, sound, and simple everyday actions.
The point is not to copy individual shots exactly. It is to train your eye to notice opportunities for B-roll everywhere. A close-up of a hand, a product, an object moving, a location detail, or a small action can all become useful cutaway material.
Adding a B-Roll Clip to the Premiere Pro Timeline
The aim is to insert the cloud shot without destroying timing that is already working, particularly if the music and existing cuts have been carefully timed.
Rather than moving everything around, find a section that has some room to breathe. Avoid disrupting an important action beat, such as a jump that has been timed to music.
Right-click in the timeline area on the video side.
Choose Add Track to create an additional video track.
Place the cloud clip on the new track above the existing footage.
Trim the clip to the length needed for the transition.
Use snapping to make positioning easier. If snapping is off, press S to turn it back on.
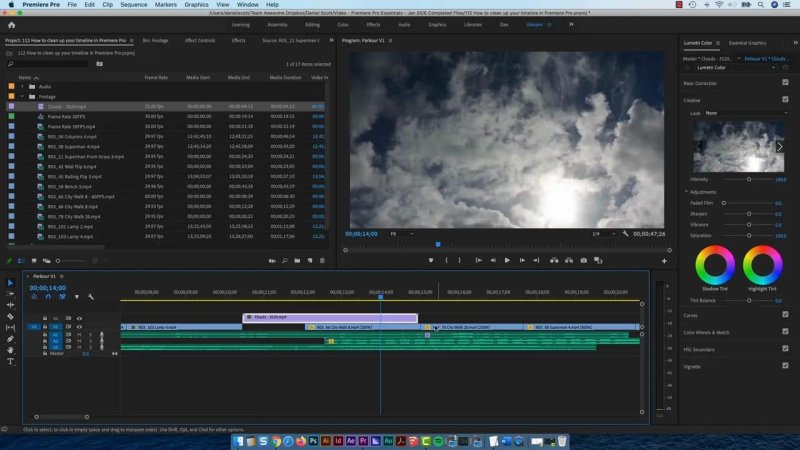
Putting the cloud clip on its own video track makes it easy to position the transition without disturbing the underlying edit.
Adding B-roll on a track above the A-roll means the original audio can keep playing uninterrupted. The audience hears the main story while the image changes to something supportive.
Slow Down B-Roll to Match the Pace of the Scene
The cloud footage may move too quickly compared with the slower, thoughtful opening shots. If the pace does not match, the transition can feel like it belongs to a different video.
In Premiere Pro, slow it down:
Right-click the B-roll clip in the timeline.
Select Speed/Duration.
Reduce the speed, such as setting it to around 50 percent.
Remember that slowing the clip makes it longer, so trim or tuck the extended section into the timeline as needed.
You do not need to obsess over the exact frame in the cloud clip. The important part is the feeling. A slightly slower movement helps maintain the reflective pace from the preceding shot, then gently carries the edit towards the street sequence.
Colour Correct B-Roll So It Belongs in the Same Scene
Even if the cloud footage is a logical match, it may not match the lighting of the clips around it. The sky may be too dark, too cool, too contrasty, or simply feel like it was filmed on another day.
Start with basic correction in the Lumetri Color panel. In this case, the cloud footage needs to be brighter, so exposure is the main adjustment.
Select the cloud clip in the timeline.
Open Lumetri Color.
Go to Basic Correction.
Adjust exposure first if the clip is noticeably too dark.
Compare the B-roll with the shots directly before and after it.
Toggle the correction on and off to check whether the adjustment genuinely improves the blend.
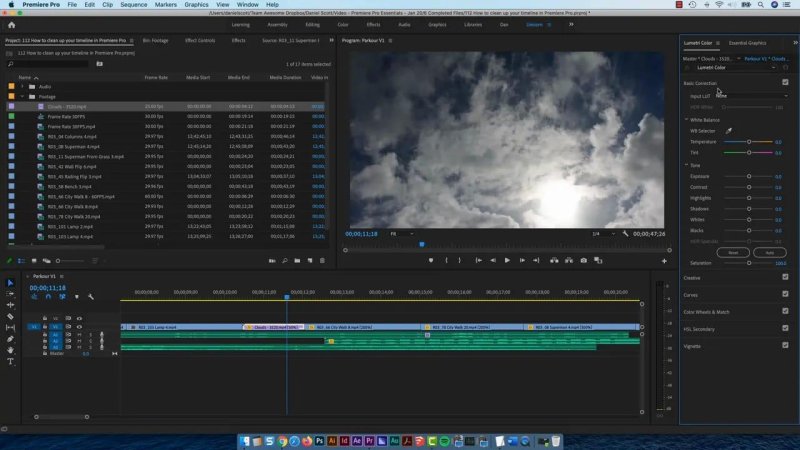
Basic correction, especially exposure, can bring an inserted B-roll shot much closer to the lighting of the surrounding sequence.
You are not trying to make every clip technically identical. You are trying to make the transition feel believable enough that it does not pull attention away from the story.
Use a LUT or Creative Look to Tie the Sequence Together
Basic colour correction gets the individual clips closer. A LUT or creative look can then help unify the whole sequence.
Think of it as a two-stage process:
First: correct each clip so obvious differences in exposure and colour are reduced.
Then: apply a creative LUT or look to give the surrounding shots a shared visual treatment.
A LUT is not a magic fix for mismatched footage. If one clip is far darker than the others, deal with that problem first in Basic Correction. Once the shots are reasonably close, a shared look can help them feel as though they belong in the same film.
The Main Takeaway: B-Roll Should Make the Edit Feel Effortless
B-roll is not just filler footage. It is a storytelling tool.
Use it to show details, add context, cover dialogue edits, establish atmosphere, and bridge moments that do not naturally connect. If a scene jumps too suddenly from someone looking at a city to someone walking down a street, a short, slow, colour-matched cloud shot can solve the problem beautifully.
Start simple. Shoot or collect footage that supports what is being said, keep it organised, and look for places where it can make the edit smoother. Your videos will feel far more deliberate, even when the B-roll is doing the quiet work of hiding a slightly dodgy cut.
FAQs
What is the difference between A-roll and B-roll?
A-roll is the main footage, such as an interview or presenter speaking. B-roll is supporting footage placed over or between the main footage to add context, cover edits, and make the story more visually engaging.
Can B-roll cover jump cuts in Premiere Pro?
Yes. Make the necessary cut in the A-roll audio and place a relevant B-roll clip on a video track above it. The audio continues while the B-roll hides the visual jump cut.
How do I slow down B-roll in Premiere Pro?
Right-click the B-roll clip, choose Speed/Duration, then reduce the speed percentage. Slowing a clip makes it longer, so trim it or reposition it to fit the available space in the timeline.
Why should I colour correct stock B-roll?
Stock footage can have different brightness, contrast, and colour from your original clips. Use Lumetri Color and Basic Correction to bring it closer to the surrounding footage, then use a creative look or LUT to help unify the sequence.
Written by Daniel Walter Scott — Founder of Bring Your Own Laptop & Chief Instructor
