How to get your image slideshow to loop in premiere pro
Questions
Student Gallery
Be the first to share something.
Course info
Overview
I am here to help you learn Adobe Premiere Pro and to show you the tools you need to become a successful video editor. Premiere Pro is the industry standard used by professional designers to create stunning, high class videos and, after completing this course, you too can become a confident, skillful and efficient creator of stunning videos.
This course is aimed at people who are completely new to Premiere Pro.
If you are self taught using Premiere, this course will show you techniques you never dreamed were necessary or possible and will show you efficiencies to help speed up your workflow.
The course covers many topics - all of them on a step-by-step basis. We will use real world video editing examples to work through:
- An interview
- A wedding video
- A short commercial
- A documentary
- Social media advertising videos
- YouTube ‘how to’ videos
- Talking head footage mixed with screencasts and voiceovers
We will work with text, animation, motion gfx, special effects and we will add music to our video.
We will learn how to do colour correction, colour balancing and also how to create amazing video transitions within our movie. Technical ‘guru’ topics such as HD v 4K, frames per second, exporting work, fixing up bad audio, balancing and synching audio will all become manageable tasks for you. Best of all...I will show you amazing shortcuts and techniques to speed up your workflow.
Throughout the course we will work on mini projects and I will be suggesting assignments which will add value to your portfolio.
Start your Premiere Pro training now and fast track your career as a video editor.
* Please note, you have full permission to transform and upload any work using footage of Daniel as a part of this course.

Daniel Walter Scott
Founder of Bring Your Own Laptop & Chief Instructor
I discovered the world of design as an art student when I stumbled upon a lab full of green & blue iMac G3’s. My initial curiosity around using the computer to create ‘art’ developed into a full-blown passion, eventually leading me to become a digital designer and founder of Bring Your Own Laptop.
Sharing and teaching are a huge part of who I am. As a certified Adobe instructor, I've had the honor of winning multiple Adobe teaching awards at their annual MAX conference. I see Bring Your Own Laptop as the supportive community I wished for when I was first starting out and intimidated by design. Through teaching, I hope to bring others along for the ride and empower my students to bring their stories, labors of love, and art into the world.
True to my Kiwi roots, I've lived in many places, and currently, I reside in Ireland with my wife and kids.
Certificates
We’re awarding certificates for this course!
Check out the How to earn your certificate video for instructions on how to earn yours and click the available certificate levels below for more information.
Downloads & Exercise files
Download Files
Please confirm you would like to download this file, some files can be large. You maybe want to consider downloading on wifi rather than mobile data.
Large file sizes may also take a while to download depending on your internet speed.
Name:
Size:
Download Files
Please confirm you would like to download this file, some files can be large. You maybe want to consider downloading on wifi rather than mobile data.
Large file sizes may also take a while to download depending on your internet speed.
Name:
Size:
How do I make an image slideshow loop seamlessly in Premiere Pro?
Create a visual handoff between the end and beginning of the slideshow by copying the last image to the end, then applying a cross dissolve from that image back into the first image. The media player or TV handles repeated playback, while this edit makes the restart far less noticeable.
How to Loop an Image Slideshow in Premiere Pro Without an Obvious Restart
Key takeaways
Create a separate version of the sequence before changing it for looping playback.
Remove music if the slideshow will run continuously in a public space.
Use Premiere Pro's loop playback control to test the transition repeatedly.
Copy the final still to create a bridge into the first image.
Reapply the cross dissolve after rearranging clips, then shorten the two duplicated stills to preserve the original running time.
A video file does not force itself to loop
If a slideshow is going on a TV, computer, foyer display, or similar screen, the playback device usually controls whether the finished video starts again. Most TV players and desktop players offer a loop setting. QuickTime on a Mac, for example, has a simple option to repeat playback.
The job in Premiere Pro is slightly different. You need to make the visual restart feel natural, so the audience does not get a very obvious dip to black and instantly realise the slideshow has reached the end.
That is particularly useful for a slideshow intended to run quietly and continuously. If the audio becomes repetitive or distracting, remove it from this looping version and keep the focus on the images.
Start with a duplicate sequence
Do not modify the approved slideshow directly. Right-click the existing sequence and duplicate it, then give the duplicate a clear name, such as Option A Version Two.
This is a small bit of housekeeping that saves a lot of pain. You retain the original version, including its music and original timing, while creating a dedicated silent looping version for the display.
Open the duplicate sequence and close other sequence tabs if they are likely to cause confusion. Then unmute the audio track if necessary, select the music, and delete it.
Turn on loop playback in Premiere Pro
Before fixing the edit, enable looping in the Program Monitor so you can test the ending and beginning over and over. By default, pressing the spacebar reaches the end of the sequence and stops. That makes it hard to judge whether the loop feels convincing.
To add the control:
Click the plus button in the Program Monitor button bar.
Open the Button Editor.
Find the Loop button.
Click and drag it into the monitor's button bar.
Click OK, then activate Loop playback.
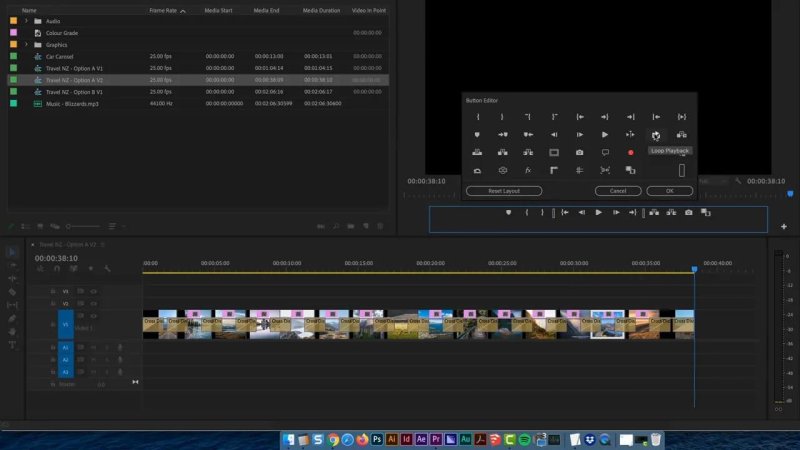
Add the Loop control to the Program Monitor so the ending can be tested continuously.
Now, when playback reaches the end, it jumps straight back to the beginning. That jump will immediately reveal the problem with an ordinary slideshow ending: the final image fades to black, then the first image suddenly begins again.
Fake the seamless loop with a final-image bridge
The trick is a little bit inceptiony, but it works. Copy the last still image in the slideshow and paste that copy at the end of the sequence. This gives you a duplicate of the final image sitting immediately after the original slideshow.
The layout is now conceptually like this:
The slideshow plays normally and finishes on its last image.
A copied version of that last image follows it.
That copied image crossfades into the first image when the sequence loops back to the start.
Rather than ending in black, the final photo begins fading back into the first photo. When playback restarts, it feels like the fade is simply continuing, not like the sequence has stopped and begun all over again.
Reapply the transition after moving clips
When clips are broken apart and put back together, Premiere Pro does not always reconnect the transition automatically. Remove the old cross dissolve at the new join, then reapply it properly.
With nothing selected, hold Shift so Premiere Pro snaps to the edit point, then use Command + D on a Mac to apply the default video transition. Make sure the outside of the edit is highlighted, which confirms Premiere Pro has targeted the join rather than only one clip.
If your default transition is not a cross dissolve, set it back to the transition you used in the slideshow before applying it. The goal is a consistent fade from the copied final image back into the first image.
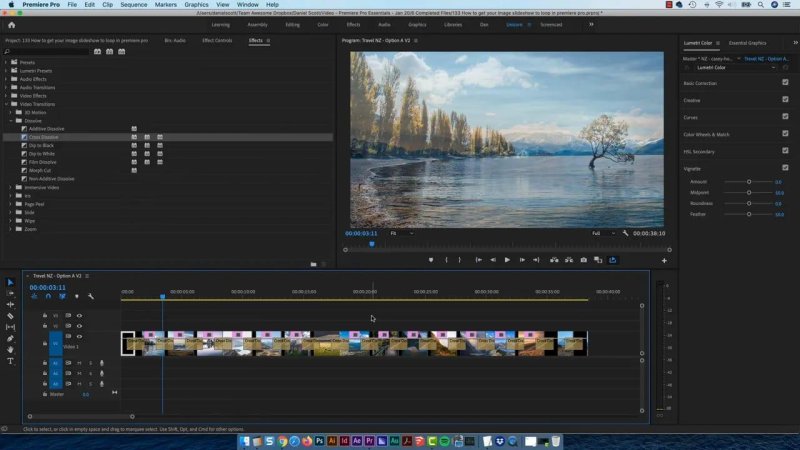
The duplicated ending image creates the transition that hides the jump back to the opening image.
Keep the total slideshow duration the same
There is one catch. Adding the duplicate final image makes the sequence longer. If the original final image and its copy both remain at full duration, you have effectively doubled the length of that final section.
The simple fix is to halve the duration of both the original final still and the copied still. Together, they will then equal the duration of the single original image.
Right-click each of those two still-image clips in the lower thumbnail area of the timeline and choose Speed/Duration. Be careful where you right-click. Right-clicking over an effects area can bring up the wrong options.
For video clips, entering a speed such as 50% may be the natural instinct. Still images are easier to manage by setting their durations directly. In a 30-frame sequence, entering 30 frames creates roughly half a second for each clip. Do the same to the other half of the pair.
If Ripple Edit is enabled, Premiere Pro may move later clips as the duration changes. If that happens, drag the clip back into position and make sure the edit point still snaps cleanly together.
Test the loop like it will run in real life
Press the spacebar and let the sequence repeat several times. Ignore the timeline and focus on the visual experience. You should see the slideshow fade through its final image and carry on naturally into the opening image.
The loop should feel like a continuous sequence of photographs, not a slideshow that reaches a black screen, stops, and abruptly starts again. Once the handoff is working, export the sequence and enable looping on the TV, computer, or media player that will display it.
Key Terms
Loop playback
A Premiere Pro playback setting that returns the playhead to the beginning when it reaches the end. It is ideal for repeatedly checking whether an edit loops smoothly.
Cross dissolve
A transition that gradually fades one clip into another. Here, it connects the copied final still back to the first image and disguises the restart.
Ripple Edit
A timeline behaviour that shifts later clips when a clip's duration changes. It can be helpful, but it may require repositioning clips after shortening still images.
Speed/Duration
The Premiere Pro command used to adjust how long a clip lasts. For still images, it is the practical way to shorten the two clips that form the looping bridge.
FAQs
Can Premiere Pro export a video that automatically loops?
Premiere Pro creates the video file, but the TV, computer, or media player normally controls whether that file repeats. Export a visually seamless loop, then enable the loop option on the playback device.
Why does my slideshow loop through black?
The sequence likely ends with a fade to black before the player returns to the first frame. Copy the final image, place it at the end, and cross dissolve it into the opening image to hide that reset.
Why did my cross dissolve disappear after moving clips?
Premiere Pro does not necessarily recreate a transition when clips are separated and rejoined. Delete the old transition, snap to the new edit point with Shift, deselect clips, and apply the default video transition with Command + D on a Mac.
Do I need to make the looping slideshow longer?
No. The copied final image temporarily makes the sequence longer, but you can halve the duration of both the original final still and its duplicate. Their combined duration then matches the original timing.
Written by Daniel Walter Scott — Founder of Bring Your Own Laptop & Chief Instructor
