What are aspect ratios how to set ratios in Premiere Pro
Questions


Student Gallery
Be the first to share something.
Course info
Overview
I am here to help you learn Adobe Premiere Pro and to show you the tools you need to become a successful video editor. Premiere Pro is the industry standard used by professional designers to create stunning, high class videos and, after completing this course, you too can become a confident, skillful and efficient creator of stunning videos.
This course is aimed at people who are completely new to Premiere Pro.
If you are self taught using Premiere, this course will show you techniques you never dreamed were necessary or possible and will show you efficiencies to help speed up your workflow.
The course covers many topics - all of them on a step-by-step basis. We will use real world video editing examples to work through:
- An interview
- A wedding video
- A short commercial
- A documentary
- Social media advertising videos
- YouTube ‘how to’ videos
- Talking head footage mixed with screencasts and voiceovers
We will work with text, animation, motion gfx, special effects and we will add music to our video.
We will learn how to do colour correction, colour balancing and also how to create amazing video transitions within our movie. Technical ‘guru’ topics such as HD v 4K, frames per second, exporting work, fixing up bad audio, balancing and synching audio will all become manageable tasks for you. Best of all...I will show you amazing shortcuts and techniques to speed up your workflow.
Throughout the course we will work on mini projects and I will be suggesting assignments which will add value to your portfolio.
Start your Premiere Pro training now and fast track your career as a video editor.
* Please note, you have full permission to transform and upload any work using footage of Daniel as a part of this course.

Daniel Walter Scott
Founder of Bring Your Own Laptop & Chief Instructor
I discovered the world of design as an art student when I stumbled upon a lab full of green & blue iMac G3’s. My initial curiosity around using the computer to create ‘art’ developed into a full-blown passion, eventually leading me to become a digital designer and founder of Bring Your Own Laptop.
Sharing and teaching are a huge part of who I am. As a certified Adobe instructor, I've had the honor of winning multiple Adobe teaching awards at their annual MAX conference. I see Bring Your Own Laptop as the supportive community I wished for when I was first starting out and intimidated by design. Through teaching, I hope to bring others along for the ride and empower my students to bring their stories, labors of love, and art into the world.
True to my Kiwi roots, I've lived in many places, and currently, I reside in Ireland with my wife and kids.
Certificates
We’re awarding certificates for this course!
Check out the How to earn your certificate video for instructions on how to earn yours and click the available certificate levels below for more information.
Downloads & Exercise files
Transcript
The first thing to-- I guess the term is the shape. So, think aspect ratio, think what shape is it. That is what it means, it's not the physical size of it, it's the shape, so this is a square, it's always a square, doesn't matter what size it is, so it has the expect ratio of 1:1. So there is this side, measures 1, and this is equally 1, it's the exact same, because it's a square.
So aspect ratio of 1:1 means, I am a square. A rectangle, so remember, replace aspect ratio of shape, so the shape of a rectangle is this, 16:9. So 16 across compared to 9 down, and it can get a little confusing, because you're like, "Isn't that just the height, is that 16 centimeters or inches, what is it doing?" It just means, the actual 16 made up units versus 9 made up units, and those units can be anything, because you can see here, this here is our HD footage, we've learned that it's 1080 high and it is 1920 wide, but it is an aspect ratio of 16 compared to 9, down the side, but UHD, the bigger version is exactly the same, I'm like, "How can that be?" because of this, watch this.
I can scale this one up, and I can see that it's the exact same. It's 16 across by 9 down. The fact that it happens to be a whole bunch more pixels bigger doesn't really matter, and that's why people give us aspect ratios, rather than sizes because you'll find stuff, on, let's say here, this is an aspect ratio of 16 to 9, like this one here, either of these two, but they say, the optimal is going to be, pixels of 1920 by 1080, that's what we got here, well, why doesn't it want this? Because at the moment it doesn't like the really big sizes for social media. Too big, drags on data plans, and most social media platforms, I seen on a phone, and that phone can't actually display this really big size. That will change though, they'll still have the same aspect ratio, but they might want something slightly bigger, let's have a look.
I show you, because the rectangular Facebook video-- I'm just looking at random websites, to give you a, I guess an idea of the confusing nature of it, and trying to tie it all together, because they say it's an aspect ratio of 16 to 9, which I'm doing, but they say the size is different, they say the size is 1280 by 720, whereas this other website says, Instagram wants 1920 by 1080, and you're like, "Hmm, they're the same aspect ratios but different numbers." They just want different quality. You'll also see minimum and maximum. You'll find, at the moment, I think the recommended size is this, but the minimum size, is a width of 600, whereas we can go up to this, and down to that. So let's work our way through a couple of actual aspect ratios into Premiere Pro.
Let's start with the easiest, 1:1, it's going to be square. 1 across the top, is exactly the same as the height, so it ends up being a square. Now in this case the optimal size is 1080 by 1080, but it can be smaller-- whereas this-- so I'm looking on a completely different website. I guess I'm trying to mix you up through different dimensions to show you, people say the same thing in a different kind of way. On this website here it says, your square recommendation is 1:1, and it says the square size is 600 x 600, but this is the minimum. So you need to check, at your time of recording, not your time of recording, your time of being live, right now, is go and check, just say what is the square recommended pixel size, for a 1:1 on Instagram, or whatever new fan dangled social media is out, fan dangled makes me old. Reluctant social media person. Anyway, so 600, if I made it 600 x 600, that accept it, but at the moment they really want 1080 x 1080. In the future it might be more, depending on how things go. So let's look at putting this into Premiere Pro.
So what you do is, in Premiere Pro, we're going to go to our Project Window, we're going to create a sequence, a brand new one, because we can't really get it from a video, unless you've got a video camera shooting in square. I don't know any that do, but I'm sure they're ones out there, but let's go to a new sequence. And how do you get started? Probably the best way for using any sort of social media, is to get started with this one called Digital DSLR. It's a really kind of just generic size. There's already a 1080 in there, which is good. We're going to use 25 frames/second. Now pretty much all social media will accept everything, they have maximums. I think Facebook at the moment won't accept anything higher than 30 frames/second for general videos, and is there a low one? I don't know, just stick to 25, nice and simple, and pretty consistent across the net at the moment.
So we'd start with this, but before we click 'OK', we're going to go in here and click 'Settings', and we are going to leave all of it, except we're going to play around with the frame size, The cool thing about Premiere Pro is it actually tells you, you can see, at the moment we're using this 16 x 9, so if we were ready to make video for-- let's have a look, this one, 16 x 9, here we go, so for Instagram TV, I have to make a video for that, then, look, 16 x 9, I've got the right ratio, and the optimal at the moment is 1920. 1920 x 1080, so actually don't have to do anything. It's only when we get into the weird shapes of, let's have a look, square, square, square, 1 : 1, 1080 x 1080.
I realize I say "ten eighty", and not "one thousand and eighty", it's just, I don't know, the industry seems to say it like that, and if you want to be cool like everyone else you say ‘ten eighty’. You can see I changed that, you can see, look at that, gives me the ratio. It says I'm 1:1, you're like, "Jackpot," we're on the right track. Everything else I'm going to leave, I'm just going to give it a name. We can do it afterwards or now, I'm actually going to use this for the next project. So make sure you're following along with this one, and we're going to call this one, let's call it 'Instagram', Insta-gram, and call this '1:1'. I'm going to probably reuse this later on, and it's going to help us get the language right. I'm just going to write 'square', just in case, yeah, not sure what 1:1 is, so click 'OK', and we've got ourselves our first sequence, be adding video to.
Let's have a look at this one, pretty common, and the reason you'd pick different sizes, can you see, a video post versus video stories, they're very different. You could use this, they call it screen real estate. On my little mobile phone, I can either have a video this big, or look at that, I can take up the whole screen with a video. So Instagram stories, at the moment you can use either of these sizes, but let's say it's just a generic post in Instagram, they want 4 to 5. You can kind of see the optimal size there, so I'm going to do that, what is it, 1350. So I'm going to go to a new sequence. I'm going to start with this one just because, but before I click 'OK', come into here, and I'm going to say, what was it, it was 4, so 1080 across the top, to 1350. Look at that, 4.5, and we're away. We'll give it a name, I'm not going to now because we don't need it, but the same thing is--
We'll do one more together to get the idea, so 9:16, which is basically the one that we've been dealing with throughout the course, 16:9, flipped up, portrait. So it's 1080 x 1920, so 1080 x 1920. Look at that, 9 x 16. Last one to hopefully drive it home is, just to recap, remember, the aspect ratio is the shape of it, not the size. Just how far across it is, by how far down it is. Let's have a little look at one of the Facebook ones now. You can see the recommended size is this, you're like, "It's a random size, "I wonder what aspect ratio is." Don't look down here. So I put it in this, 1280, it's going to here, it's 1280, and this one over here is what, 720, so 720. Look, it's 16 x 9, just a regular old horizontal movie, but it's just smaller, they just want smaller videos.
So in here they want something about this sort of size. I'm using this program, Illustrator, just because it was easier to mock this all up in. So I'm going to copy and paste this one, I'm to make it blue, and I'm going to make it-- what did they say? I can't remember, let's have a look, it was 1280 x 720. So if I go 1280 here, x 720, you can see, it's like, what I've been working on, just slightly smaller. So I make a new sequence, I make it this size, and really, I could actually get any of these bits of footage, that I've worked for now, to work in this size, and even though they say, recommended size, I bet you they probably accept larger sizes. So do some testing, you might go, I've got this thing in 4K or UHD, do I have to shrink it down to export it?, because some website called Hootsuite decided that, they said it's optimal like this, probably not. They're pretty clearer in these days, where you can upload any old size, and it will convert it to the size that they need. Takes a bit of processing time but works fine.
The other thing you can do is, let's have a look at Premiere Pro. Let's say that you are ready to export something to Facebook, and you were like, you want to use their 16 x 9. How do you check say some existing stuff, you're like, "Already made this thing." Great face. So I've got my earlier project open, my XD Intro sequence. With it selected down here in the Timeline I can go, 'Sequence', 'Sequence Settings', and you bring up this window, which you can change now, I could physically change my sequence size, but you can see it's the right aspect ratio, you're like, "Phew, but it's the wrong size, it's too big."
Let's say you need to get it down to that, was it 1280? Can't remember. 1280, what you can do is instead of trying to shrink it here, and then shrink everything down, what you can do, during export, who remembers what the shortcut export was? That's right, 'Command M', 'Ctrl M' on a PC, and in here what you can do is actually say, I want to be this h.264, which is probably the most common to upload to social media, and under 'Video', I can say, I do not want to Match Source, I want you to shrink it for me, to that 720, because this is locked, if I click out, look at that, it's 1080 x 720, ready to go. You might do this-- it's going to-- I know it's going to accept the larger size, but let's say that you've got hundreds of them to do, you might want this to be smaller just to save on upload time, or you might be uploading them to your own platform, or website, or something.
So you can just export it, it won't change the original size, just the size on the export. I do this quite a bit when I'm editing in 4K, then I need to export it for HD, I can come into here and just say, scale it down, don't actually have to, change it in the settings, just hereby, export settings, either via the Media Encoder or just doing it here in Premiere Pro.
All right, just a recap, remember, aspect ratio is another way of saying what is the shape, and 1:1 is another way of saying, it's the same height by the same width, so it's a square. The shape of this is 16 across x 9, which kind of looks like a rectangle. There's everything in between. So let's do a little for instance. Let's say you've been hired by somebody to help them with their Twitter accounts, and you want to do some video for them. The first thing you're going to do is go, 'Twitter video sizes'. You'll have a look, there'll be a bunch of aspect ratios. You decide on which is best for you. Sometimes it's hard to get away from this kind of rectangle format, because the footage you already have is recorded this way, but you can decide what aspect ratios you're going to do.
The next thing you're going to do is you're going to work out what the optimal size for that aspect ratio is, and there'll be a height and a width, in pixels. You open up Premiere Pro, you go to 'New Sequence', and then you type them in. You'll also note here that I've put in 1:1, and I've done 16 : 9, I think that's the more official way of doing it, but I put times, 'x' in all the time.
That my friends is aspect ratios. Hopefully we're going to start creating some aspect ratio videos now, to hopefully put it into a little bit more context. If you are a little confused, don't worry, aspect ratios are hard, and are a bit of a brain teaser. Hopefully that helped, on to the next video.
What is an aspect ratio in video?
An aspect ratio describes the shape of a video frame by comparing its width with its height. It is not the pixel size or quality. For example, 1:1 is square, 16:9 is widescreen, and 9:16 is a vertical portrait video.
What Are Video Aspect Ratios? A Simple Guide for Premiere Pro and Social Media
Aspect ratios can feel like one of those unnecessarily confusing bits of video language. Then social platforms start asking for 4:5, 1:1, 9:16, and 16:9, and it is fair to wonder what the hang any of it means.
The simple answer is this: an aspect ratio is the shape of your video. That is it. It does not tell you the physical size, the number of pixels, or whether something is HD or UHD. It tells you how wide the frame is compared with how tall it is.
Aspect Ratio Means Shape, Not Size
Think of aspect ratio as a shorthand for the proportions of a frame. The first number is the width, and the second number is the height.
1:1 means the width and height are equal, so it is a square.
16:9 means the frame is 16 units wide for every 9 units high, so it is a landscape rectangle.
9:16 is 16:9 turned upright, so it is a tall portrait rectangle.
4:5 is a portrait rectangle that is taller than it is wide.
The numbers are not centimetres, inches, or any other real-world unit. They are simply a comparison. You could imagine them as made-up units. The only thing that matters is the relationship between width and height.
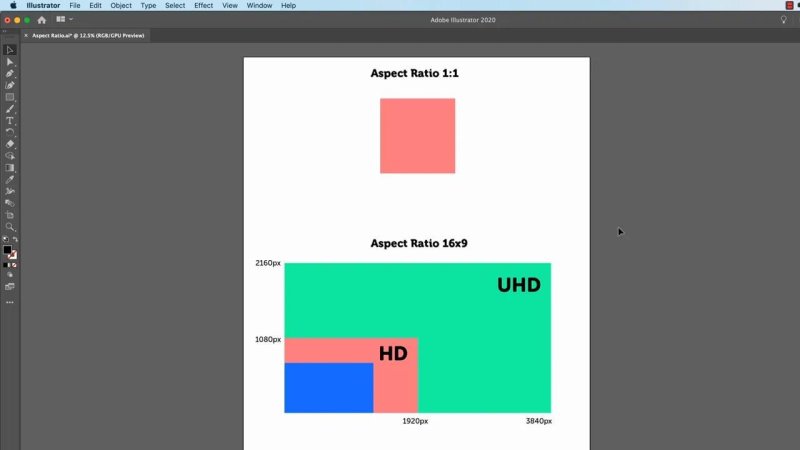
A square stays 1:1, while HD and UHD can share the same 16:9 widescreen shape.
Why HD and UHD Can Have the Same Aspect Ratio
This is the bit that often trips people up. A standard HD video might be 1920 by 1080 pixels. A UHD or 4K version has far more pixels, but it can still have exactly the same 16:9 aspect ratio.
Why? Because both frames have the same shape. The UHD frame is just a much larger version of the HD frame. You can scale one up or down and the proportions stay the same.
That is why websites and platforms often give you two pieces of information:
Aspect ratio, which tells you the shape required.
Pixel dimensions, which tell you the recommended export size and therefore the amount of detail.
For example, 1280 by 720 and 1920 by 1080 are both 16:9. They are different sizes, but the same wide rectangle.
Why Social Media Video Sizes Look So Confusing
Social platforms often list minimum, maximum, and recommended dimensions. This can make it seem like every website has invented a completely different aspect ratio, when often they are asking for the same shape at a different pixel size.
A platform may recommend 1280 by 720 for a landscape video, while another recommends 1920 by 1080. Both are 16:9. One is simply smaller.
Recommended pixel sizes matter because social media is commonly used on phones. Huge video files take longer to upload, use more data, and may be more detail than a phone can display anyway. Platforms can also change their preferred specifications over time as devices and services evolve.
Always check the current recommended dimensions for the specific platform and post type you are creating. Search for the platform name, the type of content, and “video size”. For example, search for a platform’s feed video dimensions, story video dimensions, or portrait video dimensions.
Common Social Media Aspect Ratios
1:1 Square Video
A 1:1 aspect ratio is a square. A common pixel dimension is 1080 by 1080, although smaller square sizes may also be accepted.
The key is not whether the square is 600 by 600 or 1080 by 1080. Both are still 1:1. The larger version simply contains more pixels.
4:5 Portrait Feed Video
A 4:5 frame is a tall rectangle that works well for an upright feed post because it occupies more of a phone screen than a standard landscape video. One example of a 4:5 frame is 1080 by 1350.
That means 1080 pixels across and 1350 pixels down. Premiere Pro will confirm that those settings produce a 4:5 aspect ratio.
9:16 Vertical Video
For full-screen vertical content, use 9:16. It is the familiar widescreen 16:9 ratio flipped upright. A common size is 1080 by 1920.
Vertical video is useful when the goal is to use the full height of a mobile screen rather than leave unused space above and below a landscape video.
16:9 Landscape Video
16:9 is the standard horizontal video shape. If your footage is already shot in normal HD or UHD landscape format, it will commonly start out as 16:9.
The export size may change depending on the destination, but the shape does not. For instance, 1280 by 720 and 1920 by 1080 are both ordinary 16:9 landscape video.
How to Create a Custom Aspect Ratio Sequence in Premiere Pro
When you are making video for a non-standard social media shape, create a new sequence and set the frame dimensions yourself.
In the Project panel, create a New Sequence.
Start with a general preset, such as a Digital SLR preset with a suitable frame rate.
Before confirming, open the Settings tab.
Change the Frame Size values to the width and height required.
Check the aspect ratio Premiere Pro displays.
Name the sequence clearly, such as Instagram 1:1 Square, so it is easy to reuse later.
For a square sequence, set the width and height to 1080 by 1080. Premiere Pro should show a 1:1 ratio. For a 4:5 portrait sequence, enter 1080 by 1350. For a 9:16 vertical sequence, enter 1080 by 1920.
For general social media work, a consistent frame rate such as 25 frames per second is a straightforward choice. Platforms may support a range of frame rates and have their own limits, so check the current requirements if a project has a particular delivery specification.
Choose the Aspect Ratio Before You Start Editing
Different aspect ratios are not just technical settings. They affect how much room you have to frame people, text, graphics, and everything else in the shot.
A horizontal 16:9 video can be difficult to turn into a tall 9:16 clip without cropping important parts of the image. Likewise, a vertical clip may not work nicely in a wide frame. Decide where the video is going before you build the edit, especially if you have the option to shoot specifically for the platform.
Sometimes you will need to use the footage you already have, and a landscape aspect ratio will be the practical choice. That is completely fine. The important thing is to choose the shape deliberately, then use the best current pixel dimensions for that destination.
How to Check an Existing Sequence
Maybe the edit is already done and you need to know whether it is suitable for a particular platform. You do not need to guess.
Select the sequence in the timeline.
Choose Sequence.
Select Sequence Settings.
Check the frame size and aspect ratio shown in the settings window.
This tells you whether the sequence is square, landscape, or portrait. It also tells you whether the pixel dimensions are larger or smaller than the recommended delivery size.
Resize on Export Instead of Rebuilding Your Edit
If the aspect ratio is correct but the pixel dimensions are larger than you need, you often do not need to resize the whole sequence and then adjust every clip. You can export a smaller version instead.
For example, if you have a 1920 by 1080 16:9 edit and need a smaller 1280 by 720 file, keep the original sequence as it is and scale down during export.
Open the Export settings with Command + M on Mac or Control + M on Windows.
Choose H.264, a commonly used format for uploading social media video.
Under the Video settings, turn off the option that matches the source if you need custom dimensions.
Enter the required width or height.
Keep the linked dimensions enabled so Premiere Pro maintains the correct aspect ratio.
Export the resized file.
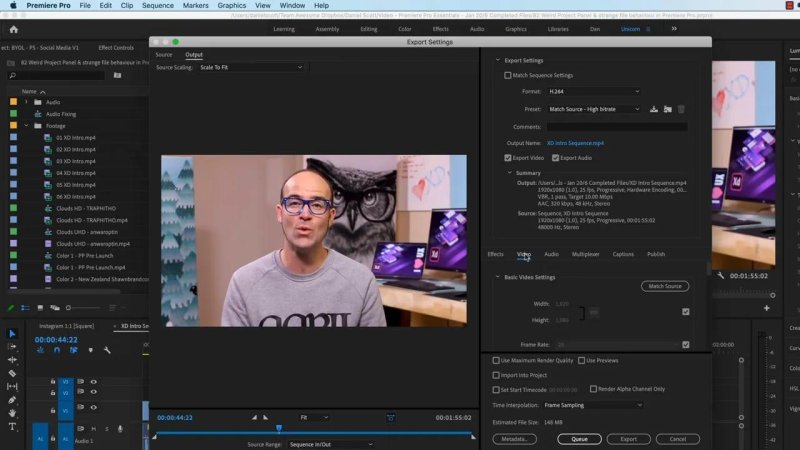
Export settings let you create a smaller delivery file without changing the original edit sequence.
This is especially handy when editing in 4K or UHD but delivering in HD. The edit stays at its original size, while the exported version is scaled down for faster uploading or for use on a website.
In many cases, platforms can accept larger files and convert them themselves. Still, exporting a smaller correctly sized version can save upload time, particularly when you have lots of videos to deliver or are uploading to your own website.
A Practical Workflow for Any Platform
When someone asks you to make video for a social media platform, use this simple process:
Search for the platform’s current video size requirements.
Choose the aspect ratio that best suits the content and placement.
Find the current recommended width and height in pixels for that ratio.
Create a new Premiere Pro sequence using those dimensions.
Edit for that frame shape, making sure important content fits comfortably.
Export in H.264 at the required dimensions, or scale down during export when appropriate.
You will see aspect ratios written as 1:1 and 16:9, but people also casually write them as 1x1 or 16x9. The important part is understanding the shape they describe.
The One Thing to Remember
Aspect ratio is simply another way of asking: what shape is this video?
A 1:1 aspect ratio means equal width and height, so it is square. A 16:9 ratio means wide landscape. A 9:16 ratio means tall portrait. Once that clicks, the strange-looking social media specifications become much less of a brain teaser.
FAQs
Is aspect ratio the same as video resolution?
No. Aspect ratio is the shape of the frame, while resolution is the number of pixels in it. A 1280 by 720 video and a 1920 by 1080 video have different resolutions but share the same 16:9 aspect ratio.
What aspect ratio is a square video?
A square video uses a 1:1 aspect ratio because its width and height are equal. Common square dimensions include 1080 by 1080 pixels.
What size is 9:16 video in Premiere Pro?
A common 9:16 vertical sequence size is 1080 by 1920 pixels. Enter 1080 as the width and 1920 as the height when creating a custom Premiere Pro sequence.
Can I change video dimensions only when exporting from Premiere Pro?
Yes, if the aspect ratio is already correct and you only need a smaller output file. Use the export settings to change the dimensions while keeping the original sequence at its existing size.
Written by Daniel Walter Scott — Founder of Bring Your Own Laptop & Chief Instructor
