How to apply easing to keyframes in Premiere Pro
Questions


Student Gallery
Be the first to share something.
Course info
Overview
I am here to help you learn Adobe Premiere Pro and to show you the tools you need to become a successful video editor. Premiere Pro is the industry standard used by professional designers to create stunning, high class videos and, after completing this course, you too can become a confident, skillful and efficient creator of stunning videos.
This course is aimed at people who are completely new to Premiere Pro.
If you are self taught using Premiere, this course will show you techniques you never dreamed were necessary or possible and will show you efficiencies to help speed up your workflow.
The course covers many topics - all of them on a step-by-step basis. We will use real world video editing examples to work through:
- An interview
- A wedding video
- A short commercial
- A documentary
- Social media advertising videos
- YouTube ‘how to’ videos
- Talking head footage mixed with screencasts and voiceovers
We will work with text, animation, motion gfx, special effects and we will add music to our video.
We will learn how to do colour correction, colour balancing and also how to create amazing video transitions within our movie. Technical ‘guru’ topics such as HD v 4K, frames per second, exporting work, fixing up bad audio, balancing and synching audio will all become manageable tasks for you. Best of all...I will show you amazing shortcuts and techniques to speed up your workflow.
Throughout the course we will work on mini projects and I will be suggesting assignments which will add value to your portfolio.
Start your Premiere Pro training now and fast track your career as a video editor.
* Please note, you have full permission to transform and upload any work using footage of Daniel as a part of this course.

Daniel Walter Scott
Founder of Bring Your Own Laptop & Chief Instructor
I discovered the world of design as an art student when I stumbled upon a lab full of green & blue iMac G3’s. My initial curiosity around using the computer to create ‘art’ developed into a full-blown passion, eventually leading me to become a digital designer and founder of Bring Your Own Laptop.
Sharing and teaching are a huge part of who I am. As a certified Adobe instructor, I've had the honor of winning multiple Adobe teaching awards at their annual MAX conference. I see Bring Your Own Laptop as the supportive community I wished for when I was first starting out and intimidated by design. Through teaching, I hope to bring others along for the ride and empower my students to bring their stories, labors of love, and art into the world.
True to my Kiwi roots, I've lived in many places, and currently, I reside in Ireland with my wife and kids.
Certificates
We’re awarding certificates for this course!
Check out the How to earn your certificate video for instructions on how to earn yours and click the available certificate levels below for more information.
Downloads & Exercise files
Transcript
First up we need to find some keyframes to add some easing to. I've got some keyframes applied to my little lower thirds here, where they slide in. We'll do the text first, and the box second. So with it selected, up here in my Effects Control, we need to find the keyframes. Not these ones, because that's for my background box, we'll do him in a second. So I'm going to close it down. Remember, little circles mean somewhere inside of here, very deep, is a couple of diamonds, and that's what we're looking for.
So inside 'Text', down to 'Position', a couple of diamonds. We'll do the first one. So we'll get this first one done. You don't actually have to have your CTI there, just have to click on it, make it go blue, then right click it, it's teeny tiny, I'm aware. Right click it, and you're looking for this one called Temporal Interpolation, which is a super nerdy way of saying Easing, which is a slightly less nerdy way of saying sliding in nicely.
So we want this one, then you're going to play the fun game of, is it Ease In or is it Ease Out? You'll get it wrong half the time, after about six months of playing around with this, you'll be pretty confident with it, it is, you're like, "Which one is it?" There's a lot of try it, and undo, try the other one. Now I know that this one here is going to be easing out of this keyframe. We can't ease into it because there's no side of that. Nothing's happening there, so it's easing out of this keyframe. So I'm going to right click it, I'm going to go 'Temporal Interpolation', I'm going to 'Ease Out' of it, and it changes to, like a little diamond.
You can't, oh, sorry, hourglass, you can't really see half of it, there it is there, I'm going to undo that. So that gives you a kind of a visual indicator, that you've done some Easing or Temporal Interpolation. Why do I call it Easing, and nobody else does? It's just because it's very common in lots of other programs, and they call it Easing, so I still do it too. If you Google, like, how to do easing, you'll end up here with Temporal Interpolation. Nobody calls it that, just Premiere Pro. So let's have a look at what it's doing.
Let's get our Playhead back to the beginning, and watch this over here, 'Spacebar'. Nothing really happened, because it's happening-- it's going slowly, as it's coming up the screen, you can't really see it. The one that will be a bit more obvious is the second one here, so just click on it. You don't have to have your CTI on it, right click it. Now in this case, is it Ease In or Ease Out? Easing out is this side, easing out of it, nothing's happening there. We want this side of it because there's lots of action on this side. If there's action on both sides you'll have to do it twice, you'll go, you, Ease In, and then add Ease Out.
So we're going to ease into this one. Let's have a little look. 'Spacebar'. Can you see, it just comes in with a little bit more grace. It's called easing. It's hard because the big colored box storms its way in. So let's fix that one with some Easing. Same sort of thing, we need to close all this down, find our Shape layer, find our diamonds, and this first one here, we're going to right click it, and you're going to go, oh, brain melts, which one is it? It's Ease Out, because there's nothing happening over here, there's nothing to ease in for, but using out of this keyframe it's doing lots. Right click, 'Temporal Interpolation', we're going to get this to 'Ease Out', and if you get it wrong just add Ease In as well.
It's going to do the exact same job, because there's nothing happening the other side, doesn't really matter. So if you like just clicking it and going, "Don't care," just do it twice, because you don't want to learn. That will work too, but just do it officially just to get us going.
So this one here is Temporal Interpolation. This is easing out of that keyframe and then into this one. Here we go, now hopefully, let's have a look. Can you see, it's just got a bit more-- I like the word grace, it comes in with a little bit more pizzazz, that's a terrible word, but you get the idea, right? It's just not as clunky.
Now often when you get to here you can play around with the timing, and the timing is just how far apart these are. So you might decide to go in faster, let's see what happens, watch. Move it back, 'Space bar'. Move it out. So once you play around with the easing your timing will be off, they'll get to-- they'll get to the right point and end of the right point, but their timing in between it is a lot different. There's a bit of graduation going in.
Basically think of it as-- it gets kind of like a bit of slowness. I always think of it as putting glue on it. So it's going really fast in the middle but it gets a bit 'glue'ey here, and it gets a bit 'glue'ey leaving. So it takes a little while, get some inertia, and then gets all slowed down.
All right, that is Easing, my friends, or Temporal Interpolation, giving your motion graphics some grace. And that's it, we're not going to do huge amount of motion graphics in this class, we're going to do a bit, but that is the term that they are using, we've got graphics, they are in motion. It's pretty simple, but you can now put your hand up and say, "Yep, now it's some motion graphics."
All right, enough easing, I will see you in the very next video.
How do you make keyframe animations smoother in Premiere Pro?
Add Temporal Interpolation to your keyframes and choose Ease In or Ease Out based on where the movement happens. This makes graphics accelerate and decelerate rather than travelling at one constant speed, turning a clunky slide into something with a bit more grace.
How to Add Easing to Keyframes in Premiere Pro
A graphic that slides on screen at a constant speed is technically animated, sure, but it can feel pretty clunky. It starts suddenly, moves mechanically, then stops suddenly. Easing is the simple fix.
In Premiere Pro, easing is called Temporal Interpolation. That is a very nerdy name for a very useful idea: make animated text, shapes, and lower thirds feel like they have a little momentum rather than behaving like they are on rails.
What easing actually does
Without easing, an object moves at the same speed between two keyframes. With easing applied, it slows down around one or both keyframes and moves faster through the middle.
I tend to think of it as adding a bit of glue. The animation is quick through the middle, but gets gluey as it leaves or reaches a keyframe. It takes a moment to gather momentum, then slows into its final position.
That tiny change can make a lower third, title, or background shape feel much more polished. It is still a simple bit of motion graphics, but it is no longer quite so aggressive.
Find the keyframes you want to ease
Start by selecting the graphic you want to animate. In the Effect Controls panel, find the property that has been keyframed. For a sliding lower third, that will commonly be Position.
Do not get distracted by the first set of controls you see. A lower third can have separate keyframes for its text and its background box, so make sure you open the correct layer or graphic group.
Look for the little diamond shapes beside the animated property. Those diamonds are your keyframes. Small circles or disclosure controls usually mean there are more controls nested inside, so open them up until you find the actual diamonds.
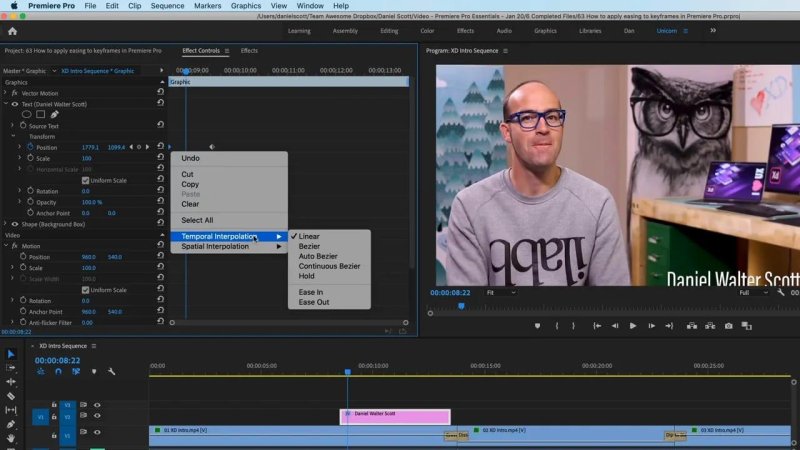
Temporal Interpolation is Premiere Pro's name for easing, and it is available from a keyframe's right-click menu.
How to apply easing in Premiere Pro
You do not need to park the Current Time Indicator directly on a keyframe. Just select the keyframe so it turns blue, right-click it, then choose:
Temporal Interpolation
Ease In or Ease Out
After easing is applied, the keyframe changes from a normal diamond to an hourglass-like shape. It is a small visual clue, but it confirms that temporal interpolation has been added.
Ease In vs Ease Out: which one do you need?
This is the bit that can melt the brain a little at first. The key is to stop thinking about the name and look at the direction of the movement.
Use Ease Out when movement leaves a keyframe
If the animation begins at a keyframe and then travels away from it, apply Ease Out to that starting keyframe. The motion eases out of its starting position, beginning more gently before building speed.
For example, if text is sitting off screen at the first keyframe and slides into place at the second, the first keyframe gets Ease Out. There is no animation before that first keyframe, so there is nothing to ease into.
Use Ease In when movement arrives at a keyframe
If the object is moving towards a keyframe and settling there, apply Ease In to the destination keyframe. The movement slows as it arrives.
Using the same sliding text example, the final keyframe gets Ease In. The text travels towards that point and lands with a little more grace rather than stopping dead.
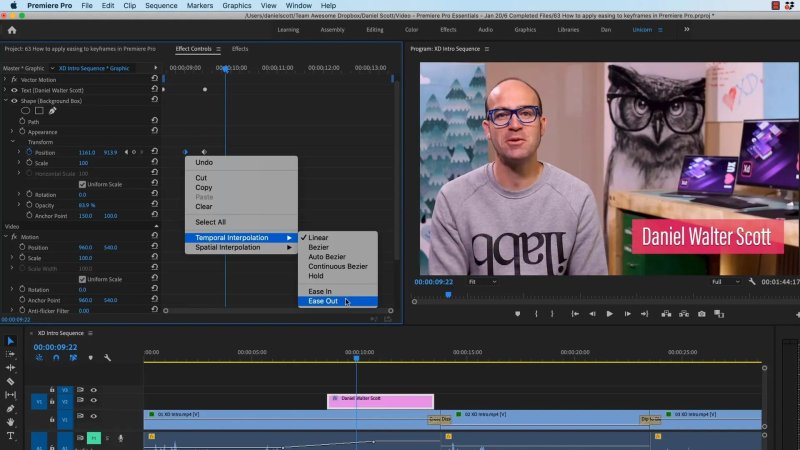
Apply Ease Out to the starting keyframe and Ease In to the finishing keyframe for a smoother slide-in.
When movement happens on both sides of a keyframe
If an object is moving before and after a keyframe, you may need to apply both types of easing to that point. Add Ease In for the motion arriving at it, then Ease Out for the motion leaving it.
And yes, sometimes you will choose the wrong one. That is normal. Try it, preview it, undo it if needed, and apply the other option. After enough practice, the direction becomes much easier to spot.
If there is no action on one side of a keyframe, applying both options will not cause trouble because there is no movement for one of them to affect. Still, it is worth learning the official logic so you know what is actually happening.
Example: easing a lower third
A lower third often contains at least two animated parts:
The text, such as a name and job title
The background box, often a coloured rectangle behind the text
It is easy to ease the text and forget the box. Then the text glides nicely into place while the large coloured background storms in at full speed. That makes the whole graphic still feel clunky.
Apply easing to both animated elements:
Select the text layer and open its Position keyframes in Effect Controls.
Apply Ease Out to the keyframe where the text starts moving.
Apply Ease In to the keyframe where the text finishes moving.
Select the background shape layer.
Find its Position keyframes and repeat the same easing approach.
Once both parts use easing, the lower third comes in as one cohesive animation. It has a bit more pizazz. Terrible word, perhaps, but you get the idea.
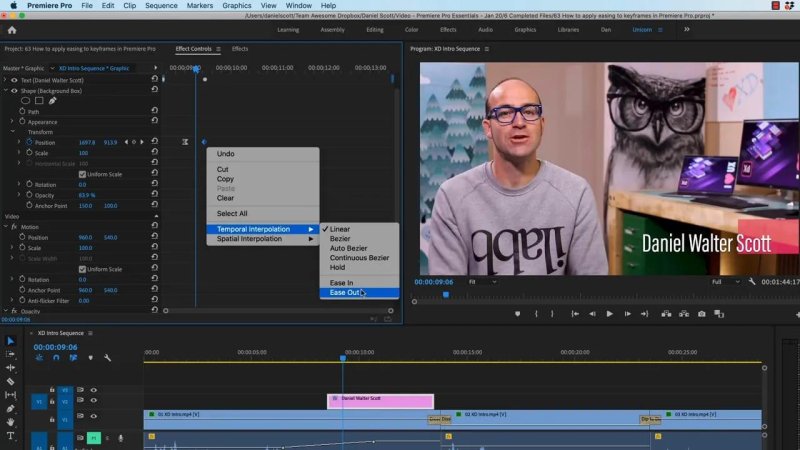
Do not forget the background shape layer, because a fast-moving box can undo the smoothness of eased text.
Adjust the timing after adding easing
Easing changes the way the animation spends its time between keyframes. The object still starts and finishes at the same points, but it is no longer travelling at one uniform speed.
That means the timing you set before easing may no longer feel right. An animation can feel too slow at the beginning or too gentle at the end simply because the keyframes are too far apart.
The fix is straightforward: drag the keyframes closer together to make the animation faster, or farther apart to make it slower.
Keyframes closer together: faster overall movement
Keyframes farther apart: slower overall movement
Easing applied: slower near the beginning or end, faster in the middle
Preview the motion after every timing change. Easing and keyframe spacing work together, so getting one right often means revisiting the other.
A simple easing workflow to remember
When you animate a title, lower third, or shape in Premiere Pro, run through this quick checklist:
Find the animated property, usually Position.
Locate the keyframe diamonds in Effect Controls.
Right-click a keyframe and choose Temporal Interpolation.
Use Ease Out where motion begins.
Use Ease In where motion ends.
Apply both where an object moves through a middle keyframe.
Preview the animation.
Adjust keyframe spacing until the timing feels right.
That is easing in Premiere Pro. It is one of those small motion graphics details that makes a surprisingly big difference. A simple graphic can move from clunky to smooth with just a couple of right-clicks.
FAQs
What is Temporal Interpolation in Premiere Pro?
Temporal Interpolation is Premiere Pro's term for controlling how an animated property moves over time between keyframes. Its Ease In and Ease Out options create smoother acceleration and deceleration.
Should I use Ease In or Ease Out for a slide-in animation?
Use Ease Out on the keyframe where the graphic begins moving, and Ease In on the keyframe where it arrives at its final position. This gives the slide-in a gentler start and finish.
Why does my animation feel too slow after adding easing?
Easing slows movement near a keyframe, so the original keyframe spacing may no longer suit the animation. Move the keyframes closer together to speed up the overall motion.
Do I need to ease both text and background shapes in a lower third?
Yes. If the text is eased but the background box moves at a constant speed, the box can still make the lower third feel abrupt. Apply easing to every animated part that needs to move together.
Written by Daniel Walter Scott — Founder of Bring Your Own Laptop & Chief Instructor
