Syncing aligning video & audio automatically in Premiere Pro
Questions


Student Gallery
Course info
Overview
I am here to help you learn Adobe Premiere Pro and to show you the tools you need to become a successful video editor. Premiere Pro is the industry standard used by professional designers to create stunning, high class videos and, after completing this course, you too can become a confident, skillful and efficient creator of stunning videos.
This course is aimed at people who are completely new to Premiere Pro.
If you are self taught using Premiere, this course will show you techniques you never dreamed were necessary or possible and will show you efficiencies to help speed up your workflow.
The course covers many topics - all of them on a step-by-step basis. We will use real world video editing examples to work through:
- An interview
- A wedding video
- A short commercial
- A documentary
- Social media advertising videos
- YouTube ‘how to’ videos
- Talking head footage mixed with screencasts and voiceovers
We will work with text, animation, motion gfx, special effects and we will add music to our video.
We will learn how to do colour correction, colour balancing and also how to create amazing video transitions within our movie. Technical ‘guru’ topics such as HD v 4K, frames per second, exporting work, fixing up bad audio, balancing and synching audio will all become manageable tasks for you. Best of all...I will show you amazing shortcuts and techniques to speed up your workflow.
Throughout the course we will work on mini projects and I will be suggesting assignments which will add value to your portfolio.
Start your Premiere Pro training now and fast track your career as a video editor.
* Please note, you have full permission to transform and upload any work using footage of Daniel as a part of this course.

Daniel Walter Scott
Founder of Bring Your Own Laptop & Chief Instructor
I discovered the world of design as an art student when I stumbled upon a lab full of green & blue iMac G3’s. My initial curiosity around using the computer to create ‘art’ developed into a full-blown passion, eventually leading me to become a digital designer and founder of Bring Your Own Laptop.
Sharing and teaching are a huge part of who I am. As a certified Adobe instructor, I've had the honor of winning multiple Adobe teaching awards at their annual MAX conference. I see Bring Your Own Laptop as the supportive community I wished for when I was first starting out and intimidated by design. Through teaching, I hope to bring others along for the ride and empower my students to bring their stories, labors of love, and art into the world.
True to my Kiwi roots, I've lived in many places, and currently, I reside in Ireland with my wife and kids.
Certificates
We’re awarding certificates for this course!
Check out the How to earn your certificate video for instructions on how to earn yours and click the available certificate levels below for more information.
Downloads & Exercise files
Transcript
All right, real quick, why do you get a video that's not synced with your audio? Often you'll have a camera that you're recording on, let's say DSLR, like I am, and it's got a terrible microphone, and you are then using a separate microphone to record the audio. So video from this guy, and audio from this. They're actually two separate files. The way for this needs to work, it will not sync up unless you've actually captured your audio, the bad audio on the video.
So you're recording, just make sure that actually, microphone is recording on your camera, but it's going to be terrible, but that's what it uses to align the good stuff. Basically the higher end you go, you get fancier, you know, digital video cameras, They'll do the same thing, they might use this microphone, and you can get away with some of these shotgun microphones, but often the higher the production level, the more often you'll get camera stuff and microphone stuff recorded, separately onto different devices, and it will be your job to make sure they're lined up.
Just make sure whoever's 'video'ing, even if it's really bad, record the audio that's coming in through the camera. Let's actually sync them, let's find the footage. It's under the Footage folder, I'm going to drop it down. So I'm back in my Project Window, so I've found footage, let's find, it's called Sync 1 Dreamweaver. Let's right click it, and say 'Make Sequence from the Clip'. Double click this, and let's call it Sync 1 Sequence. Just so you remind yourself what it is. Let's click, hold, and drag it to that side there, just so it's not all getting bunched up in the Footage folder.
So there's my Sync 1 Sequence, let's add the audio. So let's go to 'Audio', let's find it in here. It's called Sync 1 Dreamweaver, let's drag this out. Now one thing when you're dragging out audio from here, is that it won't go to the video layer, because there's no video with it, just audio. So let's have a little listen to this. "First up is, what we're making is, it's going to be a video background…
So you can see, very terrible, because I've got hard surfaces, but also because it's from my camera. Also, yeah, so-- the audio is not going to be amazing, it's amazingly better, but over here-- the reason it's not amazing is because actually I just have a microphone between my legs here. That's how I used to get my audio, work fine. You listen to it, looks okay. I've got a fancier microphone now, my shotgun microphone, but this worked great. So recorded this, so it needs both of these. One of the things that will happen though is if I select both of these, so I'm holding 'Shift', clicking them both, and I right click any of them, and I go, ah, synchronize. It's not working, why is it grayed out? It's because these two can't-- these two audio are on the same track. These two audio clips, same track, and it will try and smush them together, it doesn't like that.
So you got to have one on one track, and one on the other, because basically it's going to line them up for us. So they're on their own tracks. I'm going to hold 'Shift', click this one, click that one, right click it, hit 'Synchronize', and we're going to say-- I think it defaults to Clip Start. That will mean I'm going to try and line them up, based on where these clips both start, I can never turn my microphone on, at the same time as my camera, with any accuracy. So this one here is the automatic feature. So it doesn't-- just click on 'Audio', it's not going to work if you've got your audio on track 3, 4, or 5. We've happened to have ours on track 1, which is perfect. Let's click 'OK'. Give it a sec, it lines it all up. I'm going to double click this to delete it. Bring it back over, and let's have a listen.
"…thing that we're making, and the resources I've got." So they're both playing. You can either just mute this track… "First up is, what we're making… Way better. What we might do is just hide it, because that's all you really need, right? So you can skip on now. I'm going to show you a few little tricks, because I don't need this bad audio. I only recorded it so that I could sync up the good audio. So I'm going to, instead of muting it, I'm going to right click it, and say 'Unlink'. Click on this bottom bit, delete it. I'm going to drag this in, to the ends, because I recorded way more audio than video. Mainly just because I can, I turn my audio on first then turn my camera on, and vice versa when I turn it off, so there's a bit extra.
I'm going to move this up to the next layer, select them both, right click it, and say 'Link'. Now it just means that when I move this track around, so just moving the video part around, it's going to all move together. Now again you can carry on, I'm just going to do a little bit of work to fix this up. I need to raise it up because it's too low, you can see it bouncing down here. So how do we fix that, do you remember? You do, because we've done it loads; click on it. 'Dialogue', 'Loudness', 'Auto Match'. Magic Premiere, love it. It's probably my best feature out of the new versions of Premiere Pro.
"…like a big effect in the background." Cool. So is it at the right decibel levels? I do this as well. I do my… "Hi everyone…" get started really loud and then tail off. Your talent might not be doing this, my talent is not very talented, and I need to do this a lot. So I kind of just, how far across? Yeah, that works. So it starts too loud and then I'm going to just raise it up. Might even raise it just a bit steeply there. To delete a keyframe, just click on it, hit delete on your keyframe, 'Del' on your keyboard even; let's listen.
"Hi there, let's talk about the thing that we're making, and the resources I've got." "First up is, what we're making is, it's going to be a video background, with like text and images." "Basically a whole website over the… Probably get's just a little bit too loud, but that's what I tend to have to do for a lot of my stuff. It depends on the course, like, sometimes I don't bother.
All right, do the last little bit of editing. So I do something there. I'm going to, 'Spacebar' there, 'cut'. Hit 'C' on my keyboard to get my-- I can tell that I lose my direction because it's too short, and the rest of it looks, let's have a look. Yeah, lost my way. This is where I get started again. If you are hanging around, and you are watching, you get rewarded with a little shortcut. I'll cover it later in the course for the people that skipped on, but you get to this point and you're like, how do I get it kind of dragged, and how do I get it so he's not like, sleeping? You can get it close with this, but sometimes it's just-- it's a bit, trying to connect with stuff, and jump and snap. Get your Playhead close to where it wants to be, and just use your arrows on your keyboard.
There's the-- we've used the up and down to kind of jump around, but use the left and right, watch this. I'm just tapping the right key, and moves one frame at a time. I'm going to start there with my eyes open. so just forward one frame, back one frame. Left and right keys. Click it, 'V' key to grab the Move Tool, delete, click again, delete. Do a lot of that. There are some fancier tools which we'll cover but that's a lot of what I do.
"…in the background and the website over the top." "We'll also make the… There you go, that's me. Also note that I got better at-- can you see the-- my glasses? Just as a little tip if you are doing similar stuff to this, you keep the light way up high. So I had it quite low to reflect on my face, which was good, to light my face, but if you've got glasses you end up seeing the lights. That's not too bad, I've got this ring light, but if I just moved it up a bit higher and facing down, it still gives me a good light and it doesn't reflect in the glasses. Great for like podcasts that I do, if I've got a light in front of me, just keep it real high, means I can continue wearing my glasses without there being a big reflection in it. Anyway, thanks for hanging around, guys. Let's look at the next video.
How do I sync separately recorded audio with video in Premiere Pro?
Place your camera clip and external audio in the same sequence, with each audio clip on its own track. Select both clips, choose Synchronize, and use Audio rather than Clip Start. Premiere Pro compares the scratch audio from the camera with the good recording and lines them up automatically.
How to Automatically Sync Video and Audio in Premiere Pro
Recording video on a DSLR or camera while capturing proper audio on a separate microphone is a pretty normal setup. The camera audio can be terrible, full of room echo and hard surfaces, while the separate microphone sounds much better. The only annoying bit is getting the two files to match perfectly.
The good news is that Premiere Pro can do the hard work for you. The important thing is to set yourself up properly before you start editing.
Why video and audio go out of sync
When you record with a camera and a separate microphone, you are creating two separate files:
A video file with the camera's built in audio
An audio file from the external microphone or recorder
At higher production levels, this is very common. You might be using a DSLR, a proper video camera, a shotgun microphone, or an audio recorder. Either way, the video and the quality audio often live on different devices, which means they will not naturally start at precisely the same moment.
That is exactly why the camera audio matters, even when it sounds awful. Do not turn it off. Premiere Pro needs that rough camera recording as a reference to find the matching sounds in your good audio file.
Think of the camera audio as a syncing guide, not your final soundtrack. It can be ugly. It can be echoey. It just has to contain the same spoken words or sounds as the external recording.
The one recording rule that makes automatic sync work
Make sure the camera is recording audio while you shoot. Whoever is operating the camera needs to capture the audio coming into the camera, even if it is only from the tiny built in microphone.
If you only have silent video plus a separate audio recording, Premiere Pro has nothing useful to compare. Automatic audio sync relies on there being a matching audio reference embedded in the video clip.
This gives you a very simple workflow:
Record video with the camera's audio enabled.
Record better audio with your separate microphone or recorder.
Import both files into Premiere Pro.
Use the camera audio to align the external audio.
Delete the bad camera audio once the sync is complete.
Create a sequence from the video clip
Start in the Project panel and find the video footage. Right click the camera clip and choose New Sequence From Clip. This creates a sequence that matches the clip settings, which saves you having to guess at frame rate, dimensions, and other sequence details.
Give the sequence a name that makes sense. A name such as Sync One Sequence is plenty. It is a small thing, but projects get messy fast, and clear naming makes a big difference later.
Now open that sequence. Your camera clip will be on the timeline with its video and attached camera audio.
Add the external audio to the timeline
Find the good audio recording in your Project panel and drag it into the timeline. Because it is audio only, Premiere Pro will place it on an audio track, not on a video track.
At this point, the two recordings may be nowhere near each other. That is fine. Do not try to line them up by eye or by dragging them around for ages. Premiere Pro is about to do that for you.
There is one important detail: the camera audio and external audio must be on different audio tracks.
If both audio clips sit on the same track, the Synchronize command may be unavailable or greyed out. Premiere Pro cannot place two clips in the same space on one audio track and expects to be able to move one recording independently.
Move one of the clips to another audio track if needed. For example:
Camera audio on A1
External microphone audio on A2
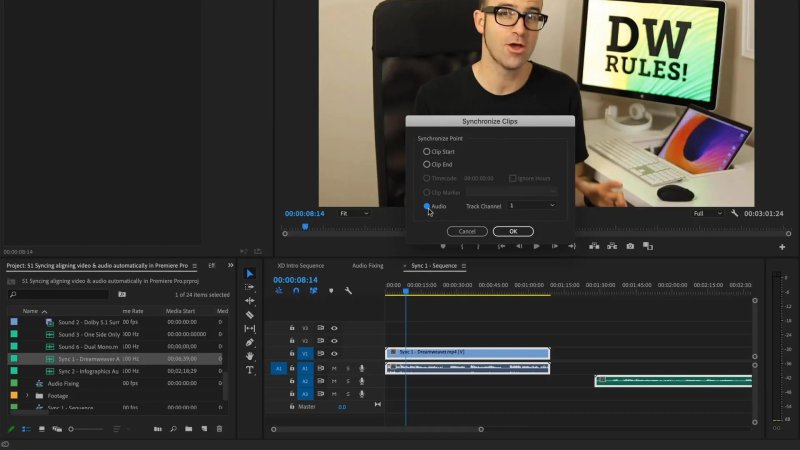
Choose Audio in the Synchronize Clips dialogue so Premiere Pro matches the recordings by their sound.
Synchronize clips by audio
Select both clips in the timeline. Hold Shift while clicking if you need to select them one at a time. Then right click either selected clip and choose Synchronize.
The Synchronize Clips dialogue gives you a few choices. It may default to Clip Start, but that is not what you want here. Clip Start simply tries to align the beginning of each clip, which is unreliable because you will almost never start the camera and external recorder at exactly the same time.
Instead, select Audio. Premiere Pro will compare the sound recorded by the camera with the sound in the external audio file, then move the clips into alignment.
If your camera audio is on track A1, use that track as the reference. Click OK, give Premiere Pro a moment, and it should line everything up.
This is the bit that feels like magic. You do not need to hunt through waveforms and nudge clips around trying to find the first syllable of a sentence. Premiere Pro does the matching for you.
Check the sync before deleting anything
Play a section where someone is speaking clearly and listen carefully. You will hear both recordings at once, so it may sound louder, phasey, or slightly weird. That is expected because both the bad camera audio and the good external recording are playing together.
The useful check is whether the speech matches the picture. If lips, words, and gestures all feel right, the clips are synced.
Once you are happy, you can mute the camera audio temporarily to hear the difference. The improvement should be obvious, especially if the camera was picking up echo from hard surfaces or the microphone was positioned too far away.
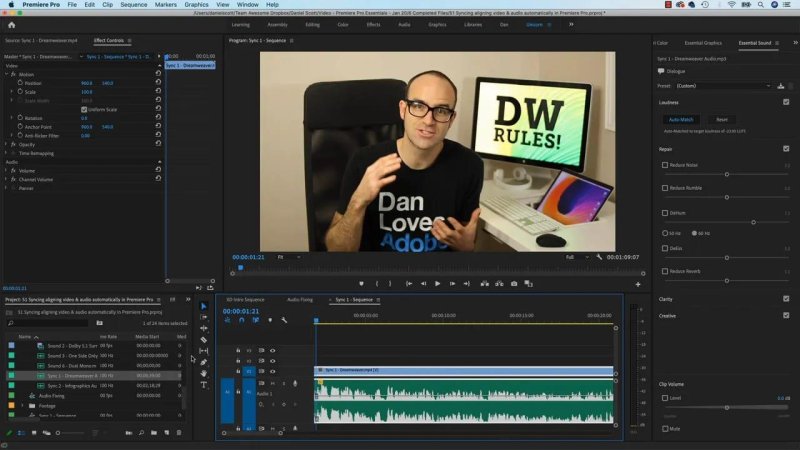
The external recording supplies the clean waveform while the camera audio remains available only as the sync reference.
Remove the bad camera audio and keep the good recording linked
Do not just leave the bad audio muted forever if you do not need it. A tidier edit is easier to work with.
Right click the camera clip and choose Unlink. This separates its video portion from the attached camera audio. Click the old camera audio clip and delete it.
Your external recording will probably be longer than the video. That is normal. It is common to turn on the audio recorder first, then start the camera, and turn the camera off before stopping the audio recorder.
Trim or drag the external audio so it starts and ends with the video. Then select the video clip and your newly synced good audio clip, right click, and choose Link.
Now the video and clean audio move together whenever you reposition the clip. That is the setup you want before doing the rest of the edit.
Quick audio cleanup: Auto Match loudness
Once the good audio is in place, check its volume. A decent recording can still be too quiet, especially if the microphone was positioned lower down or further away than ideal.
In Premiere Pro, select the audio clip and open the Essential Sound panel. Under Loudness, use Auto Match. It is one of those genuinely useful Premiere Pro features because it gets your clip close to a sensible level quickly.
It is not a replacement for listening, but it is a great starting point. Apply Auto Match, then play through the edit and see whether the overall level feels right.
Fix a loud start with volume keyframes
A very common problem is starting with far too much enthusiasm. The opening line comes in loud, then the voice settles down through the rest of the sentence. It happens. It happens a lot.
Use volume keyframes to smooth it out:
Find the point where the opening is too loud.
Add keyframes to the audio volume line.
Lower the early section.
Raise the level gradually until it meets the normal speaking volume.
Adjust the slope until it sounds natural. You may need to make the rise a little steeper or gentler, depending on the clip. If a keyframe is in the wrong place, click it and delete it, then try again.
The goal is not to make the audio graph look perfect. The goal is for the volume to feel consistent when you listen to it.
Use frame-by-frame editing for cleaner cuts
After syncing audio, you can carry on with the edit as normal. When cutting talking-head footage, getting the timing right makes a huge difference. You may need to remove a moment where you lose your train of thought, look down, blink awkwardly, or simply pause too long.
Get the playhead close to where you want the cut, then use the keyboard arrow keys for precision:
Right Arrow moves forward one frame at a time.
Left Arrow moves back one frame at a time.
C activates the Razor tool for cutting.
V returns to the Selection tool.
Moving a frame at a time is brilliant for finding a clean point where your eyes are open and your expression looks natural. Get close with the mouse, then use the arrow keys to nail the exact frame.
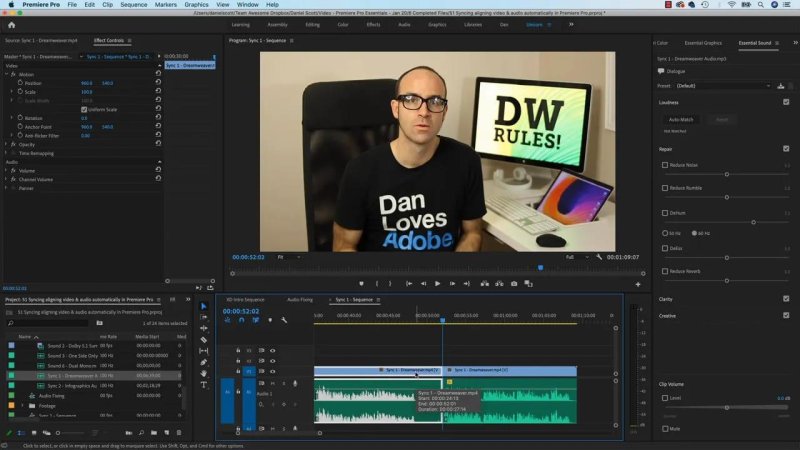
Frame-by-frame positioning helps you cut around pauses and keep the on-camera edit looking natural.
There are fancier trimming tools in Premiere Pro, but a lot of everyday editing is simply making a cut, deleting the unwanted bit, and nudging the timing frame by frame until it feels right.
A simple lighting fix for glasses reflections
One last practical tip if you record yourself and wear glasses: keep the light high.
A light positioned low and directly in front can light your face nicely, but it also creates obvious reflections in your lenses. A ring light is especially good at showing up as a big bright shape in glasses.
Raise the light and angle it down towards your face. You can still get a good, flattering light, but the reflection is less likely to sit right in the middle of your glasses. This is particularly useful for podcast-style recordings and talking-head videos where the camera is directly in front of you.
The clean Premiere Pro audio sync workflow
For most projects, the complete process is straightforward:
Record camera audio, even if it sounds rubbish.
Record better audio separately.
Create a sequence from the camera clip.
Place the external audio on a separate audio track.
Select both clips and choose Synchronize > Audio.
Check that picture and speech are correctly matched.
Unlink and delete the camera audio.
Trim the external recording and link it to the video.
Use Auto Match and keyframes to tidy the volume.
Make frame-accurate edits where needed.
That is it. Keep the horrible camera audio long enough for Premiere Pro to use it, then get rid of it and carry on with the good stuff.
FAQs
Why is Synchronize greyed out in Premiere Pro?
The selected audio clips are likely on the same audio track. Put the camera audio and external audio on separate tracks, select both clips again, then use Synchronize.
Can Premiere Pro sync audio if my video has no camera audio?
Not with the audio synchronization method shown here. Premiere Pro needs audio embedded in the video clip to compare against the external recording.
Should I keep the camera audio after syncing?
Usually, no. Once you have checked that the external audio is correctly synced, unlink the camera clip, delete its poor-quality audio, and link the video to the clean recording.
Should I use Clip Start or Audio when synchronizing?
Use Audio. Clip Start only aligns the beginning of both clips, while Audio matches the actual sound recordings and is much more accurate for separately recorded audio.
Written by Daniel Walter Scott — Founder of Bring Your Own Laptop & Chief Instructor
