Changing the scale size of rectangle or text in Premiere Pro
Questions


Student Gallery
Be the first to share something.
Course info
Overview
I am here to help you learn Adobe Premiere Pro and to show you the tools you need to become a successful video editor. Premiere Pro is the industry standard used by professional designers to create stunning, high class videos and, after completing this course, you too can become a confident, skillful and efficient creator of stunning videos.
This course is aimed at people who are completely new to Premiere Pro.
If you are self taught using Premiere, this course will show you techniques you never dreamed were necessary or possible and will show you efficiencies to help speed up your workflow.
The course covers many topics - all of them on a step-by-step basis. We will use real world video editing examples to work through:
- An interview
- A wedding video
- A short commercial
- A documentary
- Social media advertising videos
- YouTube ‘how to’ videos
- Talking head footage mixed with screencasts and voiceovers
We will work with text, animation, motion gfx, special effects and we will add music to our video.
We will learn how to do colour correction, colour balancing and also how to create amazing video transitions within our movie. Technical ‘guru’ topics such as HD v 4K, frames per second, exporting work, fixing up bad audio, balancing and synching audio will all become manageable tasks for you. Best of all...I will show you amazing shortcuts and techniques to speed up your workflow.
Throughout the course we will work on mini projects and I will be suggesting assignments which will add value to your portfolio.
Start your Premiere Pro training now and fast track your career as a video editor.
* Please note, you have full permission to transform and upload any work using footage of Daniel as a part of this course.

Daniel Walter Scott
Founder of Bring Your Own Laptop & Chief Instructor
I discovered the world of design as an art student when I stumbled upon a lab full of green & blue iMac G3’s. My initial curiosity around using the computer to create ‘art’ developed into a full-blown passion, eventually leading me to become a digital designer and founder of Bring Your Own Laptop.
Sharing and teaching are a huge part of who I am. As a certified Adobe instructor, I've had the honor of winning multiple Adobe teaching awards at their annual MAX conference. I see Bring Your Own Laptop as the supportive community I wished for when I was first starting out and intimidated by design. Through teaching, I hope to bring others along for the ride and empower my students to bring their stories, labors of love, and art into the world.
True to my Kiwi roots, I've lived in many places, and currently, I reside in Ireland with my wife and kids.
Certificates
We’re awarding certificates for this course!
Check out the How to earn your certificate video for instructions on how to earn yours and click the available certificate levels below for more information.
Downloads & Exercise files
How do you make a lower-third background box scale in from the side in Premiere Pro?
Animate the shape’s Horizontal Scale from 0 to 100, place its anchor point where you want the animation to grow from, then add Ease Out to the first keyframe. Add Position keyframes as well if you want the box to slide gently into its final spot while it scales.
How to Animate a Scale-In Lower Third in Premiere Pro
A lower third that simply slides in from the right is fine. But a lower third that scales in, moves slightly, and eases into place has a lot more life to it. It feels intentional rather than just shoved onto the screen.
The nice thing is that you do not need to start from scratch every time. Whether you are modifying your own existing graphic or tidying up somebody else’s, you can jump into the shape’s animation settings, remove what is there, and rebuild the movement properly.
Clear the Existing Background Box Animation
There are two ways to reset this lower-third background box:
The quick way: delete and redraw the box
Select the graphic clip, go to the Essential Graphics panel, select Background box, and hit Delete. You can then draw a new rectangle and start again.
That works perfectly well. But it is not always the most useful route, particularly when the graphic has other settings you want to keep.
The useful way: remove only the old keyframes
With the graphic selected, find the Shape layer and twirl open its properties until you can see the animated keyframes. Delete the two keyframes that created the original slide-in animation.
Once those keyframes are gone, the box will usually sit off to the side with no animation. That is absolutely fine. You are just clearing the old motion so you can make a better one.
You can also turn off animation using the stopwatch beside the property. Premiere Pro will warn you that this removes the keyframes. That is the point here, so go ahead. You can always drag the shape back into position afterwards.
Set the Anchor Point Before You Animate Scale
The anchor point is the shape’s home base. It decides where the scale animation grows from.
If you leave it in the wrong place, the rectangle may grow from a corner or scale in a direction that looks a bit odd. For a lower-third background box that grows in from the right, move the anchor point towards the left-middle area of the box. That way, the left edge feels anchored while the rectangle expands horizontally to the right.
Select the shape with the Selection tool, then click and drag the visible anchor point into place. For a more precise move, hold:
Command on Mac
Control on PC
This helps the anchor point snap to useful edges and positions. It is one of those tiny details that makes the animation behave the way you expected it to.
Animate Horizontal Scale Instead of Scaling Everything
For this effect, we do not want the box shrinking and growing in every direction. We want it to appear from the side.
In the shape settings, twirl open Scale and untick Uniform Scale. This separates the vertical and horizontal scale controls, allowing you to animate them independently.
Now animate Horizontal Scale:
Move the playhead to the start of the graphic.
Set a Horizontal Scale keyframe using the stopwatch.
Set Horizontal Scale to 0.
Move forward in time by the amount you want the animation to last.
Set Horizontal Scale to 100.
It does not really matter whether you set the value to zero before or after clicking the stopwatch. What matters is that animation is enabled before you create the later 100 percent value. Premiere Pro then has two points to animate between.
At this stage, the background box will scale out from the anchor point. The same approach works for text as well, not just shape layers.
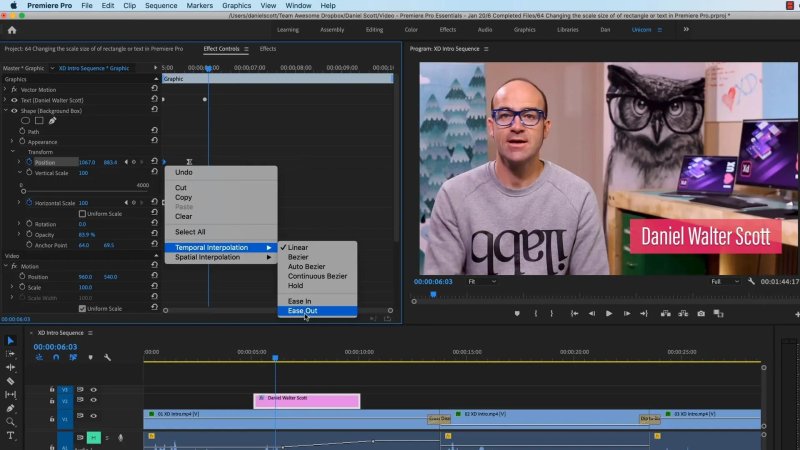
Apply Ease Out to the starting scale keyframe so the box launches smoothly rather than abruptly.
Add Easing to Make the Scale Animation Feel Better
Without easing, the animation starts and stops at a constant speed. It works, but it is a bit robotic.
For the first Horizontal Scale keyframe, right-click the keyframe and choose Ease Out. This means the box eases out of its starting position and accelerates into the movement.
The naming is easy to get backwards, so think about the direction of travel:
Ease Out on the first keyframe: the motion eases out of that keyframe.
Ease In on the final keyframe: the motion eases into that keyframe.
When working directly inside the Horizontal Scale property, Premiere Pro may show a shorter right-click menu than usual. That is fine. You can select the easing option directly without hunting through Temporal Interpolation.
Now adjust the distance between the two scale keyframes until the timing feels right. There is no magic duration here. Drag the end keyframe closer for a snappier lower third, or farther away for a slower, smoother entrance.
Add Position Keyframes for Extra Movement
Scaling alone looks good. Adding a small amount of position movement makes the graphic feel even more polished.
At the very beginning, the shape may be too small to grab or judge easily because its Horizontal Scale is zero. Move the playhead forward by a frame or so, then work with Position.
Create a Position keyframe near the beginning of the animation.
Move the background box slightly to the side, so it starts offset from its final location.
Move the playhead to the final scale keyframe.
Set the shape’s final Position where you want the lower third to sit.
Hold Shift while moving around the timeline if you want the playhead to snap neatly to the keyframe. This makes it much easier to line up the end of the movement with the end of the scale animation.
The result is a box that both expands and shifts into place. It is subtle, but that subtlety is exactly why it feels good.
Ease the Position Animation Too
The Position keyframes need easing just like the scale keyframes.
Apply Ease Out to the first Position keyframe, then apply Ease In to the final Position keyframe. The box will gently leave its offset starting point and settle into its final alignment.
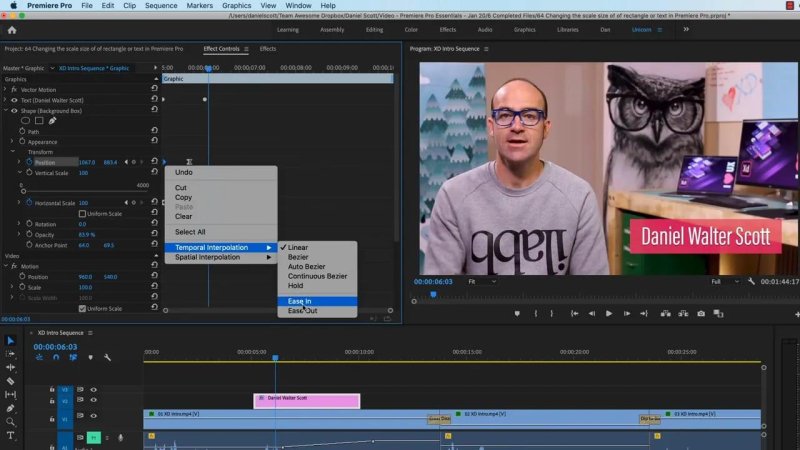
Use Ease In on the final position keyframe to let the lower third settle neatly into place.
Do not feel like the Position and Scale animations must take exactly the same amount of time. They can overlap in whatever way looks best. The box might finish scaling while it is still drifting into its final position, or the movement might finish first. Play around with it.
A Simple Recipe for a Better Lower-Third Animation
If you want the quick version, this is the setup:
Move the shape’s anchor point to the edge or area you want it to scale from.
Untick Uniform Scale.
Animate Horizontal Scale from 0 to 100.
Apply Ease Out to the first scale keyframe.
Add a small Position offset at the start.
Set the final Position where the lower third should land.
Apply Ease Out at the start and Ease In at the end of the position movement.
Adjust timing until it looks prettier than the default.
Once the background box is moving nicely, the text can come in over the top and the whole lower third starts to feel properly designed. A bit of scale, a bit of position, and a little easing goes a very long way.
FAQs
What is the difference between Ease In and Ease Out in Premiere Pro?
Ease Out controls how motion leaves a keyframe, so it is usually applied to the first keyframe of an animation. Ease In controls how motion arrives at a keyframe, so it is usually applied to the final keyframe.
Why does my shape scale from the wrong side?
The anchor point is in the wrong position. Move the shape’s anchor point to the edge or area that should remain visually fixed while the rectangle scales.
Can I use this scale animation on text in Premiere Pro?
Yes. The same keyframe and easing approach works on text layers. Set the appropriate scale property, create starting and ending keyframes, and apply easing for smoother motion.
Written by Daniel Walter Scott — Founder of Bring Your Own Laptop & Chief Instructor
