How to create small video mp4 size videos in Premiere Pro
Questions


Student Gallery
Be the first to share something.
Course info
Overview
I am here to help you learn Adobe Premiere Pro and to show you the tools you need to become a successful video editor. Premiere Pro is the industry standard used by professional designers to create stunning, high class videos and, after completing this course, you too can become a confident, skillful and efficient creator of stunning videos.
This course is aimed at people who are completely new to Premiere Pro.
If you are self taught using Premiere, this course will show you techniques you never dreamed were necessary or possible and will show you efficiencies to help speed up your workflow.
The course covers many topics - all of them on a step-by-step basis. We will use real world video editing examples to work through:
- An interview
- A wedding video
- A short commercial
- A documentary
- Social media advertising videos
- YouTube ‘how to’ videos
- Talking head footage mixed with screencasts and voiceovers
We will work with text, animation, motion gfx, special effects and we will add music to our video.
We will learn how to do colour correction, colour balancing and also how to create amazing video transitions within our movie. Technical ‘guru’ topics such as HD v 4K, frames per second, exporting work, fixing up bad audio, balancing and synching audio will all become manageable tasks for you. Best of all...I will show you amazing shortcuts and techniques to speed up your workflow.
Throughout the course we will work on mini projects and I will be suggesting assignments which will add value to your portfolio.
Start your Premiere Pro training now and fast track your career as a video editor.
* Please note, you have full permission to transform and upload any work using footage of Daniel as a part of this course.

Daniel Walter Scott
Founder of Bring Your Own Laptop & Chief Instructor
I discovered the world of design as an art student when I stumbled upon a lab full of green & blue iMac G3’s. My initial curiosity around using the computer to create ‘art’ developed into a full-blown passion, eventually leading me to become a digital designer and founder of Bring Your Own Laptop.
Sharing and teaching are a huge part of who I am. As a certified Adobe instructor, I've had the honor of winning multiple Adobe teaching awards at their annual MAX conference. I see Bring Your Own Laptop as the supportive community I wished for when I was first starting out and intimidated by design. Through teaching, I hope to bring others along for the ride and empower my students to bring their stories, labors of love, and art into the world.
True to my Kiwi roots, I've lived in many places, and currently, I reside in Ireland with my wife and kids.
Certificates
We’re awarding certificates for this course!
Check out the How to earn your certificate video for instructions on how to earn yours and click the available certificate levels below for more information.
Downloads & Exercise files
How do I make a Premiere Pro video file smaller without making it look terrible?
Instead of shrinking the video's frame size or wrecking the audio, reduce its bitrate, the amount of data processed per second. Export using Medium Bitrate preset under Format (H.264). If you still need a lighter file, scroll to Bitrate Settings, use Variable Bitrate, 1 Pass, and slide the Target Bitrate down a few notches until the estimated file size hits your sweet spot.
How to Make Small Video Files in Premiere Pro
Key takeaways
Export directly from Premiere Pro or send a sequence to Adobe Media Encoder.
Use Media Encoder to create and render several file-size versions at once.
Compare High Bitrate, Medium Bitrate, and a custom low-bitrate export before choosing one.
Bitrate is the setting that makes the biggest difference to video file size.
Lowering resolution can make the image physically smaller without necessarily reducing the file size further.
Why make a video file smaller?
Videos get big. Really big. That is fine when you are keeping a master copy or uploading somewhere that can handle it, but it becomes annoying when you need to email a clip, send it to somebody, or simply keep the file manageable.
The trick is not to make everything tiny for the sake of it. You have a reason for making a small video, so the goal is to find the best compromise between file size and quality.
Start your export from Premiere Pro
Select the sequence you want to export, either in the timeline or in the Project panel. Then go to File > Export > Media.
You can make all the export changes directly in Premiere Pro. Alternatively, send the job to Adobe Media Encoder, which is especially handy when you want to create multiple versions of the same sequence.
In older layouts, the Queue option sends the export to Media Encoder. In newer Premiere Pro export layouts, the same controls are still there, but they have been shuffled about a little. Do not panic if the panels look different. The Video and Audio sections still contain the settings you need.
Why Adobe Media Encoder is useful here
Media Encoder is brilliant for this job because you can line up multiple exports and let them all encode while you get on with something else. Before adding new jobs, clear out any old test exports from the queue so things stay tidy.
Instead of guessing at one perfect export setting, make a few versions and compare them. This gives you an actual answer to the question: how much quality am I giving up for a smaller file?
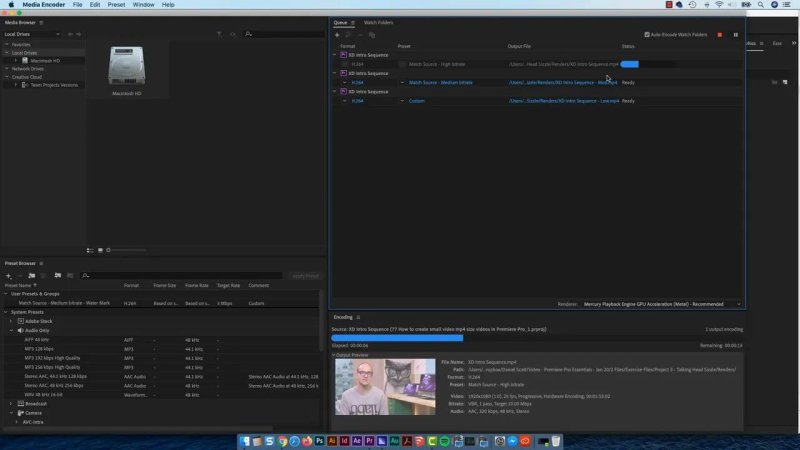
Queue several versions of the same sequence so you can compare size and quality instead of guessing.
Create high, medium, and low file-size versions
Start with your selected sequence in Adobe Media Encoder. Duplicate the queue item twice so you have three exports of the same video.
Keep the first export at Match Source High Bitrate.
Change the second export to Match Source Medium Bitrate.
Create a third custom version for a seriously small file.
Set an output location and give each version a meaningful name, such as high, medium, and low. Media Encoder normally avoids overwriting files, so it may add names such as 1, 2, and so on. That is normal, but clear naming saves you ending up with a folder full of mystery exports.
The setting that matters most: bitrate
For making an export smaller while keeping it reasonably good, go to the Video settings and find Bitrate Settings.
If you have ever exported a JPEG and chosen a lower quality value, this is basically the video version of that decision. More bitrate means more image information and a bigger file. Less bitrate means a smaller file, with more visible compression.
Use Variable Bitrate, 1 Pass
For the extra-low version, choose Variable Bitrate, 1 Pass and lower the bitrate. A high-quality version might sit around 10, a medium version around 3, and the lowest setting demonstrated here is 1.
A bitrate of 1 creates a very small file, but it is definitely a quality sacrifice. It may be acceptable for a quick email or a rough preview, but motion is where the quality drop becomes particularly obvious.
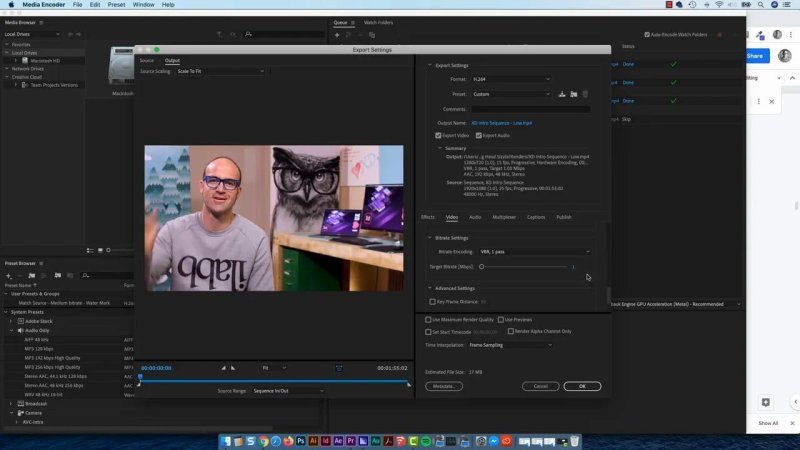
Bitrate settings are where the meaningful file-size reductions happen.
Do not try to solve this with audio settings
You can alter audio settings, but it does very little to reduce the overall file size in this situation. What it does do is make the sound worse, often in a rather unpleasant robotic way.
Leave the audio alone unless you have a specific audio requirement. Put your effort into the video bitrate first.
Render the batch and compare the results
Once your high, medium, and low versions are queued, start the render. Media Encoder will process them one after another.
If you want encoding to finish faster, close Premiere Pro and other heavy applications while Media Encoder works. That gives Media Encoder more available RAM to use for rendering.
In the example, all three exports remained HD resolution, but their file sizes changed dramatically:
High bitrate: 133 MB
Medium bitrate: 42 MB
Low bitrate: 15 MB
That is the real payoff. The medium version made a substantial reduction in size while staying much more usable than the extremely low version. The low-bitrate export was visibly rough, particularly in moving parts of the image.
Should you reduce the video resolution as well?
Your natural instinct might be to make the video physically smaller too. A 1080p sequence is still 1080p even after its bitrate has been lowered, so surely changing it to 720p must shrink the file even further?
You can do that. In the export settings, turn off Match Source and set a smaller frame size, such as 720p. Match Source simply means the export is matching the settings of your sequence, including its dimensions and frame rate.
However, once the bitrate is already very low, reducing the dimensions or frame rate may not lower the file size much more. It gives you a physically smaller picture, but it does not necessarily produce a meaningfully smaller file than the low-bitrate 1080p export.
So the practical order is simple: lower bitrate first, then reduce resolution only if you also need a smaller image dimension.
A sensible small-video workflow
Select the completed sequence in Premiere Pro.
Open File > Export > Media, or send it to Media Encoder.
Create a High Bitrate and Medium Bitrate export for comparison.
Duplicate the medium export and create a custom low version.
In Video settings, use Variable Bitrate, 1 Pass and lower the bitrate to 1 for the smallest version.
Leave audio settings alone unless you have a separate reason to change them.
Render the versions, check the actual file sizes, and play them back before sending anything out.
For most small-video jobs, the Medium Bitrate preset is a solid place to start. Go all the way down to 1 only when file size matters more than polished image quality.
Key terms
Bitrate
The amount of video data used each second. Reducing bitrate is the main way to make an exported video file smaller, although it also reduces image quality.
Variable Bitrate, 1 Pass
An encoding method that varies the amount of data used across the video while completing the export in one pass. It is the setting used here for a very low bitrate export.
Match Source
An export option that keeps the output aligned with the sequence settings, such as 1080p resolution and frame rate. Turn it off only when you want to override those settings.
Adobe Media Encoder
Adobe's separate encoding application. It is useful when you want to queue several exports and process them as a batch.
FAQs
What is the easiest way to reduce video file size in Premiere Pro?
Use the Match Source Medium Bitrate preset first. If the file still needs to be smaller, open Video settings, find Bitrate Settings, select Variable Bitrate, 1 Pass, and lower the bitrate.
Will lowering video resolution always make the file smaller?
No. Lowering resolution makes the video physically smaller, but when the bitrate is already very low it may not reduce the file size by much. Bitrate has the bigger effect.
Should I lower the audio bitrate to make my video smaller?
Not as your first move. Changing audio settings has little effect on the total file size here and can make the audio sound noticeably worse. Reduce video bitrate instead.
Why does Media Encoder add _1 to my exported filename?
Media Encoder tries not to overwrite an existing file. When the same filename already exists in the output folder, it adds an underscore and number to create a new filename.
Written by Daniel Walter Scott — Founder of Bring Your Own Laptop & Chief Instructor
