How to remove green screen from video in Premiere Pro
Questions


Student Gallery
Be the first to share something.
Course info
Overview
I am here to help you learn Adobe Premiere Pro and to show you the tools you need to become a successful video editor. Premiere Pro is the industry standard used by professional designers to create stunning, high class videos and, after completing this course, you too can become a confident, skillful and efficient creator of stunning videos.
This course is aimed at people who are completely new to Premiere Pro.
If you are self taught using Premiere, this course will show you techniques you never dreamed were necessary or possible and will show you efficiencies to help speed up your workflow.
The course covers many topics - all of them on a step-by-step basis. We will use real world video editing examples to work through:
- An interview
- A wedding video
- A short commercial
- A documentary
- Social media advertising videos
- YouTube ‘how to’ videos
- Talking head footage mixed with screencasts and voiceovers
We will work with text, animation, motion gfx, special effects and we will add music to our video.
We will learn how to do colour correction, colour balancing and also how to create amazing video transitions within our movie. Technical ‘guru’ topics such as HD v 4K, frames per second, exporting work, fixing up bad audio, balancing and synching audio will all become manageable tasks for you. Best of all...I will show you amazing shortcuts and techniques to speed up your workflow.
Throughout the course we will work on mini projects and I will be suggesting assignments which will add value to your portfolio.
Start your Premiere Pro training now and fast track your career as a video editor.
* Please note, you have full permission to transform and upload any work using footage of Daniel as a part of this course.

Daniel Walter Scott
Founder of Bring Your Own Laptop & Chief Instructor
I discovered the world of design as an art student when I stumbled upon a lab full of green & blue iMac G3’s. My initial curiosity around using the computer to create ‘art’ developed into a full-blown passion, eventually leading me to become a digital designer and founder of Bring Your Own Laptop.
Sharing and teaching are a huge part of who I am. As a certified Adobe instructor, I've had the honor of winning multiple Adobe teaching awards at their annual MAX conference. I see Bring Your Own Laptop as the supportive community I wished for when I was first starting out and intimidated by design. Through teaching, I hope to bring others along for the ride and empower my students to bring their stories, labors of love, and art into the world.
True to my Kiwi roots, I've lived in many places, and currently, I reside in Ireland with my wife and kids.
Certificates
We’re awarding certificates for this course!
Check out the How to earn your certificate video for instructions on how to earn yours and click the available certificate levels below for more information.
Downloads & Exercise files
Transcript
So in your 'Footage', double click the thumbnail, just have a little look. It's a guy that kind of looks like me, not really. There's no audio with it, it's just a guy. So if you are in charge of filming it though, the best results is when there's a nice clear definition between the background and the subject of interest. I'm not sure that's the word for it, but in this case the background is a nice consistent green, which is going to make it easy for us.
So what we'll do is we'll do it over here at the end of our Timeline, and then drag it over the top once we're finished. So let's edit-- the whole thing to our Timeline, and what we need to do is have our Playhead above it. Also, it's the wrong size, we'll-- actually I don't need to scale it up, because I'm actually going to make it, you saw at the beginning, that's quite small in the bottom right. So with it selected I'm going to go to my 'Effects Panel'.
So remember the word was keying, right? So there is-- if I type in the word "key", it's a very-- there's lots of different kinds in your effects of keying. Now the most common one that gets used is Ultra key. Ultra key. Just drag it on, it's pretty easy to use. With your track selected go to your 'Effects Controls', and it's this one here, so we're going to scroll down so we see Ultra key, and the main work is going to be done by picking the Key Color. Doesn't really matter if it's blue screen, or green screen, or white screen. You just use the Eyedropper tool to randomly click in this green area, and it will remove everything that matches that color.
You'll see, I'm not sure if you can see it on the video, but there is some frosting around the outside. So it hasn't got it all, so sometimes you need to keep picking a different green. Pick the one that's kind of closest to the person, because it's easy to remove this stuff, but it's harder when it's really close to his skin. Now I'm going to zoom in a little bit, just so I can see the area a little bit more. Where is it? The main parts that are problematic are in the-- this is the easiest part to see. Now when it's in this kind of Composite view, it's a little bit hard to see the definition.
So what you can do is just say-- where it says Output, we're going to pick 'Alpha Channel', it just gives you a kind of a clearer difference between the two; we're going to ignore the watermark, because this is a paid Adobe stock video. So this is just a good way to work, and you will switch it back to Composite when you're finished.
Now there's a few things you can do to kind of make this thing work. Now lots of-- everyone has their own kind of tactics when it comes to keying, which kind of-- where they start, I always start with my cleanup, because what I really want to do is, I want, I'm not so worried about this, I'm worried about where it transitions from his skin, because it's going to be easy to mask this out in a second, but let's go back to 'Composite'. You can start to see, can you see this kind of green kind of goop around them? It's letting the background leak in a little bit.
So what I want to do is, it's probably still better to look in 'Alpha', and then go to this 'Matte Cleanup', and the 'Choke' I find is the most-- it's going to affect the edges the most, I'm dragging it all the way left, all the way right. Can you see, it just kind of like creeps in, gets rid of the ghosting, and what you might need to do now is come in a little bit, and then switch back to 'Composite'. You can see, if I go all the way in it probably sucks it in too far, but you can get this nice balance of-- the hair is always going to be the hardest, like any sort of masking, and the other thing to do is not spend too much time just looking at one frame.
Once you've done it, and you've got it half good you move this along, because things are going to change, hopefully he's not moving-- the light source is changing-- not changing. That would be a real big hard thing to do, but you can see in here, it's pretty good most of the way through. You also need to be careful that you're not trying to get it perfect against this black, when it's not going to be-- we're going to actually use them quite small, and use them on top of our footage, so we're not going to spend forever getting it perfect. We're going to get it into position and then get it perfect, perfect enough. I seem to always stop on the gray frames.
Actually before we shrink it down let's have a look at-- because these corners here are annoying. Let's go back to 'Alpha', so we can see them more clearly, and then 'Matte Generation' is probably going to be-- the one we need to do to get rid of those edges here. So you just kind of, like-- I wish I could give you like the exact same hard facts, but it really depends on your footage, and if I'm all honest I don't do a lot of,green screen, so there's a lot of this, back and forth, nope, undo, back and forth, nope undo. Shadow, no, undo. Tolerance is probably going to work. There it is there, it's getting pretty good. Get close to it, and definitely the 'Pedestal'.
Don't worry too much about what these terms mean, it's all about getting the right effect. Sometimes you get it and you might have to come back, and play around with other parts. If it does start wrecking it you can go back to maybe, the Choke is a little bit too hard now, that I've done these other things, can you see, kind of bring the edges back. So there's a lot of 'to'ing and 'fro'ing, really the best green screens, happen when somebody has put the effort into lighting the green screen. So if you are in charge of doing some green screen, at school or at work, just make sure you spend ages trying to get the footage - Where's our source? - trying to get this lit nice and evenly.
If you've got really highs and lows all over the place, or any sort of dirt or wrinkles, oh, it's the worst. If you've got green screen and it's not a taut sheet, it's not pulled nice and tight, and you've got wrinkles everywhere, man, that's hard, but you'll have to go off and check how to do proper lighting. For me, I've done it a couple of times and it's really, you need lots of fill lights behind the person, and I've had real big problems when the talent is too close to the green screen, and there's something called, well, there's spill, it spills off the background onto the person, kind of reaches around, and bits of the edges of him become green. So that when you remove the green screen he starts disappearing.
If you do have that, the thing you're going to need to do is, this one here that says Spill Suppression. This will start messing around with the edges of him, and try to gather some of that back, but it is just trying to fix broken stuff if you've got a terrible green screen, but you might have a terrible green screen.
The last thing I want to do is I want to zoom out, and I want to put this above, and hit my backslash, ' \ ' key. So let's pretend this guy is talking all the way through this tutorial, and it's me talking, I'm going to trim it up. He's too big, let's go to 'Fit', I want-- he's not too big, he's actually probably the right size. Let's say I want him-- I want to switch these around. So that's an interesting thing, so I want the green screen to be below my watermark. You'll see there, if I just dragged it on top it kind of just smooshes it. So what we really need to do is either add a new track, so that we can do some, you go there, you go there, some crazy old reordering, or do what I do and just kind of like drag you over there, you go up one, you come back across, there you go.
So at least my watermark's on top of this man, there's another watermark. Let's listen to him. "I'm going to call it Layer 0, then in your Properties panel…" He does not match at all. Better imagine me talking. We can double click him and shrink him down, and just kind of have him at the bottom here.
All right, that's it. One last thing to talk about, the other thing to consider is, when you are filming, if you are in charge of green screen make sure-- well the other thing is, what's the difference between blue screen and green screen. No difference, it's just, you just want a really high contrast, between the person or the object, and the background. In this case this dude turned up in a blue shirt, so if you did a blue background or blue screen, that's a terrible idea because you're going to end up masking out his shirt.
So if you are in charge of, you know, the people, say "Don't wear a green shirt, or green pants", or if you're filming, say, plants, green screen's not going to work, because they're all green, you're going to have to do a red screen, or a blue screen, or whatever's going to be most high contrast, otherwise you end up with problems like this. Do you remember Anchor Man, have you seen Anchor Man? If you haven't, we'll watch the video together at the end, if you have you can skip along. Let's watch it together, we all need a break, we're getting towards the end of this video. It's funny, let's watch it. If you don't want to, skip along and I'll see you in the next video.
"Happy St. Patrick's day to all of our native American friends. On the big map-- where's my map? There's no map, it's just green." "No, there's a map there, look at the monitor." "Oh God, Ron, where's my legs. "Where are my legs?" "Your legs are there." "I don't have any legs, Ron. I don't even know how I'm standing up." "No, Brick, your legs are fine, the color of your pants just, just matches the Chroma key behind you." "In 93, 93." "Relax." That's enough of the, ah, green screen and Anchor Man, ah, some of the best. Now let's get on to the next video.
How do I remove a green screen in Premiere Pro?
Apply the Ultra Key effect to the green screen clip, use the eyedropper to select the background colour, then refine the matte until the subject has clean edges. The trick is not chasing perfection on one frame. Check the whole clip, fix the obvious problems, then judge it at its final size in the edit.
How to Remove a Green Screen in Adobe Premiere Pro
Key takeaways
Use Ultra Key to remove green, blue, or another solid-colour background.
Choose a key colour close to the subject, not just any random patch of green.
Switch to Alpha Channel output to inspect the matte clearly.
Use Matte Cleanup and Matte Generation controls to remove edge ghosting and stray background areas.
Good lighting, a taut screen, and colour contrast make a vastly better key before editing even begins.
Keep green screen subjects away from the backdrop to reduce green spill around their edges.
Start with footage that is actually easy to key
You can absolutely work with stock green screen footage, and that is handy if you do not happen to have a green screen at home. But if you are filming the shot yourself, the clean-up starts before Premiere Pro ever opens.
The best green screen footage has a clear definition between the subject and the background. Ideally, the backdrop is one consistent shade, evenly lit, clean, and pulled tight. That makes it much easier for Premiere Pro to identify what should disappear and what should stay.
Wrinkles, dirt, dark corners, bright hotspots, and uneven lighting are all a pain. They create multiple shades of green, which means the keyer has to work much harder. You can fix some of it in post, but it quickly becomes a lot of back and forth, a lot of undo, and a lot of trying another setting.
Apply Ultra Key to the green screen clip
Put the green screen footage on your timeline and make sure the playhead is sitting over the clip. You can do the keying at the end of the timeline first if you like, then drag the finished shot into its proper place once it is sorted.
Select the green screen clip in the timeline.
Open the Effects panel.
Search for key.
Find Ultra Key and drag it onto the clip.
Open Effect Controls for the selected clip.
Ultra Key is the common Premiere Pro effect for this job, and it is pretty straightforward. It does not really matter whether the background is green, blue, or some other solid colour. The process is the same. You tell Ultra Key which colour to remove.
Choose the key colour with the eyedropper
Under Ultra Key, use the Key Colour eyedropper and click the green backdrop in the Program Monitor. Premiere Pro will remove pixels matching that colour.
That first click often gets you most of the way there, but not all the way. You may notice a faint green halo or a slightly frosted edge around the person. If so, try another patch of green, preferably one nearer to the subject.
The thinking here is simple. It is usually easier to remove leftover background farther away from the person than it is to recover detail around skin, hair, or clothing. Pick a representative green that gives you the cleanest starting point around the important edges.
Use Alpha Channel to see the matte properly
Looking at the keyed image in Composite mode can make edge issues hard to spot. Switch Ultra Key’s Output setting to Alpha Channel instead.
In this view, white represents the part of the image you are keeping, while black represents the transparent area you are removing. It gives you a much clearer way to see whether your subject is solid, whether the background is properly gone, and whether weird bits remain in the corners.
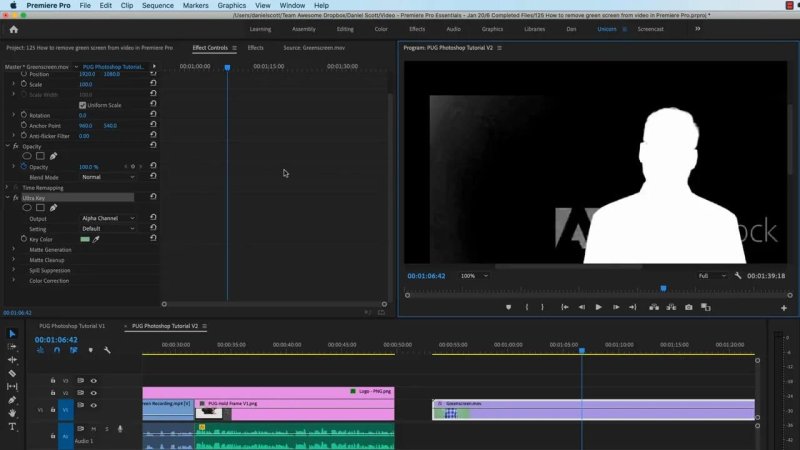
Alpha Channel output makes the kept subject and removed background much easier to judge.
Ignore any stock-footage watermark while practising the technique. The important part here is learning how the matte behaves. When you are finished refining it, switch Output back to Composite to see the normal full-colour result.
Clean up the edge without destroying the subject
There is no magic set of numbers that works for every green screen. It depends entirely on the footage, so expect a bit of fiddling. The aim is not to memorise every control. The aim is to get the right result.
Begin with Matte Cleanup
I tend to start with Matte Cleanup, because the transition around the person is what matters most. A bit of background left well away from the subject is often easy to deal with later. A rough edge around the skin or hair is much more obvious.
The Choke control is particularly useful for tightening a soft, ghostly edge. Push it in one direction and it will pull the matte inward, removing some of that fringe. Push it too far and you start cutting into the subject, which is especially noticeable in hair.
Hair is nearly always the hardest part. Get the edge looking good enough, then move on. Do not spend ages staring at one frame and trying to make it absolutely flawless against a black background.
Then use Matte Generation for leftover areas
If the corners or wider areas of the background are still hanging around, open Matte Generation. Settings such as Tolerance and Pedestal can help remove those remaining patches.
This is very much a process of adjustment. Try a control, see what it does, undo it if it wrecks the image, and try another. Sometimes a change in Matte Generation means the Choke setting that looked good earlier is now too aggressive. Bring it back a little and rebalance the matte.
Keep switching between Alpha Channel and Composite output as you work. Alpha is brilliant for seeing the technical matte. Composite is where you check whether the person still looks natural.
Check the whole clip, not just one lucky frame
Once you have a decent key, scrub through the clip. The lighting and background may be mostly consistent, but a tiny change in the shot can expose an edge problem somewhere else.
You are looking for flickering edges, green haloing, disappearing detail, or patches of the backdrop returning. If the lighting shifts a lot during the shot, keying gets much harder. A stable setup is your friend.
Also, keep the final use in mind. If the person will be shrunk down and placed in the bottom corner over another video, do not spend forever trying to make a full-screen key perfect against black. Put the subject into the actual composition, make them the correct size, and then decide what still needs attention. Perfect enough is often genuinely perfect enough.
Fix green spill with Spill Suppression
Green spill happens when light bounces off the screen and reaches around the subject. The edges of their hair, shoulders, or clothes pick up green, and then those areas can start disappearing when you key out the backdrop.
Ultra Key includes Spill Suppression to help reduce that green contamination and recover a more natural edge. It is useful when you have to rescue a difficult shot, but it is still fixing a problem that would be better avoided during filming.
The best practical fix is to keep the person away from the green screen and light the setup properly. Use enough fill light to get an even backdrop, while avoiding a situation where the screen is throwing coloured light onto the talent.
Place the keyed subject into your edit
Once the background is removed, move the green screen clip above the footage or graphic where you want it to appear. Then use the clip’s Motion controls to resize and position the subject.
For example, a presenter can sit neatly in the bottom-right corner while the main tutorial footage continues behind them. If you have a watermark or other graphic that must remain visible, make sure its video track sits above the green screen clip. Layer order matters.
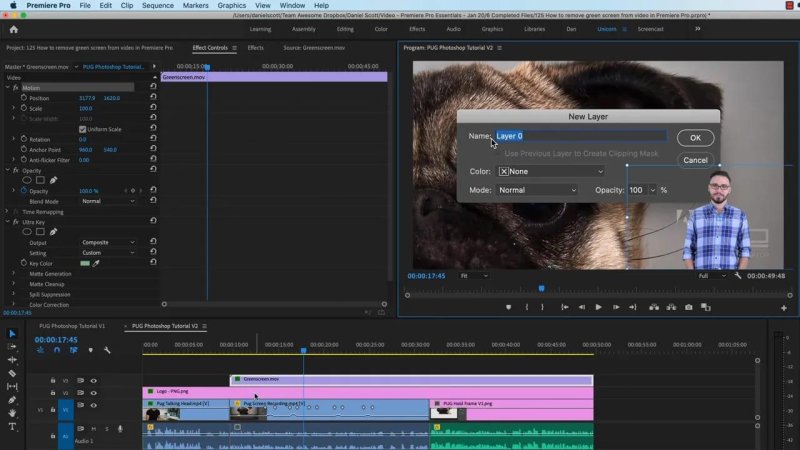
Once the key is clean, resize and position the presenter as an overlay while keeping important graphics on the top track.
If dragging clips around becomes messy, add a new video track and deliberately organise the stack. Your background goes at the bottom, the keyed presenter above it, and any watermark or interface graphic that needs to sit in front goes above that.
Green screen versus blue screen
There is no real technical winner between green screen and blue screen. What matters is contrast between the subject and the background.
If someone turns up in a blue shirt, a blue screen is a terrible idea because Premiere Pro will happily try to remove their shirt along with the background. The same goes for green clothing in front of a green screen.
Think about the subject before choosing the backdrop:
Do not use a green screen if the subject is wearing green trousers, a green shirt, or other green details you want to keep.
Do not use green for filming plants or objects with lots of green in them.
Use blue, red, or another contrasting colour if it separates the subject more clearly.
Tell people what not to wear before the shoot, not after you have a difficult key to fix.
Otherwise, you end up in the classic situation where a person’s clothes disappear into the graphic behind them. Funny when it is a comedy weather report. Less funny when it is your deadline.
Key Terms
Chroma key
A technique that removes a chosen background colour so a subject can be placed over a different image or video.
Ultra Key
Premiere Pro’s keying effect for removing a green, blue, or other coloured background from a video clip.
Matte
The black-and-white map that defines what is visible and what is transparent. White keeps the subject, while black removes the background.
Alpha Channel
An Ultra Key output view that displays the matte directly, making edge problems and leftover background easier to identify.
Green spill
Green light reflected from the backdrop onto the subject. It can tint edge details and make them disappear or look unnatural after keying.
FAQs
Where is Ultra Key in Premiere Pro?
Open the Effects panel and search for “key”. Drag Ultra Key onto the selected green screen clip, then adjust it in the Effect Controls panel.
Why is there a green outline around my subject?
A green outline usually means the initial key colour has not removed every shade of the backdrop, or green spill has reached the subject. Try a key colour closer to the subject, refine Matte Cleanup and Matte Generation, then use Spill Suppression if needed.
Should I use green screen or blue screen?
Use whichever colour has the strongest contrast with the subject. Avoid green if the subject wears green or if you are filming plants. Avoid blue if the subject wears blue.
Why should I check a green screen key across the whole clip?
A key that looks good on one frame can fail elsewhere if lighting, movement, or background colour changes. Scrubbing through the clip helps you catch flickering edges, spill, and background patches before exporting.
Written by Daniel Walter Scott — Founder of Bring Your Own Laptop & Chief Instructor
