Organizing your video editing footage like a Pro in Premiere
Questions


Student Gallery
Be the first to share something.
Course info
Overview
I am here to help you learn Adobe Premiere Pro and to show you the tools you need to become a successful video editor. Premiere Pro is the industry standard used by professional designers to create stunning, high class videos and, after completing this course, you too can become a confident, skillful and efficient creator of stunning videos.
This course is aimed at people who are completely new to Premiere Pro.
If you are self taught using Premiere, this course will show you techniques you never dreamed were necessary or possible and will show you efficiencies to help speed up your workflow.
The course covers many topics - all of them on a step-by-step basis. We will use real world video editing examples to work through:
- An interview
- A wedding video
- A short commercial
- A documentary
- Social media advertising videos
- YouTube ‘how to’ videos
- Talking head footage mixed with screencasts and voiceovers
We will work with text, animation, motion gfx, special effects and we will add music to our video.
We will learn how to do colour correction, colour balancing and also how to create amazing video transitions within our movie. Technical ‘guru’ topics such as HD v 4K, frames per second, exporting work, fixing up bad audio, balancing and synching audio will all become manageable tasks for you. Best of all...I will show you amazing shortcuts and techniques to speed up your workflow.
Throughout the course we will work on mini projects and I will be suggesting assignments which will add value to your portfolio.
Start your Premiere Pro training now and fast track your career as a video editor.
* Please note, you have full permission to transform and upload any work using footage of Daniel as a part of this course.

Daniel Walter Scott
Founder of Bring Your Own Laptop & Chief Instructor
I discovered the world of design as an art student when I stumbled upon a lab full of green & blue iMac G3’s. My initial curiosity around using the computer to create ‘art’ developed into a full-blown passion, eventually leading me to become a digital designer and founder of Bring Your Own Laptop.
Sharing and teaching are a huge part of who I am. As a certified Adobe instructor, I've had the honor of winning multiple Adobe teaching awards at their annual MAX conference. I see Bring Your Own Laptop as the supportive community I wished for when I was first starting out and intimidated by design. Through teaching, I hope to bring others along for the ride and empower my students to bring their stories, labors of love, and art into the world.
True to my Kiwi roots, I've lived in many places, and currently, I reside in Ireland with my wife and kids.
Certificates
We’re awarding certificates for this course!
Check out the How to earn your certificate video for instructions on how to earn yours and click the available certificate levels below for more information.
Downloads & Exercise files
How should I organise video files for Premiere Pro?
Start every job with the same simple project folder structure: Audio, Copy, Footage, Graphics, Project Files, and Renders. Then organise the footage in a way that makes sense for the job, whether that is by camera, scene, location, or shoot day, so you can find anything again without the panic.
How to Organise Video Files for Adobe Premiere Pro
Key takeaways
Use one reusable folder template for every new Premiere Pro project.
Keep source media, project files, supporting documents, and exports separate.
Organise footage by the detail that will be most useful while editing, such as scene, camera, or location.
Name folders clearly enough that you can return to a project years later and still know where everything lives.
There are no absolute rules, but a consistent structure saves a lot of faffing about on bigger jobs.
Why file organisation matters before you start editing
You can absolutely throw a few MP4 files into a folder and get editing. For a tiny project, that is often completely fine. No judgement. Well, maybe a tiny bit of judgement if everything is on the desktop, but you do you.
Once a project gets more involved, though, a pile of random files becomes a problem. A wedding with multiple videographers, a short film with separate scenes, or a commercial with lots of takes can quickly become difficult to navigate. The time lost searching for a clip, a document, or an old export adds up very quickly.
Good file organisation is not about making folders for the sake of folders. It is about being able to answer questions quickly: Where is the music? Which folder has the outdoor footage? Where did the Premiere Pro project go? Which file is the final export?
Set things up well at the beginning and you make the edit easier now, easier for anyone else who needs to work on it, and much easier for future you.
A simple Premiere Pro project folder structure
The structure I use for most new jobs has six main folders. It is deliberately generic because it works for a wide range of video projects.
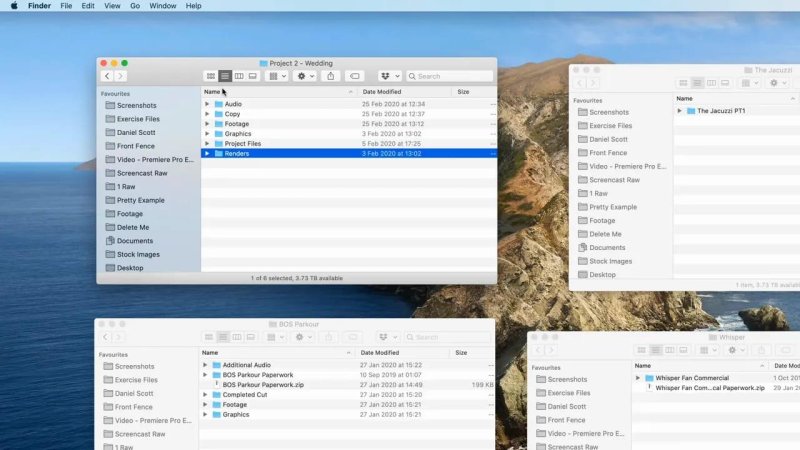
A repeatable top-level folder template gives every project a sensible home from the beginning.
Audio: Put dialogue recordings, music, voiceovers, sound effects, and other audio assets here.
Copy: Keep project-related text and documents here. This could include talent releases, scripts, shooting schedules, briefs, or a wedding programme with event timings.
Footage: This is the main home for captured video files, typically MP4 files from cameras or media supplied by a client.
Graphics: Store still images and design assets here, including JPEGs and Photoshop PSD files.
Project Files: Save the Adobe Premiere Pro project file here.
Renders: Put finished exports here. You might call this folder Exports instead. Either name is fine, just pick one and stay consistent.
That is the whole starting point. Nothing wildly clever, just a reliable place for everything.
Create a reusable project template
The best part of a folder structure like this is that you do not need to rebuild it every time. Make the six folders once, keep them as a template, and copy and paste the template whenever a new job lands.
You might name the template something like ZZ Template Folder Structure. The ZZ simply pushes it to the bottom of an alphabetically sorted folder list, keeping it out of the way but easy to find when you need it.
For each new project, duplicate the template, rename the copied master folder for the job, and add the date if that helps your workflow. Then start putting media into the appropriate folder immediately, before importing anything into Premiere Pro.
This is a quick habit, but it makes the beginning of a new edit feel far less chaotic. The footage has somewhere to go, the project file has somewhere to live, and your exports will not end up buried in Downloads or scattered across a desktop.
How to organise footage inside the Footage folder
The Footage folder is where things can vary from job to job. That is normal. The best approach is to organise around the way you will actually need to find and edit the material.
There is no single perfect system. The important bit is that the folder names tell you what is inside.
Organise multicamera projects by camera
For a wedding, footage may arrive already separated by camera. A shoot with four videographers could have folders for A Cam, B Cam, C Cam, and D Cam. This makes perfect sense when the project relies on switching between different angles of the same moments.
Keeping each camera together can be especially useful when you need to identify a particular angle, check coverage, or keep track of which clips came from which operator.
Organise narrative work by scene
A short film can make more sense when divided into scenes. For example, one folder might hold driving scenes, another might contain material for entering a building, and later folders can contain the remaining sequence of scenes.
This approach is useful because editing often follows the story. When you are working on a particular moment, you can head directly to that scene rather than trawling through every clip shot across the entire production.
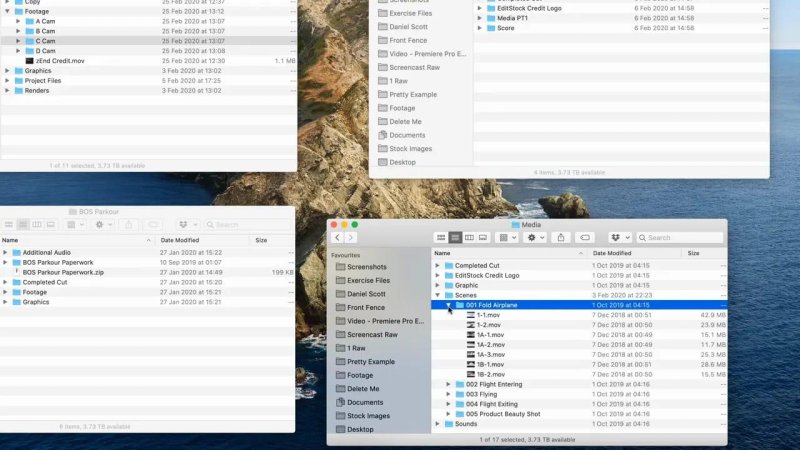
Scene-based folders make it much quicker to jump into the specific part of a story you are cutting.
Organise commercial footage by action or section
A commercial might be split into clearly named sections based on what happens in the footage. If one section involves folding a paper aeroplane and another involves throwing it, those can become separate folders.
This is basically scene organisation with more explicit labels. It is brilliant for an editor because the folder name immediately tells you what kind of shot you are about to find.
Organise footage by location and camera
Another useful combination is location first, then camera. A parkour project, for example, might be divided into Indoor and Outdoor folders, with each containing media from the cameras used on that part of the shoot.
Inside those location folders, camera names can provide another level of clarity. A GoPro Hero4, Canon 1DX Mark II, and Canon 7D can each have their own folder. That makes it easier to identify footage characteristics and keep material from different cameras grouped together.
Use names that make sense when you return later
The real test of a good folder structure is not whether it looks tidy today. It is whether you can open it two years from now and find exactly what someone is asking for.
If a client asks for the footage shot outside, you should be able to think: Footage, then Outdoor. Done. If they need the wedding schedule, it should be in Copy. If they want the finished video, it should be in Renders or Exports.
That level of clarity is what you are aiming for. It also means another editor can open the project and understand it without needing a guided tour of your brain.
Adapt the system, but stay consistent
Agencies, production companies, and editing houses often have their own established file structures. If you are working within one of those systems, use it. Consistency across a team matters more than insisting on your personal favourite folder names.
For independent work, this six-folder structure is a solid default. You can adapt it as projects demand it, adding folders for proxies, After Effects files, stock media, or other project-specific needs. Just do not overcomplicate it before there is a reason.
If your current system is to dump everything in one folder and hope for the best, that can work until it does not. For larger jobs, a little bit of structure means less hunting, fewer missing-file headaches, and a much calmer editing process.
Key Terms
Project folder structure
A consistent set of folders used to separate each type of asset in a video job. It keeps media, documents, Premiere Pro files, and finished exports easy to locate.
Footage
The recorded video files used in an edit, such as MP4 files captured on cameras or supplied by a client.
Multicamera footage
Material filmed simultaneously with two or more cameras. Organising it by camera can make it easier to identify and manage different angles.
Renders
Finished video files exported from Premiere Pro. Some editors call this folder Exports, but the purpose is the same.
FAQs
What folders should a Premiere Pro project have?
A practical starting structure is Audio, Copy, Footage, Graphics, Project Files, and Renders. It separates your media, documents, Premiere project file, and final exports without making the setup overly complicated.
Should I organise video footage by camera or by scene?
Use the option that helps you find clips most easily while editing. Multicamera events such as weddings often suit camera-based folders, while short films and commercials often work better when arranged by scene or action.
Where should I save Premiere Pro exports?
Save exported videos in a dedicated Renders or Exports folder inside the project folder. Keeping exports separate prevents final files from getting mixed in with original footage and work-in-progress assets.
Do I need the same folder structure for every video project?
You do not need an identical structure for every job, but using a consistent base template is very useful. Add project-specific folders when needed while keeping the core locations for footage, audio, graphics, project files, and exports predictable.
Written by Daniel Walter Scott — Founder of Bring Your Own Laptop & Chief Instructor
