How to do an audio transition in Adobe Premiere Pro
Questions






Student Gallery
Be the first to share something.
Course info
Overview
I am here to help you learn Adobe Premiere Pro and to show you the tools you need to become a successful video editor. Premiere Pro is the industry standard used by professional designers to create stunning, high class videos and, after completing this course, you too can become a confident, skillful and efficient creator of stunning videos.
This course is aimed at people who are completely new to Premiere Pro.
If you are self taught using Premiere, this course will show you techniques you never dreamed were necessary or possible and will show you efficiencies to help speed up your workflow.
The course covers many topics - all of them on a step-by-step basis. We will use real world video editing examples to work through:
- An interview
- A wedding video
- A short commercial
- A documentary
- Social media advertising videos
- YouTube ‘how to’ videos
- Talking head footage mixed with screencasts and voiceovers
We will work with text, animation, motion gfx, special effects and we will add music to our video.
We will learn how to do colour correction, colour balancing and also how to create amazing video transitions within our movie. Technical ‘guru’ topics such as HD v 4K, frames per second, exporting work, fixing up bad audio, balancing and synching audio will all become manageable tasks for you. Best of all...I will show you amazing shortcuts and techniques to speed up your workflow.
Throughout the course we will work on mini projects and I will be suggesting assignments which will add value to your portfolio.
Start your Premiere Pro training now and fast track your career as a video editor.
* Please note, you have full permission to transform and upload any work using footage of Daniel as a part of this course.

Daniel Walter Scott
Founder of Bring Your Own Laptop & Chief Instructor
I discovered the world of design as an art student when I stumbled upon a lab full of green & blue iMac G3’s. My initial curiosity around using the computer to create ‘art’ developed into a full-blown passion, eventually leading me to become a digital designer and founder of Bring Your Own Laptop.
Sharing and teaching are a huge part of who I am. As a certified Adobe instructor, I've had the honor of winning multiple Adobe teaching awards at their annual MAX conference. I see Bring Your Own Laptop as the supportive community I wished for when I was first starting out and intimidated by design. Through teaching, I hope to bring others along for the ride and empower my students to bring their stories, labors of love, and art into the world.
True to my Kiwi roots, I've lived in many places, and currently, I reside in Ireland with my wife and kids.
Certificates
We’re awarding certificates for this course!
Check out the How to earn your certificate video for instructions on how to earn yours and click the available certificate levels below for more information.
Downloads & Exercise files
How do I smoothly blend audio clips in Premiere Pro?
Use an audio crossfade transition, usually Constant Power, on the edit point between two audio clips. Drag it from Effects > Audio Transitions > Crossfade onto the cut, then adjust its duration if the blend needs to happen faster or more slowly.
How to Add Audio Transitions in Premiere Pro
Key takeaways
Use Constant Power as the reliable default for most audio transitions.
Zoom into the timeline and enlarge waveforms before making detailed audio edits.
Place a crossfade precisely on the gap between two clips.
Use an audio transition at the end of a clip to create a simple fade-out.
What audio transitions do in Premiere Pro
Audio transitions do much the same job as a Cross Dissolve does for video. Rather than switching abruptly from one sound to another, they blend the outgoing clip into the incoming clip.
That can be useful when an edit creates an obvious jump in background noise, music, room tone, or speech. It is not something that needs to go on every single cut, though. Plenty of edits sound completely fine without any transition at all.
If the audio is already fairly consistent and there is no huge change in sound, leave it alone. But when the cut feels abrupt, a quick crossfade can make it much less noticeable.
Prepare the timeline for an accurate edit
Before adding anything, get close enough to see what is happening. Click inside the timeline, then press + on the keyboard to zoom in.
It also helps to make the audio waveform taller. Hover between the dividing lines around the audio track area and drag to increase the track height. You are looking for enough detail to see the shape of the audio clearly, particularly around the edit point.
There is no need to make every track enormous. If dialogue is the priority, make that waveform easier to read and keep the music track out of the way.
Where to find audio transitions
Audio transitions live in the same general Effects area as video transitions. In the Effects panel, open the following folders:
Audio Transitions
Crossfade
You will find a small collection of options there. The main one to use is Constant Power. It is the default, marked with the blue indicator, and it is the one I use virtually every time.
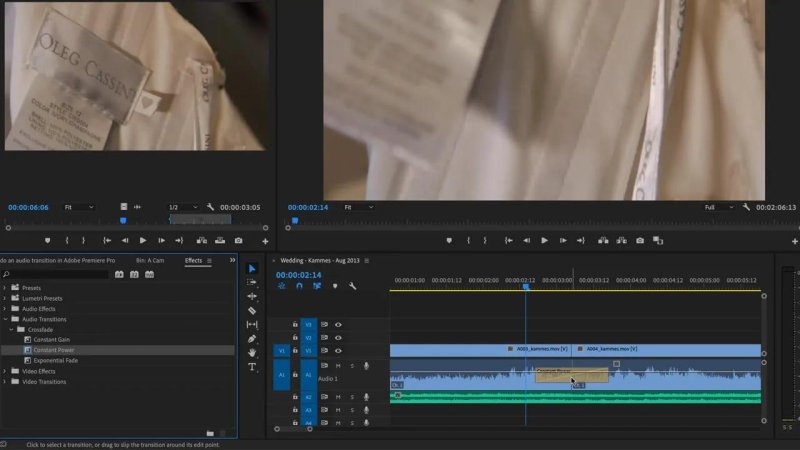
Drop the audio transition directly onto the edit point between the two clips.
Constant Power vs Constant Gain
Premiere Pro gives you a few crossfade choices, including Constant Power and Constant Gain. They create slightly different fade curves.
Constant Power uses a curved change in volume. The fade does not progress at the same rate all the way through. Constant Gain is visually more even and linear.
In practice, the differences can be subtle. If you are really into audio, you might have a strong preference. For everyday editing, Constant Power is a solid default that gets the job done without overthinking it.
How to add a Constant Power audio transition
Find the cut between the two audio clips in the timeline.
Open Effects > Audio Transitions > Crossfade.
Drag Constant Power onto the gap between the clips.
Make sure it lands on the edit point, not entirely on one clip.
Adjust the transition duration if you want the blend to be shorter or longer.
The important bit is placement. Dragging the transition onto the actual join tells Premiere Pro to use audio from both sides of the edit and blend it together.
Why an audio crossfade may not work perfectly
Sometimes you drop a crossfade onto a cut and it appears stuck to one side. That is usually because one of the clips does not have any extra audio beyond the edit point.
For a true crossfade, Premiere Pro needs audio available before the start of the incoming clip and after the end of the outgoing clip. That spare material is what allows it to overlap the clips and mix them together.
If there is no extra audio available, Premiere Pro will still do its best, but it cannot create the same proper overlap. The transition is effectively warning you that there is no pre-roll or extra audio handle on one side to use for the crossfade.
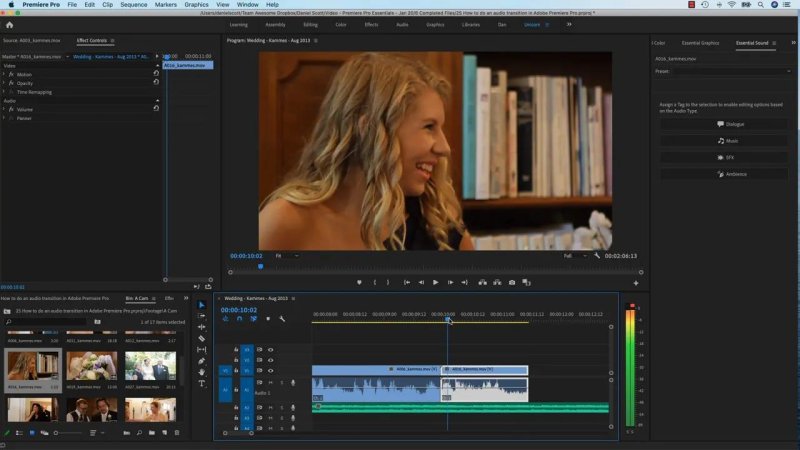
A crossfade works best when both clips have enough extra audio for Premiere Pro to overlap.
When you actually need an audio transition
Audio transitions are not mandatory. Most straightforward edits do not need them, especially where background sound remains fairly steady from one shot to the next.
They become more useful when the sound changes dramatically. A quiet conversation cutting suddenly to something loud and chaotic is a good example. In that case, blending the audio can soften the jump and make the edit feel more deliberate.
Use them to solve a specific problem, not because a transition exists. A clean cut is often better than a needless fade.
Use Constant Power to fade audio out at the end
The most common time to use an audio transition is often not between two clips at all. It is at the end of a section when you want the sound to fade away.
Drag Constant Power onto the end of the audio clip. Rather than crossfading into another clip, it fades the existing audio down to silence.
You can pair that with a video fade by adding Dip to Black from the video Dissolve transitions to the end of the video clip. The result is a straightforward finish where both picture and sound fade out together.
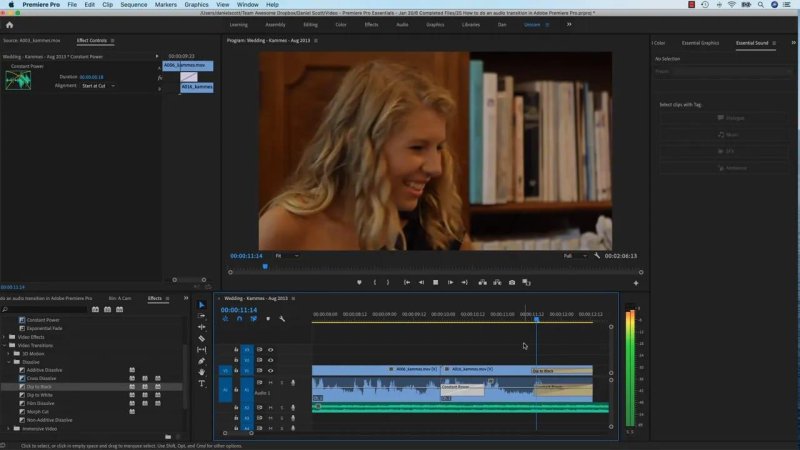
Pair an audio fade-out with Dip to Black for a clean ending in both sound and picture.
Keep it simple
For most Premiere Pro projects, you do not need a collection of fancy audio transitions. Zoom in, inspect the waveform, and use Constant Power when a cut sounds too sudden or when you need to fade out at the end.
That is usually all there is to it. Drag it onto the gap, make sure Premiere Pro has enough audio to work with, and adjust the duration only if the fade needs to be faster or slower.
Key terms
Audio crossfade
An effect that gradually reduces one clip's audio while increasing the next clip's audio. It helps reduce abrupt changes at an edit point.
Constant Power
Premiere Pro's default audio crossfade. It uses a curved volume fade and is a practical choice for most audio transitions.
Waveform
The visual display of an audio clip's volume over time in the timeline. Enlarging it makes cuts and sound changes easier to inspect.
Audio handle
Extra audio available before or after a clip's visible edit point. Handles give Premiere Pro material to overlap when creating a proper crossfade.
FAQs
What is the best audio transition in Premiere Pro?
Constant Power is the best general-purpose choice. It is Premiere Pro's default crossfade and is a reliable option for blending clips or fading audio out.
Where are audio transitions in Premiere Pro?
Open the Effects panel, then go to Audio Transitions and open the Crossfade folder. Constant Power, Constant Gain, and other crossfade options are located there.
Why is my audio transition only appearing on one clip?
One of the clips probably has no extra audio beyond the cut. Premiere Pro needs spare audio on both sides of the edit to create a full overlapping crossfade.
Can I use an audio transition to fade out music?
Yes. Add Constant Power to the end of the music clip, then change its duration if needed. This creates an audio fade-out rather than a transition into another clip.
Written by Daniel Walter Scott — Founder of Bring Your Own Laptop & Chief Instructor
