How to change the default duration timing for an image in Premiere Pro
Questions

Oops! You need to be a member to join in.
Feel free to browse but if you'd like to jump into the conversation you'll need to join our awesome student community.
Explore 30+ Essential and Advanced courses in Figma, Photoshop, Illustrator, Lightroom, Premiere Pro, Webflow, and more. Enjoy self paced learning, personalized support, earn certificates, and exciting community challenges.
Student Gallery
Be the first to share something.
Course info
Overview
I am here to help you learn Adobe Premiere Pro and to show you the tools you need to become a successful video editor. Premiere Pro is the industry standard used by professional designers to create stunning, high class videos and, after completing this course, you too can become a confident, skillful and efficient creator of stunning videos.
This course is aimed at people who are completely new to Premiere Pro.
If you are self taught using Premiere, this course will show you techniques you never dreamed were necessary or possible and will show you efficiencies to help speed up your workflow.
The course covers many topics - all of them on a step-by-step basis. We will use real world video editing examples to work through:
- An interview
- A wedding video
- A short commercial
- A documentary
- Social media advertising videos
- YouTube ‘how to’ videos
- Talking head footage mixed with screencasts and voiceovers
We will work with text, animation, motion gfx, special effects and we will add music to our video.
We will learn how to do colour correction, colour balancing and also how to create amazing video transitions within our movie. Technical ‘guru’ topics such as HD v 4K, frames per second, exporting work, fixing up bad audio, balancing and synching audio will all become manageable tasks for you. Best of all...I will show you amazing shortcuts and techniques to speed up your workflow.
Throughout the course we will work on mini projects and I will be suggesting assignments which will add value to your portfolio.
Start your Premiere Pro training now and fast track your career as a video editor.
* Please note, you have full permission to transform and upload any work using footage of Daniel as a part of this course.

Daniel Walter Scott
Founder of Bring Your Own Laptop & Chief Instructor
I discovered the world of design as an art student when I stumbled upon a lab full of green & blue iMac G3’s. My initial curiosity around using the computer to create ‘art’ developed into a full-blown passion, eventually leading me to become a digital designer and founder of Bring Your Own Laptop.
Sharing and teaching are a huge part of who I am. As a certified Adobe instructor, I've had the honor of winning multiple Adobe teaching awards at their annual MAX conference. I see Bring Your Own Laptop as the supportive community I wished for when I was first starting out and intimidated by design. Through teaching, I hope to bring others along for the ride and empower my students to bring their stories, labors of love, and art into the world.
True to my Kiwi roots, I've lived in many places, and currently, I reside in Ireland with my wife and kids.
Certificates
We’re awarding certificates for this course!
Check out the How to earn your certificate video for instructions on how to earn yours and click the available certificate levels below for more information.
Downloads & Exercise files
Download Files
Please confirm you would like to download this file, some files can be large. You maybe want to consider downloading on wifi rather than mobile data.
Large file sizes may also take a while to download depending on your internet speed.
Name:
Size:
Download Files
Please confirm you would like to download this file, some files can be large. You maybe want to consider downloading on wifi rather than mobile data.
Large file sizes may also take a while to download depending on your internet speed.
Name:
Size:
How do I change how long still images stay on screen in Premiere Pro?
You can change image duration directly on the timeline with Speed/Duration, or set a new default under Preferences > Timeline. The slightly strange bit is that a new preference only applies to images imported after you make the change, not the stills already sitting in your project.
How to Change the Default Image Duration in Premiere Pro
When you drag a batch of photos into a Premiere Pro timeline, each still image is usually five seconds long by default. That is fine sometimes, but for a slideshow, travel montage, or sequence cut to music, five seconds can feel painfully long.
You have three practical ways to control still-image duration: change clips already on the timeline, change the duration of clips in the Project panel, or set a new default for future imports. They sound like the same thing, but Premiere Pro treats them rather differently. Super easy in parts, super strange in others.
Change the duration of images already on the timeline
If your images are already in a sequence, this is the quickest method. Drag a selection box around all the stills you want to change. Start in an empty bit of the timeline, then click and drag across the clips.
Select all the image clips on the timeline.
Right-click any selected image.
Choose Speed/Duration.
Enter the duration you want.
Enable Ripple Edit, Shifting Trailing Clips.
Confirm the change.
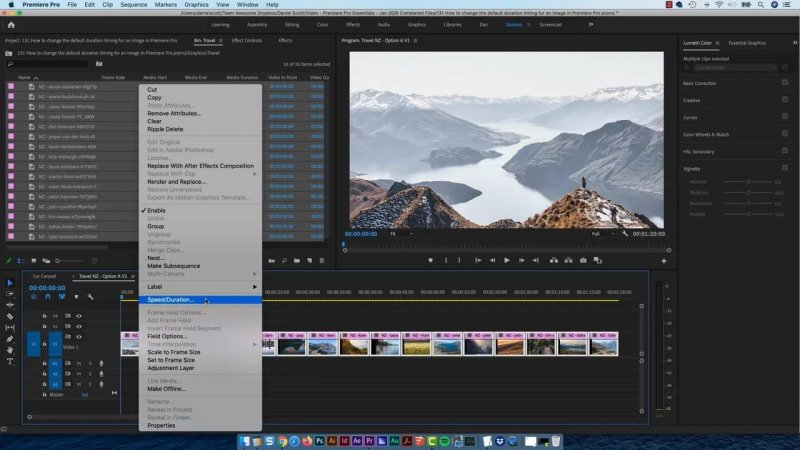
Speed/Duration changes a whole group of selected stills in one go.
The Ripple Edit option is the important little checkbox here. If you shorten a stack of five-second images to something shorter without ripple editing, Premiere Pro leaves gaps behind. You can manually delete those gaps, but that is a pretty slow way to work through a long photo sequence.
With Ripple Edit enabled, Premiere Pro closes those gaps automatically and pulls the following clips along. Much nicer.
For this particular sequence, a duration of two seconds and ten frames gave the images a pace that suited the backing track. Your timing will depend on the music, the images, and how much time each shot needs, but it is a useful reminder that duration is an editing decision, not just a technical setting.
Why the default image duration stays at five seconds
Changing clips on the timeline does not change Premiere Pro's default. If you drag the same images into the timeline again, they will still arrive at five seconds unless you alter the preference or update the source clips in the Project panel.
That separation is intentional. A duration change on the timeline affects that specific use of the clip in that sequence. It does not rewrite the image's general duration everywhere else in the project.
Set a new default still image duration
If you know you will be editing loads of images at roughly the same pace, change the default duration before importing them.
Find the Timeline preferences
On Windows, go to Edit > Preferences > Timeline.
On Mac, go to Premiere Pro > Preferences > Timeline.
In the Timeline preferences, look for Still Image Default Duration. This controls the duration Premiere Pro assigns when a still is first imported.
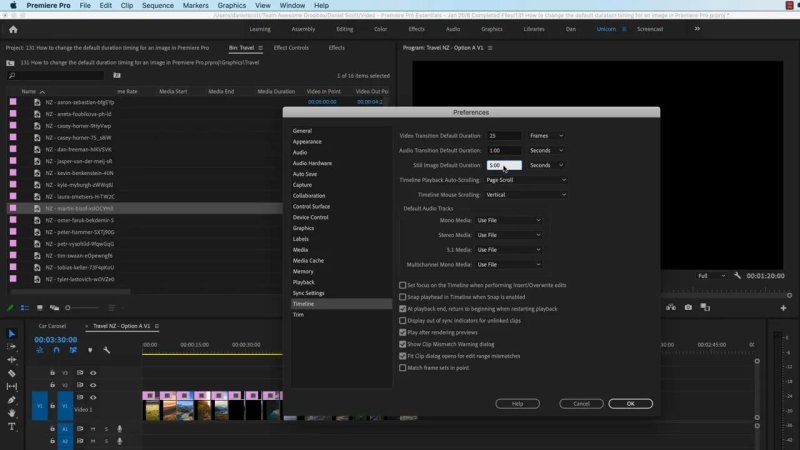
The Still Image Default Duration setting controls newly imported images, not clips already in the project.
The strange bit: this field uses seconds
The Still Image Default Duration field is not entered as a timecode value. If you type something that looks like two seconds and ten frames, Premiere Pro can interpret it as a number of seconds instead. That is where things get weird.
If your sequence runs at 25 frames per second, two seconds and ten frames equals 60 frames in total:
Two seconds equals 50 frames.
Add 10 frames.
Total: 60 frames.
60 divided by 25 frames per second equals 2.4 seconds.
So, for a 25 fps sequence, enter 2.4 in the preference field to get the equivalent of two seconds and ten frames. Do the small bit of maths for your own frame rate if it differs.
Why changing Preferences does not update existing images
This catches people out all the time. You update Still Image Default Duration, click OK, drag your existing images into the timeline, and they are still five seconds long. It feels like the preference simply did nothing.
It did work, but only for future imports. Premiere Pro assigns a duration to a still image when it is imported into the Project panel. Existing imported stills keep the duration they were given at that point.
The logic is that the same image might be used in different places, and Premiere Pro should not suddenly alter edits you have already made. Fair enough. Still a bit of a quirk.
How to update images already in your project
Once images have already been imported, you have two sensible options.
Option 1: Delete and reimport the images
If you are early in the project and the photos are not used all over the place, delete the imported stills and import them again after changing the default duration. The reimported images will use the new Still Image Default Duration.
This is the clean option when you can get away with it.
Option 2: Change duration in the Project panel
If the images are already organised across the project and reimporting them would be a pain, change their duration from the Project panel instead.
Select the still images in the Project panel.
Right-click the selected images.
Choose Speed/Duration.
Enter the new duration and confirm.
Drag the updated stills into the timeline.
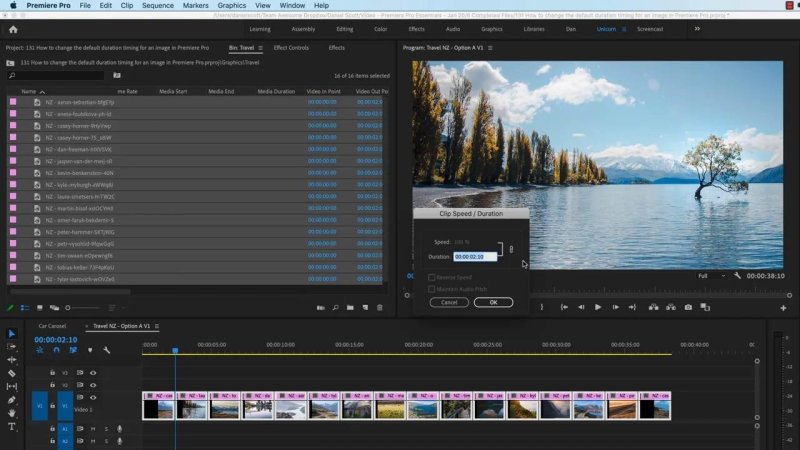
Changing Speed/Duration in the Project panel updates the source stills for new timeline edits.
This differs from changing clips down on the timeline. In the Project panel, you are updating the duration associated with those imported still images. New uses of them in the timeline will come in at that updated length.
Which image-duration method should you use?
There is no one magical setting that is right for every job. Use the method that matches where you are in the edit.
Images already in a sequence: Select them on the timeline, use Speed/Duration, and enable Ripple Edit to remove gaps.
New project with lots of images to import: Set Still Image Default Duration in Preferences first.
Images already imported but not yet edited: Select them in the Project panel and use Speed/Duration.
Different sections need different pacing: Do not worry too much about the global preference. Set duration as you edit each group.
For many projects, right-clicking a batch of selected images and using Speed/Duration is the most flexible approach. One sequence may need fast image changes, another may need slower, more considered shots. A universal default is handy, but it is not always the answer.
Match image duration to music
There is a good reason to be fussy about a number like two seconds and ten frames. In a photo montage, pacing is everything. A duration that feels arbitrary when you look at one image can feel completely right once the images are running with the music.
Add your backing track, then test the pace of the cuts against it. In this case, the chosen image duration worked with the rhythm of the music, especially with crossfades softening the literal cuts between images.
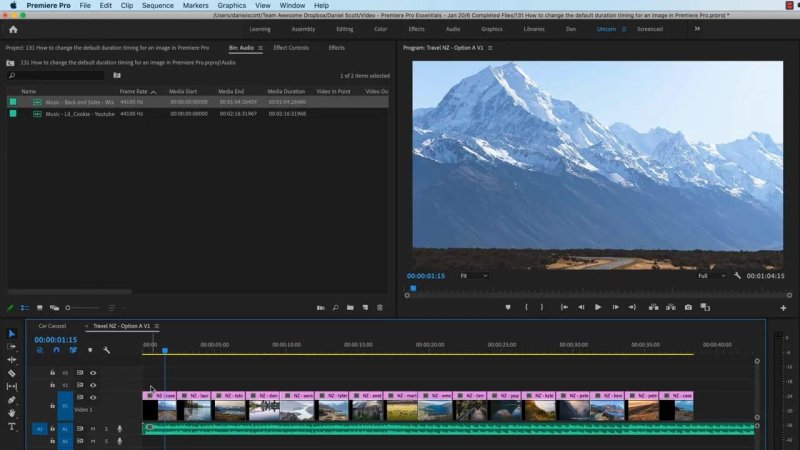
A music track makes it much easier to judge whether the image duration has the right pace.
When there is no voiceover to balance, music can sit a little higher than it would beneath speech. Still, keep an eye on the audio meter and lower it slightly if it is banging into zero.
A simple workflow for photo montages in Premiere Pro
Decide whether the project needs a custom default image duration.
Set that preference before importing stills, if possible.
Import and arrange the images.
Use Speed/Duration on selected groups when the pacing needs adjustment.
Use Ripple Edit when shortening timeline clips to avoid gaps.
Add music and fine-tune the image duration until the cuts feel right.
Five seconds is just Premiere Pro's starting point. It is not a rule. Set your still-image duration deliberately, use the Project panel and timeline tools for the right job, and the whole sequence becomes much quicker to manage.
FAQs
Why are my images still five seconds long after changing Premiere Pro preferences?
Still Image Default Duration only affects images imported after the preference is changed. Existing stills retain the duration assigned when they were originally imported. Reimport them or select them in the Project panel and change their duration with Speed/Duration.
How do I remove gaps after shortening image clips in Premiere Pro?
Select the images on the timeline, choose Speed/Duration, and enable Ripple Edit, Shifting Trailing Clips. Premiere Pro will shorten the clips and close the gaps automatically.
Can I change the duration of multiple photos at once in Premiere Pro?
Yes. Select all the still images either on the timeline or in the Project panel, right-click, choose Speed/Duration, and enter the duration once for the whole selection.
Where is Still Image Default Duration in Premiere Pro?
Open Preferences and choose Timeline. On Windows, go to Edit > Preferences > Timeline. On Mac, go to Premiere Pro > Preferences > Timeline.
Written by Daniel Walter Scott — Founder of Bring Your Own Laptop & Chief Instructor
