The ULTIMATE Premiere Pro shortcut list
Questions


Student Gallery
Be the first to share something.
Course info
Overview
I am here to help you learn Adobe Premiere Pro and to show you the tools you need to become a successful video editor. Premiere Pro is the industry standard used by professional designers to create stunning, high class videos and, after completing this course, you too can become a confident, skillful and efficient creator of stunning videos.
This course is aimed at people who are completely new to Premiere Pro.
If you are self taught using Premiere, this course will show you techniques you never dreamed were necessary or possible and will show you efficiencies to help speed up your workflow.
The course covers many topics - all of them on a step-by-step basis. We will use real world video editing examples to work through:
- An interview
- A wedding video
- A short commercial
- A documentary
- Social media advertising videos
- YouTube ‘how to’ videos
- Talking head footage mixed with screencasts and voiceovers
We will work with text, animation, motion gfx, special effects and we will add music to our video.
We will learn how to do colour correction, colour balancing and also how to create amazing video transitions within our movie. Technical ‘guru’ topics such as HD v 4K, frames per second, exporting work, fixing up bad audio, balancing and synching audio will all become manageable tasks for you. Best of all...I will show you amazing shortcuts and techniques to speed up your workflow.
Throughout the course we will work on mini projects and I will be suggesting assignments which will add value to your portfolio.
Start your Premiere Pro training now and fast track your career as a video editor.
* Please note, you have full permission to transform and upload any work using footage of Daniel as a part of this course.

Daniel Walter Scott
Founder of Bring Your Own Laptop & Chief Instructor
I discovered the world of design as an art student when I stumbled upon a lab full of green & blue iMac G3’s. My initial curiosity around using the computer to create ‘art’ developed into a full-blown passion, eventually leading me to become a digital designer and founder of Bring Your Own Laptop.
Sharing and teaching are a huge part of who I am. As a certified Adobe instructor, I've had the honor of winning multiple Adobe teaching awards at their annual MAX conference. I see Bring Your Own Laptop as the supportive community I wished for when I was first starting out and intimidated by design. Through teaching, I hope to bring others along for the ride and empower my students to bring their stories, labors of love, and art into the world.
True to my Kiwi roots, I've lived in many places, and currently, I reside in Ireland with my wife and kids.
Certificates
We’re awarding certificates for this course!
Check out the How to earn your certificate video for instructions on how to earn yours and click the available certificate levels below for more information.
Downloads & Exercise files
Transcript
So there's a few little extra bonuses in here for you, we'll call them bonuses. Also remember there's a PDF that you can print off, of all of these shortcuts, that will be in your Exercise Files. Yeah, let's get into the ultimateness. Let's start with some easy ones to get going.
The first one that I use the most is the backslash, ' \ ' key. Just tap it on your keyboard, puts everything in the Timeline in view. So you can see everything at once. The cool thing about it is you can zoom in, say you are working very tight in here, if you tap backslash one, see the whole thing, tap it again, goes back into that exact same kind of zoom level you were at, but I never do that, basically this is what I do. I trim stuff up because of this giant soundtrack, and then I hit backslash again, just kind of fits it in appropriately. It's a good start, next one.
The next shortcut that I found the most exciting was the Tilde key or the back tick key, ' ~ '. I'm not even sure which one does it because sometimes I've got different keyboards, sometimes it's this, sometimes it's that. You might have to hunt around and see if you can find it. On my Mac it was up there, now it's down here, it will move. What does it do? It means wherever your mouse is, just tap it, and it makes it full screen. Super handy when you've got like really complicated bins, and it's hard to search and look through them all, just tap the Tilde key, it goes full screen, tap it again, it goes back, so wherever your mouse is. Full screen, Full screen Timeline, you can even combine it with a backslash; look at that. I made it big and made it fit in there, nice. That's the Tilde/grave key, some people call it the squiggle, or it's back tick, but it looks like that.
Next shortcut, next one is holding down the 'Shift' key while you drag your Playhead or CTI. It will, if you're holding down 'Shift', snap to useful things. You can see the gaps here, see my audio track down the bottom here. If I'm holding 'Shift' and dragging, it will snap to these. Gets even more useful if you have a track selected, and up here in my Effects Controls I've got keyframes. If I need to adjust these keyframes, dragging this CTI, it will snap to the keyframes, stop making all those random duplicates that are right next to it, close but not quite. Hold 'Shift', drags to the front, to the key frames and to the end; nice.
This next shortcut is how to do a nice razor cut that show us the… "All limits are inside your head." There's a sweet jump, but what I want to do is chop a few bits out. So I'm just going to make sure my track is selected, and 'Command K' on a Mac, and 'Ctrl K' on a PC. Go to my next one, 'Command K', next one, 'Command K' on a Mac, 'Ctrl K' on a PC. I'll do one more and then I'm going to magically delete some bits. By magic I mean just clicking them and deleting them.
Another little shortcut is you can click the gaps and hit 'Del', and it just toggles everything in. So I'm just clicking it once, hitting 'Del' on my keyboard. Not very short 'cut'ey, you say, let's undo those, get them back, and instead of just deleting them, is hold down the 'Option' key on your keyboard, if you're on a Mac, the 'Alt' key on a PC, hold that down and hit the backspace key. Generally in the top right, next to the plus ' + ' and minus, ' - '. That will both delete it and Ripple Delete at the same time, look at that. Not good enough, you say, let's undo it. Still not good enough, you say, let's say you've got footage and there's lots of gaps, hundreds of them, for some strange unknown reason. Select all the ones you want to remove, go to 'Sequence', come down to 'Close Gap'. Hey, you're crying a little, right, because you've done this, we've all done it.
All right, next trick, it gets better. How? You ask; the Ripple Edit tool. That tool that you should use more, you know it's there, you never do, is this one here, Ripple Edit, it's got a terrible shortcut, the B key, B for bad shortcut, that's how we'll remember it. We'll select it and instead, watch, I can drag this along, and the gap that's going to open up gets closed automatically. It will Ripple Delete it, you're like, "I use that all the time, don't tell me about Ripple Edit tool." All right, how about this one, let's go 'undo', and instead of any of these tools here, nothing-- so no tools selected, I've got this clip selected and I just hit the 'Q' key. Look at that, it did it all in one go, no Ripple Edit, no clicking and dragging. Undo, watch that again, get it anywhere you want, hit the 'Q' key and it just trims it up.
You can do the other way around, if you get to the end and you're like, oh, I want to just-- let's say this one here, I want to trim it up a little bit. It's selected, I hit the 'W' key, which is right next to the Q key, which is handy. It's called the Ripple Trim tool, some people call it topping and tailing. Just got to make sure the clip is selected, Q and W, love those keys. Not to be left out, Q and W have a buddy, his name is E. If you look down at your keyboard, there he is, just to the right of them. His job is to do something called the Extend Edit to Playhead. So get your Playhead where you want it to be, and you click on the end of it, it kind of goes red, and you hit 'E', will jump out to wherever your Playhead is. It does not work if you have the clip selected, because it doesn't know where to end. So you've got to really be very specific and click on the end, it could be either end.
I can click on this one, so it's red, and say 'E', and it will jump back to it. It also doesn't work, you can't click the ends, if you have any of these other tools. You just need to be on your Selection tool. It's the shortcut that I never use, to be honest, but I reckon it might make at least one person's day out there. Get it to the right point, click the end, click 'E', oh, good. Extend Edit to Playhead; next shortcut.
To continue on our Timeline mastery, we're going to insert, let's put in some sheep, I'm from New Zealand, we love sheep. If you know nothing of New Zealand, you know Flight of the Concords, Lord of the Rings, and there's more sheep than people. I wish it wasn't true, but it is. What you do is, you're like, "Okay, I'm going to put it in there," so I know it's that long and I'm going to grab this, and I'm going to extend you out, and you slip it in, you're like, "Yay." Today gets better, I'm going to undo all of that jugglery, and we are going to, as we drag it in, hold down the 'Command' key on a Mac, 'Ctrl' key on a PC, ready, steady, we can put it anywhere, put it there, oh, look at that, just opened up a gap. No messing around with, ah, man, Source Matching. Source Patching, the mysterious Vs on the side sent, to confuse us all.
There's another way of doing it, that way I use a lot, this way is pretty good as well, let's say that this one's been on the cutting block, we want to get rid of it. Replace with sheep, so what we can do is click, hold, and drag, and if you drag it up to your program window, you get some awesome things, like Overlay, or Replace, look at that. Just replace that one, same time, has the same animations, or transitions. There's other ways of doing it but that's just too easy. Let's have a quick look at the other ones, you can insert it before, let's insert it afterwards. Look at that, two sheep, we have millions of sheep. Have a little look, it'd be one of these things that you're doing all the time, and it's just nicer often just to look in here and do it, Overlay. Look at that, over the top, I didn't do, have to do any more of that mysterious Source Patching. If I were all honest, nobody really knows how it works, or why these should be different, anyway, next shortcut.
I lied, one last little thing to show you, it's really good for big stacks of images, there's just a whole bunch of images. There's always some reshuffling to be done, in this case I got too many sheep together, so I want you to be down here, and I can just drag it, and it does an Insert Edit, and kind of overrides that one, or I can use my fancy new trick, hold down the 'Command' key on a Mac, 'Ctrl' key on a PC, and it kind of pushes along, but, lift the gap here, that's all right, I can get rid of that, delete. Oh, there's a way of doing it all in one go. So just like before, drag it along, 'Command' on a Mac, 'Ctrl' on a PC, but also, on a Mac hold down the 'Option' key, so 'Command' and 'Option'. On a PC, it is 'Ctrl' and 'Alt'. Man, it's hard to do in my head at the moment. You can see them on the screen, look at that, there's a little switch-a-roonie. Puts that over there, gets rid of the gap, everything shuffles along. I can make this one go backwards. So 'Command Option' on a Mac, 'Ctrl Alt' on a PC, and it kind of shuffles that one over here and everything tidies up nicely.
Now another shortcut, or at least another range of shortcuts. Let's talk about importing. So you might not know, you might know, you can just double click in your Project Window, anywhere in here that doesn't have words. Double click and say, I'm going to bring in all of these guys. You don't have to go File, Import, or any sort of shortcut. I can import more, just double click the non have things in area. You can go a bit faster, undo that. You can actually just drag it straight up from your Finder window. Either Mac or PC. Just drag it, let's grab both mp4s, drag it straight to here. You have to kind of rearrange things so you can see it, but check it out. It creates a sequence and puts both of them in there. It's a great easy way to get started.
Another couple of good hot keys, is look down your keyboard, J, K, and L, that's what I rest my fingers on, pretty much constantly when I'm editing. So L is going forward, it's playing, 'K' is stop, but the cool thing about is, if you tap 'L' twice, play it once, plays double speed. I do a lot of my editing, or at least checking of myself talking, using that speed. I don't mind that I sound like a chipmunk, but it's way better than listening to myself talk. You can tap it three times, one, two, three, a little bit hard to understand, but if you're just trying to kind of listen through something real quick, it's a good way to speed things up. 'J' is backwards. I use it surprisingly a lot, you can hit 'J', a couple of times backwards. Just to kind of get the Playhead where you need to. Useful if you are kind of jumping around like that. 'L' to go forwards, 'K' to stop. If you need to go forward one frame, because you need to find, like something that is, say just scrub it along, and you find a bad picture.
All of my, like freeze frames, there you go, that's a bad one. Just trying to find something where I don't look as, like that. Your left and right arrows, so remember, I've got my Playhead selected down here, the blue arrow, just hit left once, right once. Just frame, I can kind of go back a couple of frames until, ah, there we go. Way more handsome. So just tap them along, it's really helpful as well, because weirdly in Premiere Pro, if you hold your 'Shift' key and snap to the end, it snaps to the next one, never this one, so you can go back one, that's what I do a lot.
So dragging along, holding 'Shift', snaps there, goes, no, get back one, go back to this clip, watch. Back one arrow, look at that. If you hold down 'Shift' and do it, it jumps in sessions of five. So I'm just tapping my left arrow, holding 'Shift' key, and it goes into like bigger chunks, because you might find that useful, sometimes. Same with forwards, hold 'Shift', goes in lots of five frames. There we go, nailed it. So I'm going to reuse one of my earlier shortcuts, I want to delete it.
Do you remember, I want to Ripple delete it. That's right, hold down your 'Option' key on a Mac and hit backspace, or 'Alt' key on a PC. Now listening to this one, I've got terrible audio. "Hi, my name is Dan." It sounds like I'm recording in my toilet, clearly not, but it does sound like that. So I'm going to add some better audio that I've recorded off camera. I'm going to hit my backslash key, because I want it to be full screen, and we're going to unlink it. You right click it, you got to 'Unlink', and then you delete one of them. You've done that before, right, but you can just hold down your 'Option' key on a Mac, 'Alt' key on a PC, and click off, click one. So I have nothing selected, hold down 'Alt' on a PC, 'Option' on a Mac, and you can just click one of them, hit, 'Del'.
Another weird thing you can do with it, is with both of them selected, you can hold down the 'Option' key on a Mac, 'Alt' key on a PC, and just drag one of them. So you might just want-- don't want the audio at the end there, where you're kind of like doing stuff, but you want the visual still. They're still kind of linked. It's weird, I've used it once or twice, but at the moment, nothing selected, hold down my 'Option' key on a Mac, 'Alt' key on a PC, and delete it.
One of the way you might do that is - I'm going to delete all this. - is I'm going to open it up in my Source Monitor, you might go, bring it in, brings them both, but if you drag just one of these icons, if I drag just the video, I can drag it to one of my V1 tracks, get the kind of the same result. If you just want the audio from it, just drag the little audio. Down to one of the audio tracks. All right, I want it, so this guy is gone, let's bring in our better audio, not amazing. I'm going to bring in my mp3, I'm going to drag it on.
The next shortcut I want to show you is the-- we've used the left and right, just to go forward one frame, back one frame. The up arrow and the down arrow will jump to the next significant thing that's happening in your Timeline. In our case if I go up one, it's jumping to the beginning of the mp3, and go up one again, it's beginning of this. It's really handy way to kind of like start scrolling through all of your work. Up arrow, down arrow, and like before, I go back one frame, weirdly.
So Premiere Pro loves to get to the end, but go past where it needs to go, get back one frame. We're back where we want to be. If this doesn't work for you, say you've got something else on this other layer, which one do I want? That's the sequence, let's put that on there, and you're like, "I'm jumping up and down," but let's say it's skipping. I'm going to make it do it. Watch this, it's not going to find this Dreamweaver one, watch, I go down and, why aren't you jumping to this one? Works on some of them, but not others. You kind of notice, already gave it away, it's any of these. So this is your Track Targeting. Kind of like Source Matching, except, it's not the same, just make sure they're all on, that's generally a good rule. Does most of what you want. All right, up and down arrow.
Next one is, I'm not sure if I've even said this one already. Selection follows Playhead, I think I did. Just means it's going to kind of jump to whatever is, the Playhead is above, that can be useful, but just know you can turn it off if you're like, actually just don't select anything when it's moving around. I'm going to have mine off for the second, I'm going to have mine off for the moment.
Next one is Nudging. So we've done-- back and forward goes forward one frame, back one frame. So left arrow, right arrow, but if I hold down my 'Command' key on a Mac, or 'Ctrl' key on PC, and use the same ones, watch what happens to the footage down here. Left, right, I'll zoom in so you can see it. ' + ', ' + ', ' + '. With this selected I'm going to go 'Command' on a Mac, 'Ctrl' on a PC, left one, right one, just kind of nudges it along, and you're like, "When would you ever use that?" It is just helpful sometimes, because sometimes the Playhead kind of likes to jump to things, and in our case it's going to work really well.
I'm going to zoom out, I want to grab this, and I can't even remember which one it is, but this is the good voiceover. I think it's this one. What you want to do is you're doing some manual aligning, right? You're trying to see when he starts talking, he, that's me, and I come in there, and you're trying to line these things up, right? Here I am. "Hi, my name is Dan." It's not quite right, but you can zoom in and then you can use your nudge to kind of try and align the peaks of this. You can see the peaks a little bit easier by dragging this down. Fine, where I started saying "Hi, and I bet you this, has got to go left. So I'm holding my 'Command' key down on my Mac, 'Ctrl' key on a PC, just nudging along.
There'll be things you need to line up, logos, brands, different waveforms, sound effects. "Hi, my name is Dan, and I love…" It's not the right one, but you get the idea. If you are still doing this manually, there's times where you do need to. Let me show you the quick way. So I'm going to delete both of these, because I have got both the bad audio. Remember this? "My name is Dan, and I…" The old toilet audio, and then I've got the good stuff. I'm going to put you over there, anywhere really. I'm going to select them both, right click any one of them, and say, sync, where are you? Synchronized, there it is, it's grayed out, why is it grayed out? I think it's on the same track. These guys need to be on different tracks. Select them both, right click, now I can synchronize, and it's going to say, what would you like to do? Let's synchronize the audio, because I've got the bad audio and the good audio, and hopefully it will do some Premiere Pro magic. Backslash, ' \ ', look at that, it found the right one, we were close.
There it is there, let's have a listen. "Hi, my name is Dan." It's got both audio tracks going, and I mute the bad one. "I love animating infographics." There you go, it's lined it up automatically. So just make sure you're recording all the bad audio on your camera, and your good audio on something else so that it can match it up. Way easier than the manual way. So let's do a few tricks, let's get our Playhead kind of just before I start talking, and do you remember, the Ripple Edit was Q. Kind of trimmed it off, got rid of that, I don't need all this stuff. I can click this gap here, goes all the way to the beginning, find the end.
"…boring data to life using After Effects." Space bar. What's the Ripple Out, remember? 'W'. There's this little bit left here, you're gone. I want to unlink these without using the right click, 'Unlink' option, because Unlink is there, and it's not hard, but man, this is big, and you're like, unlink, unlink. Here it is, every single time, maybe just me, but remember, if you hold down the 'Option' key on a Mac, 'Alt' key on a PC, click it once, delete it, let's move him up. We don't have to group them but it feels good. Let's right click it, search through it, find Group. Unmute this, and you'll notice over here, it's not quite loud enough.
A really super easy shortcut for all dialogue; man, this is good. With it selected, make sure the audio is selected, go to your 'Window', find 'Essential Sound', grab it. 'Essential Sound', click I am 'Dialogue', I need to be-- if this is closed, open up 'Loudness', click 'Auto Match', watch what happens. "… and bringing potentially boring data to life." Look at that. minus, ' - ', because it's bouncing around in the right areas now. "I love animating infographic." The audio is not amazing, but it's better than the camera stuff, too good. I want to go through lots of other cool stuff in here, but you have to check out my Premiere Pro Essentials course for that, bit of Advanced as well, because man, this video is getting already pretty long.
Let's get on to the next shortcut. Next let's do a little bit of tidying up. I'm not sure about you, but this thing is, it's messy, man, it's messy, especially when you're new, even when you're experienced. So first of all, backslash, ' \ ', look at that, fills it up. The other one is, there's this random area, if you can't see it, it's as small as it can get, you've got this like random important area here, you're like, it doesn't look very important, but you can right click in here. So right click in any of these V1s, probably works in A1 as well. Right click and go to this one that says, 'Delete Tracks', plural, just the plural one. You can say, actually I would like you to go and delete any video and audio tracks, all that are empty, and watch this, ready? Watching, messy, messy, messy. Nice, just a clean track. You might have two video tracks, but it can be a little bit nicer. I can make this a little bit smaller, ah, so good.
Another thing you can do is you've kind of expanded these out, and some of them are big, and some of them are small, and they're all over the place, you just want to go, actually, all you guys can you go to, can you just minimize and just be small; ah, look at that. Likewise you can go in here and say, actually, everyone be expanded. Just so that you don't have to go and do this whole fun game of like, "Oh, they got the right one, is this the right one?" Ah. There is a shortcut for it as well, hold down the 'Shift' key, and hit minus, ' - ' to make them small, and plus, ' + ' to make them big. Cool, eh; hold 'Shift', ' + ', ' - ', you have to actually have, a blue line running in here. So click anywhere in this, ' + ', ' - ', holding 'Shift', nice.
The next one's not even really a shortcut but it's my gift to you, especially if you're-- you don't use Premiere Pro very often, you end up with things like this, and you're like, "What is all this gray stuff, where did it come from?" It's probably because you hit your X key or your forward slash key, instead of your backslash key, and you're like, you've ignored it for ages and it works fine, Just right click in this gray area, and go to 'Clear In and Out Points'. You can use in and out points for good, but most of the time people accidentally put them in, and you just live with it, right click, 'Clear In and Out'.
Next thing I want to show you is the hidden buttons. In your Program Monitor, there's this little ' + ' button down the bottom, click on it. There's a bunch of stuff that you might use, much of stuff you won't use, I only used one or two things out of here. Probably the most useful is this Loop Playback. To use it, it's kind of weird, you kind of hold it and drag it, and dump it into there, anywhere you want, click 'OK', and now we can loop our playback. Why that's good is let's say that I am trying to do the timing for this, I want to sit back and kind of get a feel for it, instead of having to go all the way back to the beginning, you drag your Playhead, you've done that a million times. You can set an in point, which is 'I' on my keyboard, and then put an out point, which is an 'O', then turn that on, hit 'Play', kick back, I am actually kicking back.
Just watching, just to get a feel for the timing. Who remembers how to get rid of this frustrating gray stuff? You remember, right click it, 'Clear In and Out'. Then it will just actually play the whole thing over. It will get to the end, my end actually is a bit there. Watch. Go back to the beginning. "When I first started doing…" Cool, eh; have a little dig through there, there'll be stuff that you use. If you're a multi-cam person that's quite useful in there. Toggling proxies if you're hard core, I'm going to do that. Turn it off, next shortcut, please.
Let's look at adding a transition. so if I want to add a default transition, which is by default Cross Dissolve, I need my cursor, I can set my Playhead between two bits of footage, and it's not going to work, 'Command D' on a Mac, 'Ctrl D' on a PC, you're going to have nothing selected. Then do the exact same shortcut, and that will apply your Cross Dissolve. You can do it from all, select them all and hit 'Command D', or, you just can't have one selected, you can have two of them selected, watch this. You two, 'Command D'. Now there is a shortcut for the default transition for audio. Constant Gain, I think it is. So again, between the two you just hold 'Shift - Command - D'. So that's 'Shift - Ctrl - D' on a PC. That will do your default audio transition. You can do them all in one go, select them all, and go, a weird one, just 'Shift', and 'D' by itself, no other keys. Same for both Mac and PC.
Really good if you are banging out lots of the same thing, with all the same sort of transitions, if Cross Dissolve isn't your thing, or Constant Power, you can go and change your presets, under your Effects Panel, find your video transitions, find the one you want. Let's say I'm going to be the Dip to Black. Just right click it and say, you are now my default transition. Select all these guys, 'Command D'. Now we've got--
One thing I want to show you is this. It's another, less of a shortcut and more of a, saving your sanity, like why is this transition-- this one's in the middle, this one's not? Ah, man, I wish-- can I just-- why won't it go in the middle, you can force it. You can go, make sure it's selected, go to your 'Effects Controls', so we've got the transition selected. We can say, no don't start a cut, I want you to start at the center, I'm going to force you to. It kind of freaks out a little bit but it works perfect, especially with a Dip to Black at least. Nice. Symmetrical. The little shaded line says, I can't really do it but I'm trying to do my best. Works kind of okay with the Cross Dissolve, not as well. With a Cross Dissolve, is the same kind of thing, you just force it to it, by selecting it, but you watch, it will just pause her, until it kind of starts going. She's kind of paused all this time and then launches into life, but who's going to know? You might. That is transition shortcut goodness.
Next one is the scroll wheel on your mouse. Not everyone has one but if you do, it's that thing in the middle there. By default it does something really kind of weird. It just moves up and down if you've got a few tracks, but if you hold down the 'Shift' key, that's really good. Goes back and forth, kind of scrubs the Timeline, instead of dragging this ridiculous thing, so hold 'Shift', to scroll your wheel up and down. You can hold down the 'Option' key on a Mac, 'Alt' key on a PC, and it zooms in, that's a real good one, and it's wherever your Playhead is, sorry, your mouse. So it doesn't really matter where that is, you can just go, I want to zoom into this bit. Make sure you're zooming in. So wherever your mouse is pointed it will zoom. That will work with pinching and zooming on a trackpad. It does at least on my MacBook Pro.
This next shortcut is probably one of my most favorites. I'm not sure why I left it this late in the video, but if you're still around it's like a prize. So I'm working on this Wedding, and Wedding footage, there's so much of it, let me show you. So I've gone full screen, that's, remember, Tilde, or the uptick, that's not the shortcut, but I just want to show you all this, look, there's just lots going on, right? What I want to do is, actually give you a little bonus shortcut. If you want to close all these down in one go, hold down the 'Option' key on a Mac, 'Alt' key on a PC, and just click on one of them. Look, they all get collapsed if you've got a big mess of bins open.
That is also not the shortcut. So I'm going to come back out of that, what I want to do is, I have no idea which bin this footage is, what it's called, what the in and out points are. So with it selected, tap your 'F' key on your keyboard, and it takes you to the Source Monitor, takes you to the in and out points, tells you the name, what codes you got, what in points, what out points. Just a real helpful one if you're like, "Where did this one, where is that one kept?" Shows you where it is, there's in and out points. I can make adjustments, grab it, know that I've used it already. That's the 'F' key, it's called Match Frame.
Okay, this is like an impromptu tip/shortcut, because I was opening something and it's missing some footage. You've all done it and you're like, "Okay, cool," and you're like, "Okay, I can locate it," and you spend ages just hacking around, this thing's a weird window. Just to make things easier, if you kind of vaguely know where it is, I know that it's not on my desktop, I know it's in this Dropbox folder somewhere, somewhere. Just click 'Display' - check this on, it's not normally on. - and just click 'Search' and kick back, and it will find the exact word. As long as you haven't changed the name, makes things and life easy. You can see there was three other graphics that it needed, but because they're all kind of in the same boat, or at least the same location, just linked them all. Great if you have to kind of move things off, to different documents or hard drives.
Anyway, that's an extra little tip. Let's talk about Time Codes and Markers, let's say you're doing an Instagram thing here, and you're like, "How long can this be?" You know that it has to be, you've checked, Instagram story video is 15 seconds, type in '00' for the frames, hit 'Enter', jumps out. Hit 'M' for your marker, you know, that's how long it needs to be. So everything here needs to - select all of this. - come out to this, there we go, little visual reference.
Another cool thing with your Timeline is, forget Instagram stories, and let's just say I get to the end here, and I need it to be another 10 seconds. What you can do is click, instead of doing Math, which I'm terrible at, I can just say +10 seconds and 0 frames, hit 'Enter', and it jumps out, 'M' for a marker. You can even minus, not that I've ever done that, but you can, just type over the top. Let's go -1 second, 0 frames, 'Enter'. Look at that, jumping around.
Next shortcut, I'm playing this and I want to get a full screen look at it. Instead of watching it in the program even-- instead of watching it in the program window, remember we can hit that Tilde/grave key/squiggly back tick thing. We've used to kind of make it bigger but we can also, make sure your mouse is over the top of it, and hold 'Control ' first, both Mac and PC, and then hit the key, and it goes full screen, then we get to watch it. You have to use spacebar because you've got no controls, to turn it off, turn it back on, and when you're finished, hit 'Esc', it jumps back in, that's cinema mode. Hold down 'Control' and then hit that crazy key, that's somewhere on your keyboard. So we've done the marker thing, and I should have edited it in then, but let's say I get to here, I'm like, "Yeah, I definitely need a marker right here."
So I've got nothing selected, hit my marker so it ends up up here, and a cool little trick is you can hold down, the 'Option' key on a Mac, 'Alt' key on a PC, and click it once and it turns into this strange looking thing. You're like, "What is that? I can drag it one side." Look at that, I can kind of like use a marker for like an area. I can say, actually I want all of this to be a marker. You can make it even better by double clicking it, and say, 'Needs New Quote'. You might be adding notes for a colleague, or just a reminder for yourself. Starts life as a regular marker but if you hit 'Alt' on a PC, or 'Option' on a Mac, you can click it and it turns into that little stretchy guy.
Nice; next handy shortcut, I do this surprisingly a lot, is I've got some video, I just want to check it for a couple of things, I want to see what it is. You can drag it into Premiere Pro without actually opening it. You need to be able to see your Source Monitor, and if you just drag it directly from your Finder or your Window, straight into the Source Monitor, it does a cool thing, it means I get to play it and kind of look at it, but it's not imported into my project, because this actually has nothing to do with this project. I just wanted to see what the file was, I can check some stuff about it. I can do the things you normally can do in the Source Monitor. There's no audio, it plays just fine, I know what it is, I can then add it, and it will be brought into my Project Window, but at the moment it's just like this temporary thing. I do it quite a lot when I record my own headshot stuff, and I just want to check the audio and video levels, make sure it's all in focus without actually creating a project, and sticking it, I just drag it into the Source Monitor. If you go and open up something else in your Source Monitor, let's open something else, it's gone, we're just like it was never there.
The next one is, you hold down the 'Shift' key, hold it down on your keyboard, and then you can hit the numbers, it can't be-- not the number keypad, if you've got it, the ones that are just above all the letters. Just kind of toggles through all the different panels. Now there's no real reason to go from the Program Window down to the Timeline. So hold 'Shift 3', kind of jumps down there. What is really helpful is, this whole thing, where you've got project, and there's Effects Controls, and they're all kind of small and squished, and they're down here and you can't get to them. It's handy to know that if I go 'Shift 1', I go to my Project panel. If I go to 'Shift 2', go to my Source panel. So I use 1, 2, 5, and 7. Those are the kind of ones that I end up toggling between, because they're all a bit strange. So hold 'Shift' down, toggle those top ones, there are other ones, and you might be like, "How do you remember those ones?" To be honest, I only remember those ones because I got this fancy keyboard, which I'll show you, I'll show you now, I guess.
So this is my setup, setup? I've plugged a keyboard into my laptop, and it will monitor into my laptop, you got it. So this is the keyboard here, let me zoom in. The wrong way, honest, that was another project. Anyway, this is the keyboard, you just plug it in, and, there's a Mac and a PC version of this. It is from a website called Editor Keys. If you go to 'bringyourownlaptop.com/keyboard', it will take you there, it's an affiliate link that I've got with them, but you can go directly to them if you would rather. They give me a small commission on sales. Yeah, it's a cool keyboard, now who's it good for? It's good for people that are brand new, that are only just getting started in Premiere Pro, and it's, it's just for, like, I'm finding it now, I'm not using it as much anymore. I've just got to a point now where, you know, I'm using Premiere Pro enough, and I know the shortcuts well enough, that I don't actually check the keyboard shortcuts anymore, but it was super handy for me to get from kind of like moderate to advanced, at least in terms of shortcuts, because it's just, like when you're waiting for things to render, or your poor machine to catch up you kind of just look on your keyboard, and you're like, "Oh, look at that, Match Frame tool." That makes sense, you kind of know where it-- you know what it does, but you just don't know what the shortcut is off by heart.
They've kind of grouped all these things into cool colors as well. Kind of-- in and out points, you can see we've talked about, like the dumb Ripple Edit is B, but yeah, up to you, now I got this corded version. I got that one, not that one there, I wish I did. I went and just bought my own version, before I had any sort of kind of relationship, with Editor Keys, at least in terms of affiliates, and I cheaped, I wish I didn't, because Mark, Mark Brown, I think he's guy that runs it, he-- there's Premiere Pro options, there's all sorts of different video editing options, but I went in for this one. Actually no, I went for the corded version, it's not even there anymore. Oh yeah, there's a wired and wireless. A, I wish I went for wireless, and then, B, I wish I went for the backlit pretty version. Anything but the cheapest one that I got.
You can get covers for different Macs, not for all of them, like they just-- they do a few for Surface and some MacBooks, but not all of them, it's up to you, kind of what you're using. Obviously it's cheaper just to get a skin, but anyway it was really cool. They do some other cool stuff as well, they do it for Photoshop and Illustrator, but yeah, how many keyboards do you need? It really depends, if you're going to be doing, a little bit of Premiere Pro every now and again, then the keyboard's probably not right for you, but if you are, like serious about it, or doing some regular work in Premiere Pro, whip out the old keyboard, save a few minutes every day, it all adds up.
All right, ultimate shortcuts video over. On to the next video, our last video.
What are the most useful Premiere Pro keyboard shortcuts?
The most useful Premiere Pro shortcuts are the ones that remove tiny repetitive jobs: \ to fit the timeline, Q and W to ripple trim, J, K and L for playback, and Cmd/Ctrl + K to cut. Learn those first, then add the workflow tricks below as you need them.
The Ultimate Adobe Premiere Pro Shortcuts and Tips
There are loads of Premiere Pro shortcuts, but the good ones do not just save a second here and there. They stop you fiddling with tools, dragging clips about, zooming in and out, and generally doing the same weird little dance all day long.
Here is the ultimate collection: timeline navigation, trimming, importing, audio syncing, markers, transitions, panel tricks, and a few bonus bits that make Premiere Pro much less messy.
See More of Your Timeline Instantly
Fit the entire sequence with backslash
Tap \, the backslash key, to fit the full timeline into view. This is probably the shortcut I use most.
It is especially handy after trimming a section. Rather than constantly adjusting the timeline zoom, hit backslash and Premiere Pro fits the current sequence nicely into the available space. Tap it again and Premiere returns to the previous zoom level, although I mostly use it simply to refit the edit after making changes.
Make any panel full screen with tilde
Put the mouse over a panel and tap the tilde or backtick key. Depending on the keyboard, it may look like `, ~, or live somewhere slightly annoying.
It makes the panel under the pointer fill the screen. Use it for a complicated Project panel full of bins, a cramped Timeline, the Effect Controls panel, or anything else that needs room. Tap it again to return to the normal workspace.
You can combine this with backslash over the Timeline for a large, neatly fitted view of the whole edit.
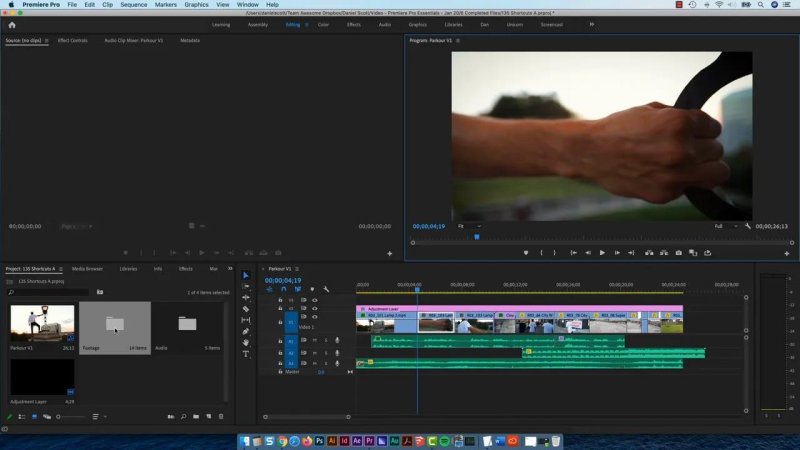
Making a busy panel full screen is much nicer than squinting at a tiny corner of the workspace.
Snap the playhead precisely with Shift
Hold Shift while dragging the playhead, also called the CTI or current-time indicator. It snaps to useful points such as clip edits and gaps.
This gets even better when you are working with keyframes. If the relevant track is selected, holding Shift lets the playhead snap to keyframes in Effect Controls. That means fewer accidental duplicate keyframes sitting one frame away from the one you actually wanted.
Cut, Delete, and Trim Without the Faffing Around
Make a razor cut at the playhead
Select the tracks you want to cut, place the playhead where you need it, then press:
Cmd + K on Mac
Ctrl + K on Windows
This adds a cut at the playhead without reaching for the Razor tool. Make several cuts, select the unwanted pieces, and remove them.
Use ripple delete to close gaps
Click a gap in the Timeline and press Delete to close it. Premiere Pro pulls the later clips back to fill the empty space.
For a selected clip or group of clips, use:
Option + Delete on Mac
Alt + Backspace on Windows
This deletes the selection and ripple deletes at the same time, closing the gap automatically. It is one of those shortcuts that feels minor until you start using it all the time.
If you somehow have hundreds of ridiculous little gaps, select the area and go to Sequence > Close Gap. Yes, it is allowed to make you a little emotional.
Ripple Edit tool: B for bad shortcut
The Ripple Edit tool is on the B key. B for bad shortcut, which is how I remember it.
Drag a clip edge with the tool and Premiere adjusts the edit while automatically closing the gap created by the trim. It is useful. You know it is there. You probably should use it more.
Q and W: ripple trim to the playhead
These are absolute favourites.
Q ripple trims the selected clip from its beginning up to the playhead.
W ripple trims the selected clip from the playhead to its end.
Make sure the clip is selected. Put the playhead where the cut should happen, press Q or W, and Premiere trims the footage and closes the space in one hit. This is sometimes called topping and tailing, and it is faster than switching tools, dragging, and trying to make the timeline tidy afterwards.
Extend a clip edge to the playhead with E
E performs an Extend Edit to Playhead. Put the playhead where the clip edge should land, use the Selection tool, and click directly on the clip edge so it turns red. Then press E.
It can extend either the start or end of a clip, but do not select the whole clip first. Premiere needs to know exactly which edge you mean. It is not the shortcut I use every day, but for the right edit it can make somebody's day.
Insert, Replace, and Rearrange Clips Faster
Insert a clip by holding Cmd or Ctrl
When dragging a clip into the Timeline, hold:
Cmd on Mac
Ctrl on Windows
Premiere opens a gap and inserts the incoming clip at that point. No manually pulling clips apart first, and no wrestling with source patching when you just need to get the footage in there.
Replace or overlay by dragging to the Program Monitor
Drag a clip from the Project panel up to the Program Monitor and Premiere offers useful drop zones, including Replace, Overlay, Insert Before, and Insert After.
Replace is particularly lovely when a clip on the cutting block needs swapping. The new clip takes its place while preserving the timing, including any transitions or animation already on that timeline clip.
Shuffle clips in image-heavy timelines
If you are moving a clip around a big stack of images, holding Cmd or Ctrl while dragging inserts it and pushes later clips along. To do the whole switcheroo without leaving a gap, hold:
Cmd + Option on Mac
Ctrl + Alt on Windows
Drag the clip to its new location and Premiere reshuffles the surrounding clips while keeping the sequence tidy.
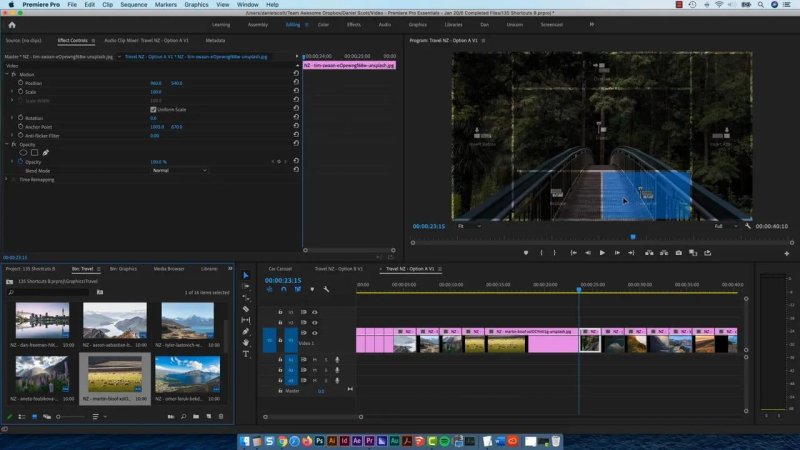
Modifier-key dragging lets the timeline shuffle clips for you instead of leaving another gap to repair.
Import Footage and Control Playback
Import without visiting the File menu
Double-click an empty area in the Project panel to open the import dialogue. You can also drag files directly from Finder or File Explorer into the Project panel.
Dragging multiple video files into the Project panel can create a sequence and put the clips into it, which is a wonderfully quick way to get an edit started.
J, K, and L playback controls
Rest your fingers around J, K, and L. They are brilliant for reviewing clips and checking an edit.
L plays forwards.
K stops playback.
J plays backwards.
Tap L again for faster forward playback.
Tap J again for faster reverse playback.
Double-speed playback is particularly useful for checking spoken footage. You may sound a bit like a chipmunk, but it is quicker than listening to every word at normal speed.
Move one frame at a time
Use the Left Arrow and Right Arrow keys to move the playhead one frame backwards or forwards. Hold Shift with either arrow to jump in five-frame increments.
This matters when Premiere snaps to the next edit point but you need the final frame of the previous clip. Snap to the edit, then go back one frame. Tiny thing. Very useful.
Jump between edits with Up and Down arrows
The Up Arrow and Down Arrow keys jump the playhead between significant points in the Timeline, such as clip starts and ends.
If Premiere ignores a clip, check track targeting on the left side of the Timeline. Generally, having the relevant video and audio tracks targeted means the navigation behaves as expected.
Separate, Sync, and Improve Audio
Select only audio or video from a linked clip
You do not always need to right-click and choose Unlink. Hold:
Option on Mac
Alt on Windows
Then click either the audio or video portion of a linked clip. You can select, delete, or move that part independently while the original clip remains linked in the timeline.
You can also drag just the small video or audio icon from the Source Monitor to add only that component to the Timeline.
Nudge clips one frame at a time
Select a clip and use:
Cmd + Left/Right Arrow on Mac
Ctrl + Left/Right Arrow on Windows
This nudges the selected clip by one frame. It is useful for manual alignment, whether you are matching a logo, a sound effect, a visual beat, or the peaks of two audio waveforms.
Synchronise external audio automatically
Manual nudging is sometimes necessary, but Premiere can do the hard work when you have camera audio and a separately recorded better track.
Put the camera clip and the external audio on different audio tracks.
Select both items.
Right-click and choose Synchronize.
Choose Audio as the synchronisation method.
Mute or delete the rough camera audio once the clips are aligned.
Premiere uses the shared audio waveform to line them up. The rough camera recording gives it something to match against, and the separate recording gives you the sound you actually want to use.
Quick dialogue loudness matching
For a fast dialogue level adjustment, select the audio clip, open Window > Essential Sound, choose Dialogue, open Loudness, then click Auto-Match.
It is not magic mastering, but it gets dialogue bouncing around a more sensible level remarkably quickly.
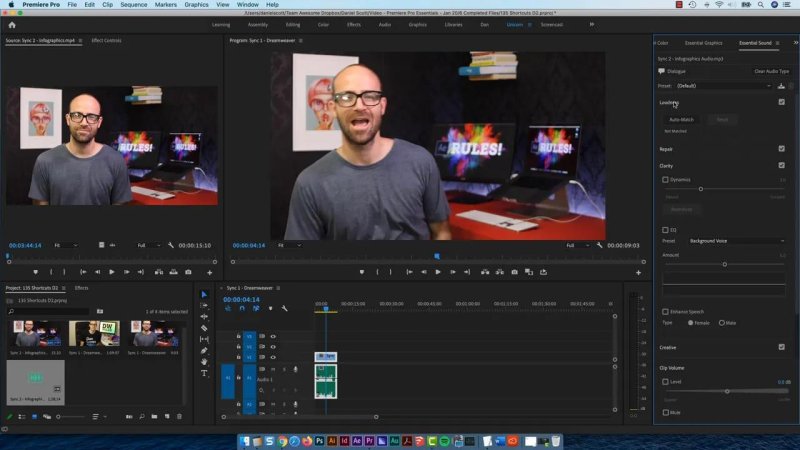
Good external audio is worth syncing, then Essential Sound can quickly bring dialogue into a sensible range.
Keep the Timeline Clean and Under Control
Delete empty tracks
Unused tracks make a Timeline feel much more chaotic than it needs to be. Right-click in the track header area, choose Delete Tracks, then delete all empty video and audio tracks.
Do choose Delete Tracks, plural. That is the useful one.
Resize all tracks together
Right-click in the track header area to make all tracks smaller or larger in one go. Alternatively, click in the Timeline so it has focus, then use:
Shift + Minus to minimise tracks
Shift + Plus to expand tracks
It saves playing the irritating game of resizing one track at a time and never grabbing quite the right edge.
Clear accidental In and Out points
If part of the Timeline is shaded grey and you have no idea why, you probably accidentally set In and Out points. Right-click the grey region and choose Clear In and Out.
In and Out points are genuinely useful, especially for playback and export ranges. But they are also very easy to create accidentally by hitting I or O.
Useful Program Monitor Buttons and Playback Tricks
Add Loop Playback
Click the + button in the Program Monitor to access its hidden button editor. Find Loop Playback, drag it into the button bar, and click OK.
To loop a specific section, set an In point with I and an Out point with O, enable Loop Playback, then press the spacebar. This is excellent when checking pacing, timing, and rhythm without repeatedly dragging the playhead back to the beginning.
Watch the Program Monitor in full screen
Move the mouse over the Program Monitor, hold Ctrl, and press the tilde or backtick key. This opens a proper full-screen playback view.
Use the Spacebar to play and pause, then press Escape when you are finished. It is a much better way to judge an edit than staring at a small Program Monitor surrounded by panels.
Transitions Without Manually Applying Every One
Apply the default video transition
Put the playhead on an edit point and make sure a single clip is not selected. Then press:
Cmd + D on Mac
Ctrl + D on Windows
Premiere applies the default video transition, normally Cross Dissolve. You can also select multiple clips or edit points and apply the transition in one go.
Apply the default audio transition
For the default audio transition, use:
Shift + Cmd + D on Mac
Shift + Ctrl + D on Windows
The default is usually Constant Power. This is excellent for applying quick audio fades across a batch of edits.
Change what the default transition is
If Cross Dissolve is not your thing, open the Effects panel, find the video transition you prefer, right-click it, and choose Set Selected as Default Transition.
For example, set Dip to Black as the default, select a group of edits, press Cmd/Ctrl + D, and all the transitions are applied in one hit.
Force a transition to centre on the cut
Sometimes Premiere places a transition entirely on one side of an edit because there are not enough handles. Select the transition, open Effect Controls, and change its alignment to Center at Cut.
Premiere may show a shaded warning line because it does not have enough footage to perform a perfect centred transition. It can still look good, especially with Dip to Black. With a Cross Dissolve, it may freeze slightly on one side, so use your eyeballs and decide whether it works.
Mouse Wheel Shortcuts That Are Actually Good
If your mouse has a scroll wheel, it can do more than move vertically through tracks.
Hold Shift and scroll to move horizontally through the Timeline.
Hold Option on Mac or Alt on Windows and scroll to zoom in or out where the mouse pointer is.
The zoom follows the mouse position, which is the nice part. Point at the exact bit of the Timeline you want to inspect, then zoom directly into it. Trackpad pinch-to-zoom can do a similar job.
Find Footage, Fix Missing Media, and Work With Markers
Find the source clip with Match Frame
Select a clip in the Timeline and press F for Match Frame. Premiere opens that source clip in the Source Monitor, showing its name and its original In and Out points.
This is brilliant when you are staring at a shot in an enormous wedding sequence and thinking, where on earth did this one live? Now you can find it, inspect it, adjust its source points, and see that it has already been used.
Relink missing media more easily
When Premiere cannot find a file, use the Locate window's Display Only Exact Name Matches option if you roughly know the folder where the footage belongs. Then search for the missing file.
As long as the name has not changed, Premiere can find the exact media much more quickly. If multiple missing assets live in the same location, link them together while you are there.
Type timecode maths directly
Need a marker exactly 15 seconds from the start for a short-form video? Click the timecode field, type the timecode with 00 frames, press Enter, then press M to add a marker.
You can also type relative values. Want a marker ten seconds later? Enter +10 seconds and zero frames. Need to move back? Enter a negative value. Premiere does the timecode maths, so you do not have to.
Turn a marker into a duration marker
Press M to add a standard marker. Then hold Option on Mac or Alt on Windows and click the marker. It becomes a stretchy duration marker that can be dragged from either side.
Double-click it to add a name or note, such as a reminder to change a quote or feedback for a colleague. A normal marker says, “something happens here.” A duration marker says, “this whole bit needs attention.”
Preview Files Before Importing Them
Sometimes you only want to check what a file is, whether it is in focus, or whether its audio is okay. Drag the file from Finder or File Explorer straight into the Source Monitor.
You can preview it without importing it into the Project panel. If it turns out to be the file you need, edit it into the Timeline and Premiere imports it then. If not, open something else in the Source Monitor and it disappears as if it was never there.
Move Between Panels With Shift and Number Keys
Hold Shift and use the number row above the letters, not the numeric keypad, to focus different Premiere Pro panels. The especially useful ones are:
Shift + 1 for the Project panel
Shift + 2 for the Source Monitor
Shift + 5 and Shift + 7 for other commonly used workspace panels
The big win is getting to a panel that is currently tiny or hidden among tabbed panels, especially Project and Effect Controls. You do not need to memorise every number. Learn the few that fit your own workflow.
Should You Buy a Premiere Pro Shortcut Keyboard?
A dedicated keyboard with colour-coded Premiere Pro shortcuts can be very useful when you are new or becoming more serious about editing. It is less about needing fancy gear and more about having the commands in front of you while the shortcuts become muscle memory.
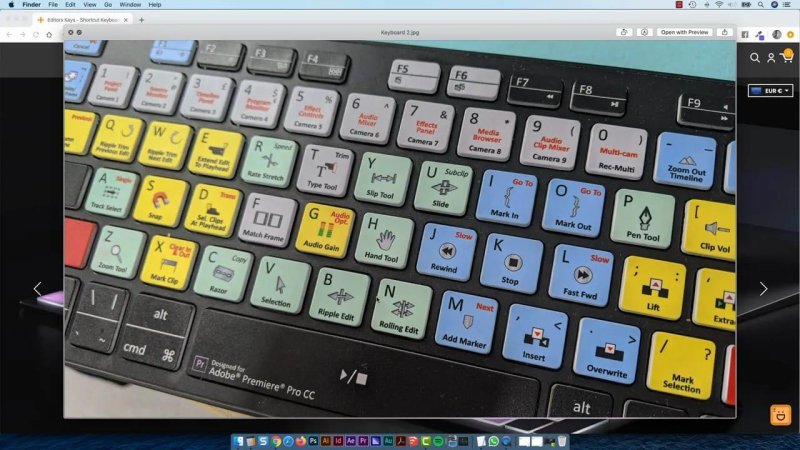
A labelled shortcut keyboard can help regular editors learn commands without constantly searching through menus.
As you edit more, you will probably stop looking at the labels. That is fine. The keyboard has still done its job.
It is most worthwhile if you use Premiere Pro regularly and want to save small chunks of time every day. If you only open Premiere every now and then, a keyboard cover or a printed shortcut sheet is probably the more sensible option.
The Shortcuts Worth Learning First
Do not try to memorise everything at once. Start with the commands that remove the most repetitive work:
\ to fit the Timeline
` or ~ to maximise the panel under the mouse
Shift while dragging to snap the playhead
Cmd/Ctrl + K to add cuts
Q and W to ripple trim
J, K and L for playback control
Left and Right Arrow for frame-by-frame navigation
Up and Down Arrow to jump between edits
Option/Alt + Delete for ripple delete
Cmd/Ctrl + D for the default video transition
F for Match Frame
M for markers
Get those into your hands and Premiere Pro starts feeling less like a collection of tiny obstacles. A few minutes saved on every edit adds up rather nicely.
FAQs
What does the backslash key do in Premiere Pro?
The backslash key fits the entire active sequence into the Timeline panel. Press it again to return to the previous timeline zoom level.
What are Q and W used for in Premiere Pro?
Q ripple trims a selected clip from its start to the playhead, while W ripple trims from the playhead to the clip end. Both commands close the resulting gap automatically.
How do I add a quick cut in Premiere Pro?
Place the playhead where the cut should go, select the relevant tracks, then press Cmd + K on Mac or Ctrl + K on Windows.
How do I synchronise camera audio with an external recording in Premiere Pro?
Place the camera clip and separate audio file on different tracks, select both, right-click, choose Synchronize, and select Audio. Premiere Pro matches their waveforms and aligns them automatically.
How do I make a Premiere Pro panel full screen?
Put the mouse pointer over the panel and press the tilde or backtick key. Press the same key again to restore the normal workspace layout.
Written by Daniel Walter Scott — Founder of Bring Your Own Laptop & Chief Instructor
