How to use an adjustment Layer in Premiere Pro
Questions




Student Gallery
Course info
Overview
I am here to help you learn Adobe Premiere Pro and to show you the tools you need to become a successful video editor. Premiere Pro is the industry standard used by professional designers to create stunning, high class videos and, after completing this course, you too can become a confident, skillful and efficient creator of stunning videos.
This course is aimed at people who are completely new to Premiere Pro.
If you are self taught using Premiere, this course will show you techniques you never dreamed were necessary or possible and will show you efficiencies to help speed up your workflow.
The course covers many topics - all of them on a step-by-step basis. We will use real world video editing examples to work through:
- An interview
- A wedding video
- A short commercial
- A documentary
- Social media advertising videos
- YouTube ‘how to’ videos
- Talking head footage mixed with screencasts and voiceovers
We will work with text, animation, motion gfx, special effects and we will add music to our video.
We will learn how to do colour correction, colour balancing and also how to create amazing video transitions within our movie. Technical ‘guru’ topics such as HD v 4K, frames per second, exporting work, fixing up bad audio, balancing and synching audio will all become manageable tasks for you. Best of all...I will show you amazing shortcuts and techniques to speed up your workflow.
Throughout the course we will work on mini projects and I will be suggesting assignments which will add value to your portfolio.
Start your Premiere Pro training now and fast track your career as a video editor.
* Please note, you have full permission to transform and upload any work using footage of Daniel as a part of this course.

Daniel Walter Scott
Founder of Bring Your Own Laptop & Chief Instructor
I discovered the world of design as an art student when I stumbled upon a lab full of green & blue iMac G3’s. My initial curiosity around using the computer to create ‘art’ developed into a full-blown passion, eventually leading me to become a digital designer and founder of Bring Your Own Laptop.
Sharing and teaching are a huge part of who I am. As a certified Adobe instructor, I've had the honor of winning multiple Adobe teaching awards at their annual MAX conference. I see Bring Your Own Laptop as the supportive community I wished for when I was first starting out and intimidated by design. Through teaching, I hope to bring others along for the ride and empower my students to bring their stories, labors of love, and art into the world.
True to my Kiwi roots, I've lived in many places, and currently, I reside in Ireland with my wife and kids.
Certificates
We’re awarding certificates for this course!
Check out the How to earn your certificate video for instructions on how to earn yours and click the available certificate levels below for more information.
Downloads & Exercise files
How do you apply one colour grade to multiple clips in Premiere Pro?
Put an adjustment layer on a video track above the clips, then apply your colour grade to that layer instead of to every individual shot. Anything beneath the adjustment layer takes on the effect, so you can change, extend, disable, or remove the look in one go.
How to Use Adjustment Layers in Adobe Premiere Pro
An adjustment layer is one of those small Premiere Pro features that makes editing feel a lot less painful. Rather than adding the same creative look to clip after clip after clip, you add it once to a layer sitting above the edit.
That layer affects everything directly underneath it. Turn it on, turn it off, change the preset, reduce the intensity, or extend it as the project grows. Nice and simple.
What Is an Adjustment Layer?
Think of an adjustment layer as a transparent clip that carries effects. It does not contain footage itself, but any effect applied to it is passed down to the clips below it on the timeline.
For colour grading, this is brilliant. You can create a consistent overall look for a sequence without repeating the same Lumetri Color settings on every shot.
For example, if you want a faded-film style or a Bleach HDR look across a whole edit, place one adjustment layer over the sequence and apply the look there. All covered clips receive that grade.
Create an Adjustment Layer in Premiere Pro
Start in the Project panel. If the panel has disappeared from your workspace, look for the panel tabs or use the small double-arrow menu to find Project.
Go to the Project panel.
Click the New Item icon at the bottom of the panel. It looks like a small page with a folded corner.
Choose Adjustment Layer.
Click OK in the settings window.
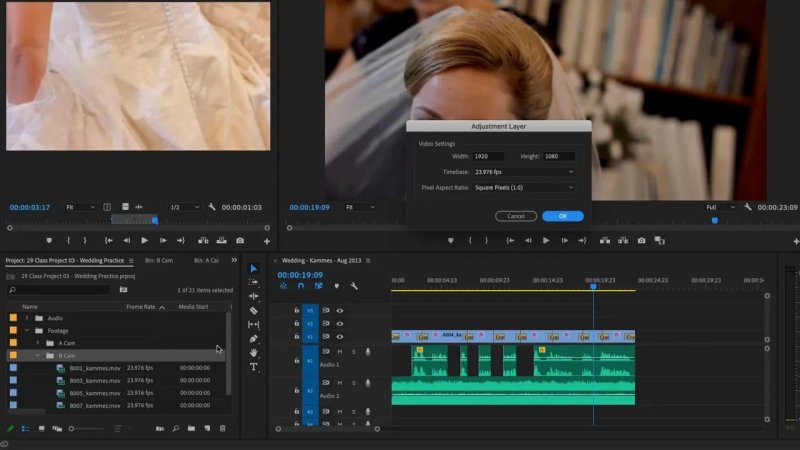
Premiere Pro creates the adjustment layer to match the dimensions of the active sequence.
Premiere Pro automatically matches the adjustment layer to the width and height of the sequence currently open, so there is usually nothing to change in the dialogue box. Click OK and you are good to go.
If the Adjustment Layer Is Created in the Wrong Bin
Here is the slightly annoying bit. Premiere Pro creates the adjustment layer inside whichever bin was selected at the time. It might land in a folder such as “Cam B” when you actually want it at the top level of the project.
No drama. Click and drag the item leftwards in the Project panel until Premiere Pro reveals the higher folder level, then drop it back in the root area. You can also rename it by double-clicking it.
Give it a name that explains its purpose, especially if the project will use several adjustment layers. Colour Grading is much more useful than leaving every item named “Adjustment Layer.”
An Alternative Way to Create One
You can also use File > New > Adjustment Layer. It is tucked away in a slightly odd place, but it works just the same.
If that option is greyed out, select the Project panel first. Premiere Pro needs that panel to be active, usually indicated by a blue outline around it.
Place the Adjustment Layer Above Your Edit
Once it exists in the Project panel, drag the adjustment layer onto a video track above the footage you want to affect. Start it at the beginning of the sequence, then drag its right edge so that it reaches across every clip that should share the look.
It needs to sit above the footage, not alongside it. The vertical track position is what tells Premiere Pro which clips the layer should affect.
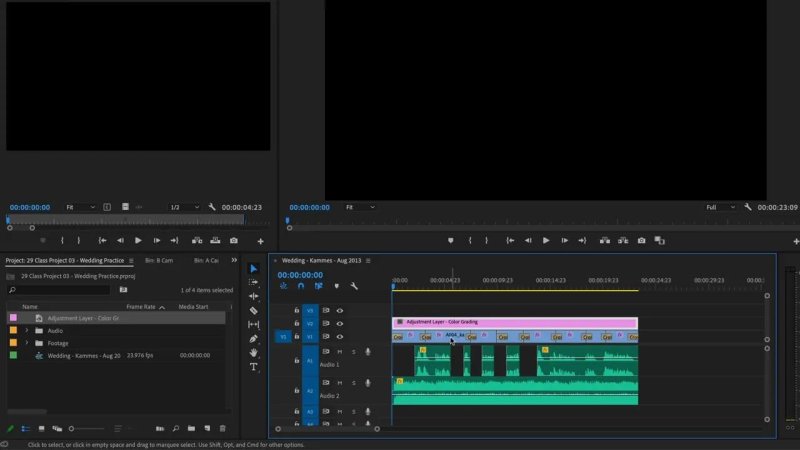
The pink adjustment layer sits above the edit, allowing one effect to cover every clip beneath it.
If you add more footage later, simply extend the adjustment layer farther down the timeline. That new footage will immediately receive the same treatment, provided it sits beneath the layer.
Remove the Old Creative Look From Individual Clips
If you have already followed the more labour-intensive route and applied a colour grade to every clip individually, there is a little cleanup job first. Remove those creative looks from the clips before putting the shared look on the adjustment layer.
Otherwise, the clips will receive both their individual grades and the adjustment-layer grade, which is not what you want.
A quicker way than resetting every setting manually is to select a clip and turn off the tick next to the Creative section in Lumetri Color. This disables the creative look on that clip. Repeat it for the clips that have already been changed.
Yes, it is a bit of pain if the work is already done. But this is the better workflow going forward.
Apply a Colour Grade to the Adjustment Layer
Now select the adjustment layer itself in the timeline. This bit matters. If a video clip is selected instead, Premiere Pro will apply the changes to that one clip rather than to the layer above everything.
With the adjustment layer selected:
Open the Lumetri Color controls.
Make sure the Creative section is enabled.
Choose the look or preset you want to use.
Adjust the look as needed.
A preset such as Bleach HDR can give the full sequence a unified stylised treatment. For a more obvious demonstration, try a strong look such as Faded Film. The change should appear across all clips under the adjustment layer.
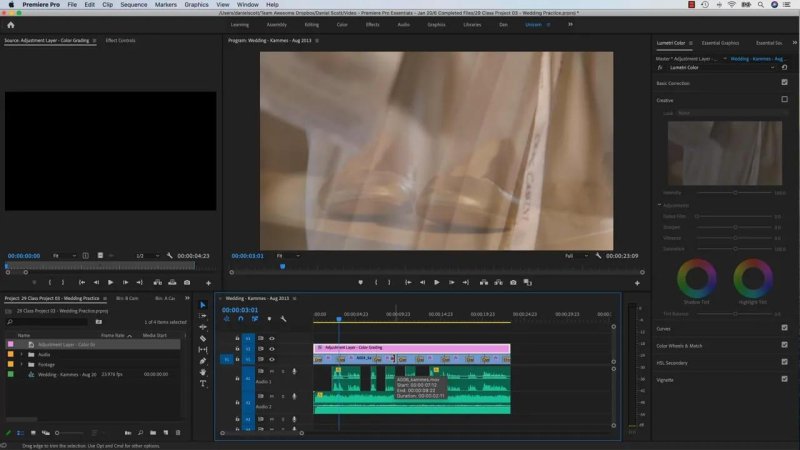
One long adjustment layer makes a sequence-wide colour grade easy to manage and revise.
Colour Correction vs Colour Grading: When to Use an Adjustment Layer
This distinction is important. An adjustment layer is especially useful for colour grading, meaning the creative overall look you want the final edit to have.
Individual clips often still need their own colour correction. Correction fixes issues in the original footage, such as shots being too dark, too warm, or simply different from the next shot.
If clips were filmed in different rooms or under different lighting, correct them individually first. One shared grade cannot properly fix footage with different exposure or white-balance problems.
On the other hand, if everything was shot in the same scene and the lighting has not changed, an adjustment layer can handle a general correction or a shared look very nicely. This is common in straightforward how-to videos where the camera setup remains consistent.
Why This Workflow Is So Useful
One change updates everything: Adjust the grade once instead of editing every clip.
Easy before-and-after checks: Disable the adjustment layer to compare the look with the original footage.
Consistent style: The same creative grade carries across the covered part of the sequence.
Simple revisions: Swap presets or tweak controls without rebuilding your individual clip grades.
Easy to expand: Drag the layer longer whenever more footage is added.
That is the magic of the adjustment layer. Keep clip-level correction for footage that genuinely needs it, then use an adjustment layer to apply the shared colour grading goodness across the whole edit.
FAQs
Does an adjustment layer affect every clip in Premiere Pro?
It affects the clips directly below it for as long as the adjustment layer covers them on the timeline. Clips outside its duration or on tracks above it will not receive its effects.
Why is the Adjustment Layer option greyed out?
The Project panel is probably not active. Click inside the Project panel so it becomes selected, then try creating the adjustment layer again.
Should I colour correct clips before using an adjustment layer?
Usually, yes. Correct individual exposure and lighting differences first, then add an adjustment layer for the shared creative grade. If all footage was shot under the same conditions, one layer can sometimes handle the general correction too.
Can I turn off an adjustment-layer colour grade?
Yes. Disable the adjustment layer or its applied effect to remove the look from every covered clip at once. This makes comparing the graded and original versions very easy.
Written by Daniel Walter Scott — Founder of Bring Your Own Laptop & Chief Instructor
