Removing background noise like fans aircon fridge hum in Premiere
Questions


Student Gallery
Be the first to share something.
Course info
Overview
I am here to help you learn Adobe Premiere Pro and to show you the tools you need to become a successful video editor. Premiere Pro is the industry standard used by professional designers to create stunning, high class videos and, after completing this course, you too can become a confident, skillful and efficient creator of stunning videos.
This course is aimed at people who are completely new to Premiere Pro.
If you are self taught using Premiere, this course will show you techniques you never dreamed were necessary or possible and will show you efficiencies to help speed up your workflow.
The course covers many topics - all of them on a step-by-step basis. We will use real world video editing examples to work through:
- An interview
- A wedding video
- A short commercial
- A documentary
- Social media advertising videos
- YouTube ‘how to’ videos
- Talking head footage mixed with screencasts and voiceovers
We will work with text, animation, motion gfx, special effects and we will add music to our video.
We will learn how to do colour correction, colour balancing and also how to create amazing video transitions within our movie. Technical ‘guru’ topics such as HD v 4K, frames per second, exporting work, fixing up bad audio, balancing and synching audio will all become manageable tasks for you. Best of all...I will show you amazing shortcuts and techniques to speed up your workflow.
Throughout the course we will work on mini projects and I will be suggesting assignments which will add value to your portfolio.
Start your Premiere Pro training now and fast track your career as a video editor.
* Please note, you have full permission to transform and upload any work using footage of Daniel as a part of this course.

Daniel Walter Scott
Founder of Bring Your Own Laptop & Chief Instructor
I discovered the world of design as an art student when I stumbled upon a lab full of green & blue iMac G3’s. My initial curiosity around using the computer to create ‘art’ developed into a full-blown passion, eventually leading me to become a digital designer and founder of Bring Your Own Laptop.
Sharing and teaching are a huge part of who I am. As a certified Adobe instructor, I've had the honor of winning multiple Adobe teaching awards at their annual MAX conference. I see Bring Your Own Laptop as the supportive community I wished for when I was first starting out and intimidated by design. Through teaching, I hope to bring others along for the ride and empower my students to bring their stories, labors of love, and art into the world.
True to my Kiwi roots, I've lived in many places, and currently, I reside in Ireland with my wife and kids.
Certificates
We’re awarding certificates for this course!
Check out the How to earn your certificate video for instructions on how to earn yours and click the available certificate levels below for more information.
Downloads & Exercise files
Transcript
To remove it, let's find-- I've got some footage in here, that has the bad audio in it, and for some reason I left it in the Audio, actual folder. It's got video on it, bad me. Let's leave it in there for the tutorial, so that you don't get lost under Audio. Something called Bad Audio Background. Let's find it, let's make a sequence from it. We won't dump it into our current sequence, so right click it, go to 'New Sequence from Clip'. Let's name this clip, let's call this one 'Audio Fixing'. We'll use this for a few of the next tutorials as well.
Remember, to get this out of here click, hold, drag it to the left. Kind of comes out, close it up, there we are. So let's have a little listen together, we'll play it all the way through, because I do end up describing stuff, so let's have a listen. To look at repair we're going to try and remove some background noise. You can probably hear it, maybe, I've got an electric fan plugged in, and it's humming away in the background. It's consistent, which is useful, for getting rid of background noises, maybe fridges, air-con, fans, let's see if we can repair it now.
So that is it, you can kind of hear. I've left the gap at the beginning here, of it, because it's very clear by itself, listen. You hear a humming, and I can see it humming, can you see down here? This is-- we'll call-- like what we're going to do is remove, like tidy up the noise flow. So kind of like the stuff down the bottom here, this background goop. Ours is coming from a fan that I purposely put on, like a little fan heater, but it works really good as well for like fridges, air-con. Works only really good for microphones as well. So if you've got a microphone that's got a background hiss, it might be that you're probably pushing it past its operating, you know, if you if you find you've got this, like 'sssss' in the background, it means your microphone's not happy, and it's not in the scope of this course to go through and fix your microphone, but check out things like raising the noise flow for microphones.
Normally it's to do with your preamp, anyway it's a bit nerdy. Let's say we want to get rid of it. So to do it, have your clip selected, find your Essential Sounds, remember, if you can't find it, 'Window, 'Essential Sounds', and we're going to, in our case it's Dialogue. I want to try and get rid of it from behind me. There's lots of things in here, I like to click these buttons, just to tidy everything up, clean them all up, and click on 'repair', and you want this one here, it says 'Reduce Noise', turn that on. It's set to 5 by default, and that's probably going to work.
So back to the beginning, listen. To look at-- pretty good, huh? Now it's pretty amazing for those background noises, like I just literally grabbed the fan and try to break it, and it fixes that up nicely. Now it's really good with consistent sounds. When there's kind of cars in the background, and it's all up and down, and it doesn't-- it's not that good, it will tidy it up. Now we've used Reduce Noise, at default, kind of halfway strength. You can turn it up and down, but let's have a little listen. I'll show you how to preview it, because you're like, "Sounds the same."
The way to do it is, see this little tick next to Repair, I'm going to hit 'Spacebar' to play, and I'm going to turn this on and off as it goes through. So you watch my tick, and just give a listen to what's going on. You might have to turn your volume up to hear it. So I will turn it off first. To look at-- you hear that? One more time. You can see it there, well you can see it actually in here, watch this. So the noise flow down the bottom here, with it off, can you see, it jumps up to about -36 decibels, whereas if I have it on, look what happens. It's a lot lower, it's still there.
You got to decide whether it's noticeable enough for you. There will always be something jumping around down the bottom here. You want to try and clean it up as much as you can. The trouble is, if I crank the Reduce Noise up, it will go, watch this, but-- to look at repair we're going to try and remove some background noise. There's a weirdness that happens to your voice. You might decide that it's perfectly fine, but I notice it, probably hear it, maybe. I've got an electric fan. Will the audience notice that? You might because you've heard me so much in this course so far, but let's say I'm sending this out for a YouTube video, nobody's probably going to notice. They'll probably notice more, hey, troll you on YouTube, "There's a bad noise in the background," but it's only tiny bit robotic, might be okay.
Now we're using Reduce Noise, which works perfect for this example. Reduce Rumble can help as well. Like it says, if you hover above, it's kind of a low frequency noises. So you can play around with Reduce Rumble. Don't worry that-- like, hey, he said reduce noise works background, and you're only going to use this. You might have to use a teeny tiny bit of all of this stuff. So it really depends, everyone's situation's different. You might whack them all on and just see where you go.
DeEss, Reverb, we're going to cover a couple of more of these, a couple more in the upcoming classes, but play around with them, drag them up and down. The cool thing about it is while you're doing it, you can raise and lower this, so you can kind of get a sense for it as you're going. Again, often headphones can be really useful, because if you're just listening through your computer speakers, they're really like, they sound quite good, and then somebody puts the headphones, and you're like, "Wow." It's not as good as you thought. All right, that is repairing background noises in videos, in Premiere Pro. Let's get on to the next video.
How do I remove background noise in Premiere Pro?
Select the noisy clip, open the Essential Sound panel, assign it as Dialogue, then open Repair and enable Reduce Noise. The default setting of 5 is a very good place to start for steady hums, hisses, fans, fridges, and air conditioning noise.
How to Remove Background Noise in Premiere Pro
Background noise is not all the same, and that matters. This approach works especially well when the unwanted sound is consistent, such as the steady hum of an electric fan, a fridge, air conditioning, or a microphone hiss.
In an audio waveform, this sort of constant unwanted sound appears as activity sitting underneath the speech. Think of it as the background goop along the bottom of the waveform. That is the noise floor, and the goal is to tidy it up without making the voice sound strange.
A constant fan hum is a perfect candidate for Premiere Pro noise reduction because the sound stays fairly predictable. More variable noise, such as cars passing outside, rises and falls and changes character. Premiere Pro can still improve it, but do not expect the same near-magical cleanup you can get from a steady hum.
Set up the clip in its own sequence
Before applying repair tools, it can be useful to make a dedicated sequence from the troublesome clip. This keeps the work focused and means you are not dropping the clip into an existing edit by accident.
Find the video clip with the bad audio in the Project panel.
Right-click it.
Choose New Sequence from Clip.
Give the sequence a helpful name, such as Audio Fixing.
If the clip begins with a short section of room tone, fan noise, or hiss before the speech begins, leave it there while you work. That quiet gap makes it much easier to hear exactly what the repair is doing.
Use Essential Sound Repair to reduce noise
With the clip selected in the timeline, open the Essential Sound panel. If it is not visible, go to Window > Essential Sound.
Because the aim is to clean up speech, assign the clip to Dialogue. This reveals the dialogue-focused controls, including the Repair section.
Select the audio or video clip in the timeline.
Open Window > Essential Sound if the panel is hidden.
Click Dialogue.
Open the Repair section.
Enable Reduce Noise.
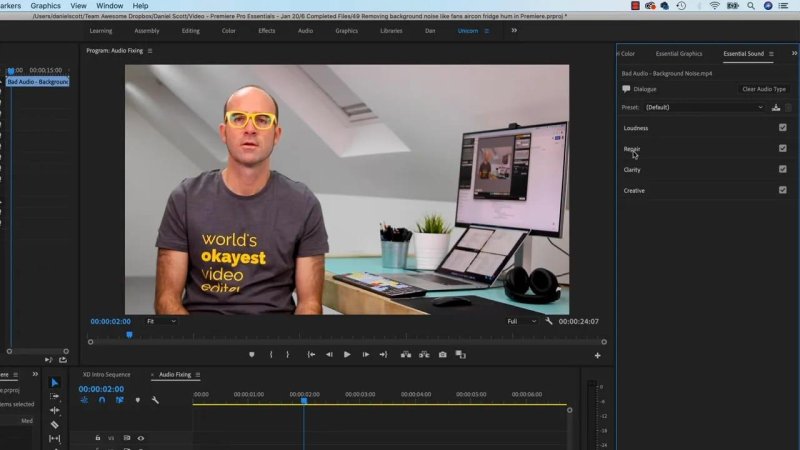
The Repair controls sit in the Dialogue category, where Reduce Noise can quickly clean up a steady background hum.
Reduce Noise starts at a value of 5, roughly halfway in strength, and it is often enough. For a continuous fan or similar hum, that default setting can make a massive difference straight away.
That is the key point: start simple. Turn on Reduce Noise, play the clip, and listen. There is no prize for using the strongest possible setting.
Compare the repair on and off
When the difference is subtle, the best way to judge it is to play the clip and toggle the Reduce Noise checkbox on and off. Hearing the untreated audio next to the repaired version makes the change much more obvious.
It also helps to look at the waveform while the clip plays. With the repair disabled, the noise floor can jump up noticeably, perhaps around minus 36 decibels in a noisy example. Switch the effect on and that activity should sit much lower.
There will nearly always be something moving at the bottom of a waveform. Audio does not become perfectly flat just because you have applied noise reduction. The practical question is whether the remaining noise is noticeable and distracting enough to justify further processing.
Do not overdo noise reduction
It is tempting to push Reduce Noise right up until the background is almost gone. The problem is that aggressive cleanup can start changing the voice itself.
At higher settings, speech can become slightly robotic, processed, or just a bit weird. You may decide that is acceptable, especially if the alternative is an annoying background hum. But it is a trade-off, so make the choice deliberately.
For many videos, a tiny trace of background noise is less distracting than an obviously overprocessed voice. People may forgive a bit of room tone. They are much more likely to notice when speech starts sounding unnatural.
Aim for the best balance, not total silence. Clean the noise up as much as you can while keeping the voice believable.
Try the other Repair controls when needed
Reduce Noise is brilliant for a general consistent background sound, but it is not the only control in the Repair section. Every recording is a bit different, so it is worth trying small amounts of more than one tool.
Reduce Noise: A good first choice for steady background noise such as fans and general room noise.
Reduce Rumble: Useful for low-frequency noises. Hover over the control in Premiere Pro for its description, then experiment with it.
DeHum: Worth trying when an electrical hum is part of the problem.
DeHiss: Helpful when the issue is a high, steady microphone-like hiss.
Reduce Reverb: A separate repair option for overly echoey recordings.
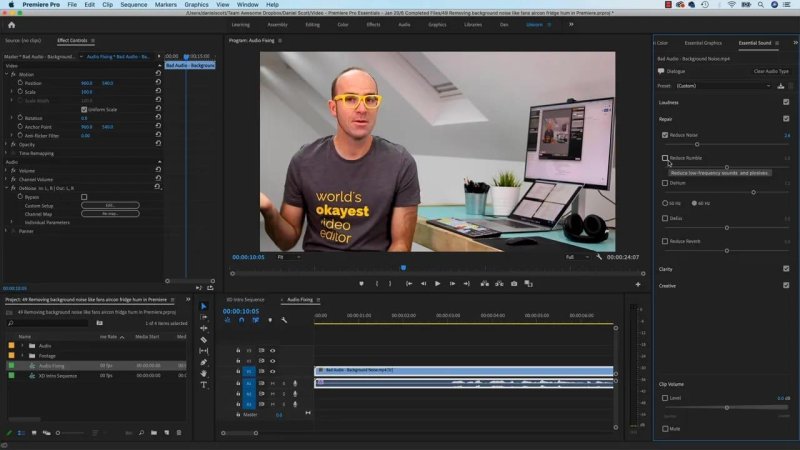
Use small amounts of the available repair controls when one tool alone does not quite solve the audio problem.
Do not get locked into the idea that Reduce Noise is the only setting you are allowed to use. A little Reduce Noise plus a little Reduce Rumble may work better than cranking either one too far. Turn controls on, drag their amounts up and down, and keep listening as you go.
Microphone hiss is often a recording issue
If a microphone has a constant hiss in the background, Premiere Pro may be able to improve it. But it is also worth knowing that the microphone or recording chain may be unhappy in the first place.
Persistent hiss can be related to pushing a microphone beyond its comfortable operating range or to the preamp setup. Repair tools are very useful, but they are not a replacement for getting the cleanest audio possible at the time of recording.
For the current edit, clean it up with the Essential Sound panel. For future recordings, investigate the microphone noise floor and preamp settings so there is less work to do later.
Use headphones for the final decision
Computer speakers can be a bit forgiving. Audio may seem fine through them, then sound much worse on headphones. For noise repair, headphones are genuinely useful because they reveal low-level hiss, hum, and strange processing artefacts that smaller speakers can hide.
Use them when adjusting the controls, particularly when deciding whether a stronger setting is worth the effect it has on the voice.
A quick workflow for cleaning noisy dialogue
Listen for the unwanted sound and decide whether it is steady or changing.
Keep a short section of noise-only audio available for comparison where possible.
Select the clip and assign it to Dialogue in Essential Sound.
Open Repair and enable Reduce Noise.
Start at the default value of 5.
Play the clip and toggle the repair on and off to compare it.
Lower or raise the amount until the voice still sounds natural.
Try small amounts of Reduce Rumble, DeHum, DeHiss, or other Repair controls if required.
Check the result on headphones before calling it done.
For steady fans, fridge hum, air conditioning, and light microphone hiss, this Premiere Pro workflow is quick, practical, and surprisingly effective. Just keep an ear on the voice. A cleaner noise floor is great, but natural dialogue is the thing that really matters.
FAQs
What is the best Reduce Noise setting in Premiere Pro?
Start with the default setting of 5. It is often enough for a consistent fan, fridge, air conditioning hum, or background hiss. Increase it gradually only if the voice still sounds natural.
Why does noise reduction make my voice sound robotic?
That normally means the noise reduction amount is too high. Lower the Reduce Noise setting and accept a little remaining background sound if that gives you a more natural voice.
Can Premiere Pro remove fan noise from dialogue?
Yes. Continuous fan noise is one of the better uses for Essential Sound's Reduce Noise control because the unwanted sound is steady and predictable.
Where is the Essential Sound panel in Premiere Pro?
Open it from the top menu by choosing Window > Essential Sound. Select the clip, assign it to Dialogue, then open Repair to access noise reduction controls.
Written by Daniel Walter Scott — Founder of Bring Your Own Laptop & Chief Instructor
