Where to get free motion graphic templates for Premiere Pro
Questions



Student Gallery
Be the first to share something.
Course info
Overview
I am here to help you learn Adobe Premiere Pro and to show you the tools you need to become a successful video editor. Premiere Pro is the industry standard used by professional designers to create stunning, high class videos and, after completing this course, you too can become a confident, skillful and efficient creator of stunning videos.
This course is aimed at people who are completely new to Premiere Pro.
If you are self taught using Premiere, this course will show you techniques you never dreamed were necessary or possible and will show you efficiencies to help speed up your workflow.
The course covers many topics - all of them on a step-by-step basis. We will use real world video editing examples to work through:
- An interview
- A wedding video
- A short commercial
- A documentary
- Social media advertising videos
- YouTube ‘how to’ videos
- Talking head footage mixed with screencasts and voiceovers
We will work with text, animation, motion gfx, special effects and we will add music to our video.
We will learn how to do colour correction, colour balancing and also how to create amazing video transitions within our movie. Technical ‘guru’ topics such as HD v 4K, frames per second, exporting work, fixing up bad audio, balancing and synching audio will all become manageable tasks for you. Best of all...I will show you amazing shortcuts and techniques to speed up your workflow.
Throughout the course we will work on mini projects and I will be suggesting assignments which will add value to your portfolio.
Start your Premiere Pro training now and fast track your career as a video editor.
* Please note, you have full permission to transform and upload any work using footage of Daniel as a part of this course.

Daniel Walter Scott
Founder of Bring Your Own Laptop & Chief Instructor
I discovered the world of design as an art student when I stumbled upon a lab full of green & blue iMac G3’s. My initial curiosity around using the computer to create ‘art’ developed into a full-blown passion, eventually leading me to become a digital designer and founder of Bring Your Own Laptop.
Sharing and teaching are a huge part of who I am. As a certified Adobe instructor, I've had the honor of winning multiple Adobe teaching awards at their annual MAX conference. I see Bring Your Own Laptop as the supportive community I wished for when I was first starting out and intimidated by design. Through teaching, I hope to bring others along for the ride and empower my students to bring their stories, labors of love, and art into the world.
True to my Kiwi roots, I've lived in many places, and currently, I reside in Ireland with my wife and kids.
Certificates
We’re awarding certificates for this course!
Check out the How to earn your certificate video for instructions on how to earn yours and click the available certificate levels below for more information.
Downloads & Exercise files
Transcript
So finding stuff on the internet, we're going to look for free stuff, because, I don't know, I don't know why, is it just me? I've got money to pay for them, I just want to look, to see what the free stuff is first, and then maybe pay for it. Motion Array, if you do a Google search for 'Premiere Pro motion graphic templates', they appear quite heavily, and they got really nice stuff. What you can do is you get to here, and you can do things like-- they've got a really nice search feature, they support these video products really well.
So I can go to Premiere Pro templates, and actually just hit 'Search', and it gives me everything, and then if you're cheap like me, go and turn this to 'Free', pop that back in and just see what they've got. So in here, remember we talked about the difference between presets and templates, presets are the things that, we did them way, way ago, and they end up in your Effects Panel. Remember we did our own preset, that's a preset, often, it is things like color grading, so you can look in here for those as well. Templates is more motion graphic templates, and there's a bunch in here. Yeah, well thought out, well considered from this site. I've downloaded one for us, but you can download them. You've got to click on the 'Download' button. There's a cool little preview. Then you hit 'Download', you need to give them your email to get it. It's the ethical bribe if you go into their emailing list, but they're pretty good with not spamming you, to send you useful stuff. Obviously you can unsubscribe, you'll end up with something like this.
So in your 'Exercise Files', under 'Project 4', I've put the little download. Let's tidy this up. Under 'Motion Array', and that's what I downloaded. It comes as a zip file, I opened it up, and these three things were in there. This is the thing you want, the mogrt, and this is a font link, a little PDF explaining how to install it, but that's my job right now. The Link one becomes useful because they've used a font called Roboto, which might not be linked to Adobe Fonts, it might not come down automatically. I know I already have Roboto installed on my machine, because I use it for other things, but often it can be really helpful to figure out what font is needed, to go off and install it, even tells you where to get it from. Typekit, which is what they used to call Adobe Fonts. Anyway, let's look at installing it.
Installing it is easy, over in your Essential Graphics panel, go to 'Browse'. Let's go to this little button down here. Look, even tells us, 'Install motion graphics template'. Find it in your Exercise Files. Doesn't matter where you've downloaded it from as long as it is called, this one here, m-o-g-r, g-r-t, mogrt, motion graphics template. Click open, and it will-- I already have it, because I've already installed it, and it will appear. You can get lucky by going, let's sort by recent, oh, look, and it appeared, but often it doesn't. If it was made three years ago it could be at the bottom. So you might have to just try and remember what it's called, and you might have to type it in. There's my one there, and I'm going to install it, by clicking-- actually I need to make a duplicate. I'm going to call this one 'Course V4'. Let's delete what we have in there, go, get rid of the music.
Let's find it, under 'Browse', drag it in. Awesome. It's going to pretty much stress your machine out pretty badly, even though it's a kind of a simple thing, basically anything that uses something called Motion Blur while it's moving, really freaks Premiere Pro out, looks cool though, so it's worth it. So what we're going to do is, we're going to lower the quality over here to '1/4'. I'm not going to pre-render it because I want to change the text. I'm just going to get a look of it. Yeah, it's playing a bit slowly. I find sometimes it does-- I don't need to see it in like actual time, I can just grab my CTI and just slowly move it across myself. That's enough of a preview for me. Even though it's not in real time it's a little bit jumpy, I find that's a easy way to test it.
Let's have a look what they've done. So again, no changing of the font, I can live with that, kind of. So pretty-- pretty basic. You can see, got some cool stuff going on in here that I can change, change the color, the text, I'm not going to run through all of that, it's pretty self-explanatory. The thing that I might do is, let's change this to 100% Pure. And I also want to go through and maybe put more than one in, because I like this kind of zoom effect. So I'm going to tuck this in, so it disappears. I'm going to do-- copy it, I'm going to paste it. Remember, just paste it over here, drag it back in. Don't tell anyone.
Drag this one on top, so we've got this kind of, like pacing, and that one doesn't disappear, just kind of goes over the top. Doesn't make much sense, if you don't change the color, so I'm going to pick a new color, and let's change it from '100% Pure' to 'Visit New Zealand'. So, space bar, lowest quality, still not going to work. I'll pre-render it for you so you can get a sense of it. That one needs to be probably longer. I'll see you in a second. We're back, I hope we got the timing right, 100%, Pure, New Zealand, look at that, we're doing it. It's beautiful, so that's really cool thing about Premiere Pro, and those mogrt templates, is that you can find lots online now, and again I'm not kind of advocating for always looking for free, because we'll do some premium ones in the next video, just give you a look.
Actually it felt like I was finishing up, there's one last thing I want to show you. Oh, I want Visit New Zealand to be on two lines. Don't worry, just put a 'return' in there. Look in here, let's have a look. So there's just, this is like, ugh. That's the problem with sometimes using somebody else's template, and you're like, "What do I do? I can't play around with any of that", there's no space after or line spacing. Just have to live with that, and try and work around it. I guess I don't want to make it seem like it's perfect all the time. I want to show you some of the issues that face us all as Premiere Pro video creators. All right, that's it, let's jump into the next video.
How do I install a downloaded motion graphics template in Premiere Pro?
Open the Essential Graphics panel, select Browse, then click Install Motion Graphics Template and choose the downloaded .mogrt file. Once it appears in Browse, drag it onto your timeline. You can then select the clip to edit whichever text, colours and other controls the template creator has made available.
How to Find, Install and Use Free Motion Graphics Templates in Premiere Pro
Key takeaways
Filter template searches by product and price so you find free Premiere Pro options rather than unrelated downloads.
Look inside the downloaded ZIP for the .mogrt file, font information and any installation instructions.
Lower playback resolution or scrub through a demanding template while you work, then render a preview when timing matters.
Expect limits: a template may let you change the words and colours but not the font or line spacing.
Find a free Premiere Pro template
I like to see what is available for free before deciding whether to pay for a template. Motion Array is one place to look: its search lets you narrow results to Premiere Pro templates and then apply a Free filter.
Check what kind of download you have found before you commit to it. A preset is not the same as a motion graphics template. Presets, often used for things such as colour grading, live in Premiere Pro’s Effects panel. The animated graphic we want here is a template that can be added to a sequence and customised.
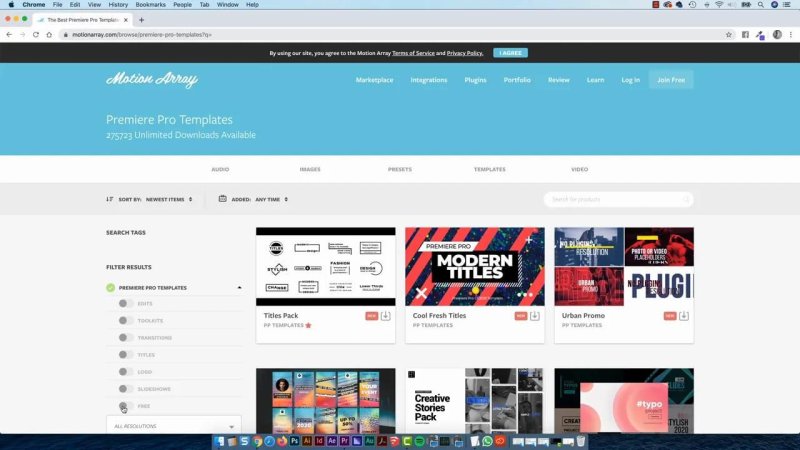
Filtering for Premiere Pro and free downloads makes the search considerably less of a treasure hunt.
Open a promising result and check its preview. For this example, I chose an animated text graphic with a zoom effect. The free download asks for an email address, so bear that in mind before downloading.
Check the download before installing it
The download arrives as a ZIP file. Open it and find the .mogrt file: that is the Motion Graphics Template you install in Premiere Pro. The example download also includes a PDF with instructions and a link to its font.
Do not ignore the font information. This template uses Roboto. If it is not already installed on your computer, the supplied link tells you what you need to get. The documentation refers to Typekit, the former name for Adobe Fonts.
Install the .mogrt file in Premiere Pro
Open the Essential Graphics panel and select Browse.
Click the Install Motion Graphics Template button.
Navigate to the extracted download, select its .mogrt file and click Open.
Find the installed template in Browse and drag it onto your timeline.
If the template does not appear near the top of the list, do not assume the installation failed. Sorting by recent may help, but a template created some time ago can be harder to spot. Search for its name instead.
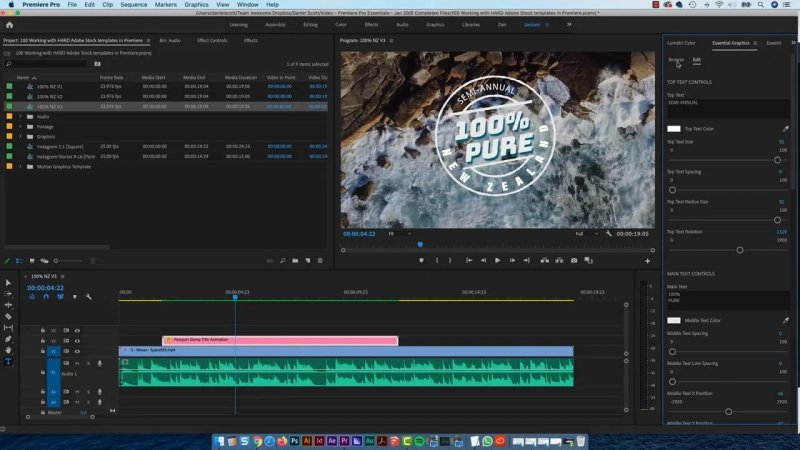
Browse is where the installed template becomes available to add to a sequence.
Preview and customise the graphic
After dragging the template over the footage, select its clip to inspect the available controls. In this example, I can change the text and colour, but not the font. That is a decision made by the template creator, not something I can fix by looking harder for a setting.
The animated zoom looks great, partly because it uses motion blur. It also makes playback rather hard work for Premiere Pro. I set the Program Monitor playback resolution to one quarter while editing. If it still struggles to play smoothly, moving the playhead slowly through the clip gives me enough of a preview to judge the animation. Once the wording and placement are closer to finished, I can render a preview to check the timing properly.
For a quick example, I replace the original text with 100% PURE. Rather than stopping at one graphic, I copy the template clip, paste it later in the sequence and overlap the two slightly. I change the second instance to VISIT NEW ZEALAND and give it a different colour. Now the two graphics have a deliberate rhythm rather than looking like an accidental repeat.
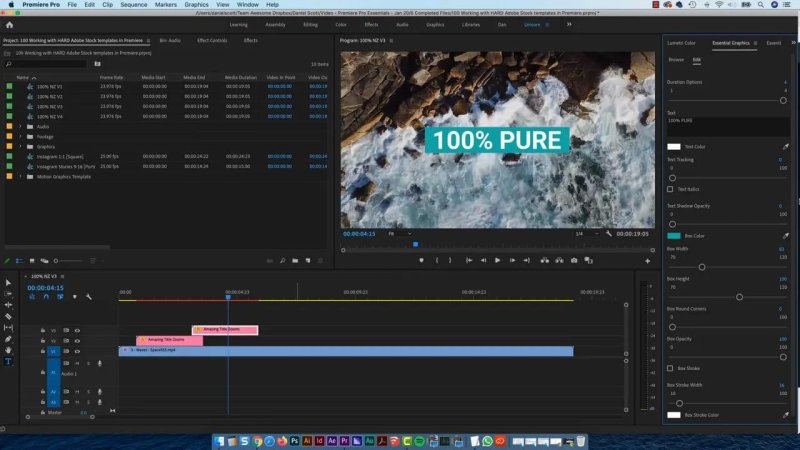
A colour change makes the second use of the same template feel distinct.
The overlap and clip length matter. A graphic that disappears too early or stays too long interrupts the flow, so this is where a rendered preview earns its keep. In the finished pass, the first message gives way to the second over the same footage.
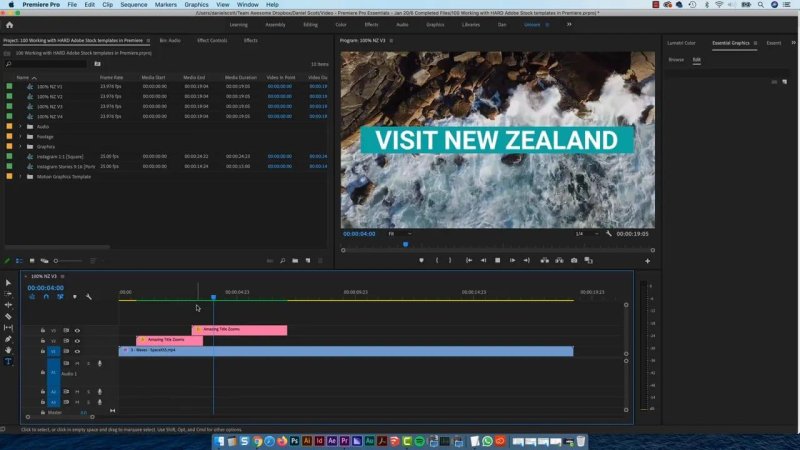
The repeated zoom effect links the two messages, while the new wording carries the sequence forward.
Know what you cannot change
Here is the slightly awkward part of using somebody else’s template: you only get the controls they chose to provide. I wanted VISIT NEW ZEALAND on two lines. Adding a return put the words on separate lines, but there was no line-spacing control to make that layout look right. There was no font control either.
That does not make the template useless. It means you have to work with its design, perhaps keeping the phrase on one line or choosing shorter wording. Check those limits early, before you build the rest of an edit around a layout the template cannot deliver.
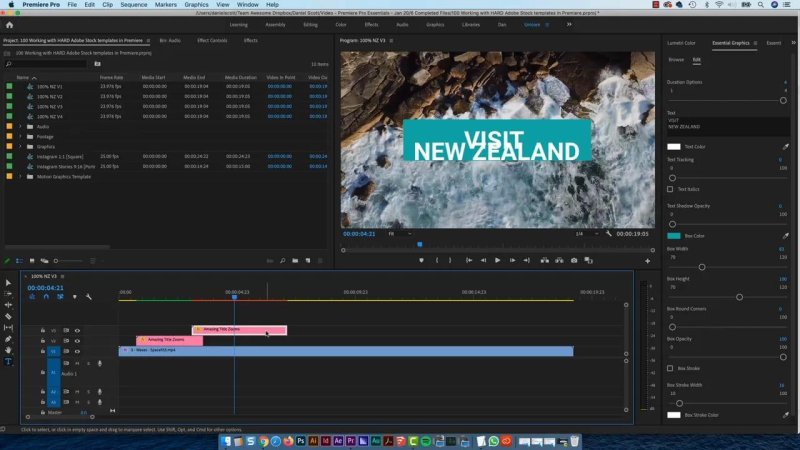
A return creates two lines, but without spacing controls the result is not quite the layout I wanted.
Key terms
.mogrt
A Motion Graphics Template file. This is the file selected when installing a downloaded graphic through Essential Graphics.
Preset
A saved effect or set of settings found in the Effects panel, rather than an animated graphic installed through Browse.
Motion blur
The blur visible while an element moves. It can make a zoom animation look polished, but it can also make the template slower to preview.
Playback resolution
The quality used to display a preview while editing. Lowering it to one quarter can make a demanding graphic easier to work with.
FAQs
Which file from a downloaded ZIP should I install?
Install the .mogrt file. Keep any font links or instructions handy in case the template needs an additional font.
Why can’t I find my newly installed template?
Try searching for its name in Essential Graphics Browse. Sorting by recent may help, but it does not always put the template where you expect.
Why is my template playing slowly?
Effects such as motion blur can make previewing demanding. Try quarter-resolution playback or scrub through the clip, then render a preview to assess its timing.
Can I change every part of a downloaded template?
No. You can change only the controls its creator has exposed. Text and colour may be editable even when the font and line spacing are not.
Written by Daniel Walter Scott — Founder of Bring Your Own Laptop & Chief Instructor
